Create custom subagents
Create and use specialized AI subagents in Claude Code for task-specific workflows and improved context management.
Subagents are specialized AI assistants that handle specific types of tasks. Use one when a side task would flood your main conversation with search results, logs, or file contents you won't reference again: the subagent does that work in its own context and returns only the summary. Define a custom subagent when you keep spawning the same kind of worker with the same instructions.
Each subagent runs in its own context window with a custom system prompt, specific tool access, and independent permissions. When Claude encounters a task that matches a subagent's description, it delegates to that subagent, which works independently and returns results. To see the context savings in practice, the context window visualization walks through a session where a subagent handles research in its own separate window.
Note
If you need multiple agents working in parallel and communicating with each other, see agent teams instead. Subagents work within a single session; agent teams coordinate across separate sessions.
Subagents help you:
- Preserve context by keeping exploration and implementation out of your main conversation
- Enforce constraints by limiting which tools a subagent can use
- Reuse configurations across projects with user-level subagents
- Specialize behavior with focused system prompts for specific domains
- Control costs by routing tasks to faster, cheaper models like Haiku
Claude uses each subagent's description to decide when to delegate tasks. When you create a subagent, write a clear description so Claude knows when to use it.
Claude Code includes several built-in subagents like Explore, Plan, and general-purpose. You can also create custom subagents to handle specific tasks. This page covers the built-in subagents, how to create your own, full configuration options, patterns for working with subagents, and example subagents.
Built-in subagents
Claude Code includes built-in subagents that Claude automatically uses when appropriate. Each inherits the parent conversation's permissions with additional tool restrictions.
- Explore
- Plan
- General-purpose
- Other
A fast, read-only agent optimized for searching and analyzing codebases.
- Model: Haiku (fast, low-latency)
- Tools: Read-only tools (denied access to Write and Edit tools)
- Purpose: File discovery, code search, codebase exploration
Claude delegates to Explore when it needs to search or understand a codebase without making changes. This keeps exploration results out of your main conversation context.
When invoking Explore, Claude specifies a thoroughness level: quick for targeted lookups, medium for balanced exploration, or very thorough for comprehensive analysis.
A research agent used during plan mode to gather context before presenting a plan.
- Model: Inherits from main conversation
- Tools: Read-only tools (denied access to Write and Edit tools)
- Purpose: Codebase research for planning
When you're in plan mode and Claude needs to understand your codebase, it delegates research to the Plan subagent. This prevents infinite nesting (subagents cannot spawn other subagents) while still gathering necessary context.
A capable agent for complex, multi-step tasks that require both exploration and action.
- Model: Inherits from main conversation
- Tools: All tools
- Purpose: Complex research, multi-step operations, code modifications
Claude delegates to general-purpose when the task requires both exploration and modification, complex reasoning to interpret results, or multiple dependent steps.
Claude Code includes additional helper agents for specific tasks. These are typically invoked automatically, so you don't need to use them directly.
| Agent | Model | When Claude uses it |
|---|---|---|
| statusline-setup | Sonnet | When you run /statusline to configure your status line |
| Claude Code Guide | Haiku | When you ask questions about Claude Code features |
Beyond these built-in subagents, you can create your own with custom prompts, tool restrictions, permission modes, hooks, and skills. The following sections show how to get started and customize subagents.
Quickstart: create your first subagent
Subagents are defined in Markdown files with YAML frontmatter. You can create them manually or use the /agents command.
This walkthrough guides you through creating a user-level subagent with the /agents command. The subagent reviews code and suggests improvements for the codebase.
In Claude Code, run:
/agents
Switch to the Library tab, select Create new agent, then choose Personal. This saves the subagent to ~/.claude/agents/ so it's available in all your projects.
Select Generate with Claude. When prompted, describe the subagent:
A code improvement agent that scans files and suggests improvements
for readability, performance, and best practices. It should explain
each issue, show the current code, and provide an improved version.
Claude generates the identifier, description, and system prompt for you.
For a read-only reviewer, deselect everything except Read-only tools. If you keep all tools selected, the subagent inherits all tools available to the main conversation.
Choose which model the subagent uses. For this example agent, select Sonnet, which balances capability and speed for analyzing code patterns.
Pick a background color for the subagent. This helps you identify which subagent is running in the UI.
Select User scope to give the subagent a persistent memory directory at ~/.claude/agent-memory/. The subagent uses this to accumulate insights across conversations, such as codebase patterns and recurring issues. Select None if you don't want the subagent to persist learnings.
Review the configuration summary. Press s or Enter to save, or press e to save and edit the file in your editor. The subagent is available immediately. Try it:
Use the code-improver agent to suggest improvements in this project
Claude delegates to your new subagent, which scans the codebase and returns improvement suggestions.
You now have a subagent you can use in any project on your machine to analyze codebases and suggest improvements.
You can also create subagents manually as Markdown files, define them via CLI flags, or distribute them through plugins. The following sections cover all configuration options.
Configure subagents
Use the /agents command
The /agents command opens a tabbed interface for managing subagents. The Running tab shows live subagents and lets you open or stop them. The Library tab lets you:
- View all available subagents (built-in, user, project, and plugin)
- Create new subagents with guided setup or Claude generation
- Edit existing subagent configuration and tool access
- Delete custom subagents
- See which subagents are active when duplicates exist
This is the recommended way to create and manage subagents. For manual creation or automation, you can also add subagent files directly.
To list all configured subagents from the command line without starting an interactive session, run claude agents. This shows agents grouped by source and indicates which are overridden by higher-priority definitions.
Choose the subagent scope
Subagents are Markdown files with YAML frontmatter. Store them in different locations depending on scope. When multiple subagents share the same name, the higher-priority location wins.
| Location | Scope | Priority | How to create |
|---|---|---|---|
| Managed settings | Organization-wide | 1 (highest) | Deployed via managed settings |
--agents CLI flag |
Current session | 2 | Pass JSON when launching Claude Code |
.claude/agents/ |
Current project | 3 | Interactive or manual |
~/.claude/agents/ |
All your projects | 4 | Interactive or manual |
Plugin's agents/ directory |
Where plugin is enabled | 5 (lowest) | Installed with plugins |
Project subagents (.claude/agents/) are ideal for subagents specific to a codebase. Check them into version control so your team can use and improve them collaboratively.
Project subagents are discovered by walking up from the current working directory. Directories added with --add-dir grant file access only and are not scanned for subagents. To share subagents across projects, use ~/.claude/agents/ or a plugin.
User subagents (~/.claude/agents/) are personal subagents available in all your projects.
CLI-defined subagents are passed as JSON when launching Claude Code. They exist only for that session and aren't saved to disk, making them useful for quick testing or automation scripts. You can define multiple subagents in a single --agents call:
claude --agents '{
  "code-reviewer": {
    "description": "Expert code reviewer. Use proactively after code changes.",
    "prompt": "You are a senior code reviewer. Focus on code quality, security, and best practices.",
    "tools": ["Read", "Grep", "Glob", "Bash"],
    "model": "sonnet"
  },
  "debugger": {
    "description": "Debugging specialist for errors and test failures.",
    "prompt": "You are an expert debugger. Analyze errors, identify root causes, and provide fixes."
  }
}'
The --agents flag accepts JSON with the same frontmatter fields as file-based subagents: description, prompt, tools, disallowedTools, model, permissionMode, mcpServers, hooks, maxTurns, skills, initialPrompt, memory, effort, background, isolation, and color. Use prompt for the system prompt, equivalent to the markdown body in file-based subagents.
Managed subagents are deployed by organization administrators. Place markdown files in .claude/agents/ inside the managed settings directory, using the same frontmatter format as project and user subagents. Managed definitions take precedence over project and user subagents with the same name.
Plugin subagents come from plugins you've installed. They appear in /agents alongside your custom subagents. See the plugin components reference for details on creating plugin subagents.
Note
For security reasons, plugin subagents do not support the hooks, mcpServers, or permissionMode frontmatter fields. These fields are ignored when loading agents from a plugin. If you need them, copy the agent file into .claude/agents/ or ~/.claude/agents/. You can also add rules to permissions.allow in settings.json or settings.local.json, but these rules apply to the entire session, not just the plugin subagent.
Subagent definitions from any of these scopes are also available to agent teams: when spawning a teammate, you can reference a subagent type and the teammate uses its tools and model, with the definition's body appended to the teammate's system prompt as additional instructions. See agent teams for which frontmatter fields apply on that path.
Write subagent files
Subagent files use YAML frontmatter for configuration, followed by the system prompt in Markdown:
Note
Subagents are loaded at session start. If you create a subagent by manually adding a file, restart your session or use /agents to load it immediately.
---
name: code-reviewer
description: Reviews code for quality and best practices
tools: Read, Glob, Grep
model: sonnet
---

You are a code reviewer. When invoked, analyze the code and provide
specific, actionable feedback on quality, security, and best practices.
The frontmatter defines the subagent's metadata and configuration. The body becomes the system prompt that guides the subagent's behavior. Subagents receive only this system prompt (plus basic environment details like working directory), not the full Claude Code system prompt.
A subagent starts in the main conversation's current working directory. Within a subagent, cd commands do not persist between Bash or PowerShell tool calls and do not affect the main conversation's working directory. To give the subagent an isolated copy of the repository instead, set isolation: worktree.
Supported frontmatter fields
The following fields can be used in the YAML frontmatter. Only name and description are required.
| Field | Required | Description |
|---|---|---|
name |
Yes | Unique identifier using lowercase letters and hyphens |
description |
Yes | When Claude should delegate to this subagent |
tools |
No | Tools the subagent can use. Inherits all tools if omitted |
disallowedTools |
No | Tools to deny, removed from inherited or specified list |
model |
No | Model to use: sonnet, opus, haiku, a full model ID (for example, claude-opus-4-6), or inherit. Defaults to inherit |
permissionMode |
No | Permission mode: default, acceptEdits, auto, dontAsk, bypassPermissions, or plan |
maxTurns |
No | Maximum number of agentic turns before the subagent stops |
skills |
No | Skills to load into the subagent's context at startup. The full skill content is injected, not just made available for invocation. Subagents don't inherit skills from the parent conversation |
mcpServers |
No | MCP servers available to this subagent. Each entry is either a server name referencing an already-configured server (e.g., "slack") or an inline definition with the server name as key and a full MCP server config as value |
hooks |
No | Lifecycle hooks scoped to this subagent |
memory |
No | Persistent memory scope: user, project, or local. Enables cross-session learning |
background |
No | Set to true to always run this subagent as a background task. Default: false |
effort |
No | Effort level when this subagent is active. Overrides the session effort level. Default: inherits from session. Options: low, medium, high, max (Opus 4.6 only) |
isolation |
No | Set to worktree to run the subagent in a temporary git worktree, giving it an isolated copy of the repository. The worktree is automatically cleaned up if the subagent makes no changes |
color |
No | Display color for the subagent in the task list and transcript. Accepts red, blue, green, yellow, purple, orange, pink, or cyan |
initialPrompt |
No | Auto-submitted as the first user turn when this agent runs as the main session agent (via --agent or the agent setting). Commands and skills are processed. Prepended to any user-provided prompt |
Choose a model
The model field controls which AI model the subagent uses:
- Model alias: Use one of the available aliases:
sonnet,opus, orhaiku - Full model ID: Use a full model ID such as
claude-opus-4-6orclaude-sonnet-4-6. Accepts the same values as the--modelflag - inherit: Use the same model as the main conversation
- Omitted: If not specified, defaults to
inherit(uses the same model as the main conversation)
When Claude invokes a subagent, it can also pass a model parameter for that specific invocation. Claude Code resolves the subagent's model in this order:
- The
CLAUDE_CODE_SUBAGENT_MODELenvironment variable, if set - The per-invocation
modelparameter - The subagent definition's
modelfrontmatter - The main conversation's model
Control subagent capabilities
You can control what subagents can do through tool access, permission modes, and conditional rules.
Available tools
Subagents can use any of Claude Code's internal tools. By default, subagents inherit all tools from the main conversation, including MCP tools.
To restrict tools, use either the tools field (allowlist) or the disallowedTools field (denylist). This example uses tools to exclusively allow Read, Grep, Glob, and Bash. The subagent can't edit files, write files, or use any MCP tools:
---
name: safe-researcher
description: Research agent with restricted capabilities
tools: Read, Grep, Glob, Bash
---
This example uses disallowedTools to inherit every tool from the main conversation except Write and Edit. The subagent keeps Bash, MCP tools, and everything else:
---
name: no-writes
description: Inherits every tool except file writes
disallowedTools: Write, Edit
---
If both are set, disallowedTools is applied first, then tools is resolved against the remaining pool. A tool listed in both is removed.
Restrict which subagents can be spawned
When an agent runs as the main thread with claude --agent, it can spawn subagents using the Agent tool. To restrict which subagent types it can spawn, use Agent(agent_type) syntax in the tools field.
Note
In version 2.1.63, the Task tool was renamed to Agent. Existing Task(...) references in settings and agent definitions still work as aliases.
---
name: coordinator
description: Coordinates work across specialized agents
tools: Agent(worker, researcher), Read, Bash
---
This is an allowlist: only the worker and researcher subagents can be spawned. If the agent tries to spawn any other type, the request fails and the agent sees only the allowed types in its prompt. To block specific agents while allowing all others, use permissions.deny instead.
To allow spawning any subagent without restrictions, use Agent without parentheses:
tools: Agent, Read, Bash
If Agent is omitted from the tools list entirely, the agent cannot spawn any subagents. This restriction only applies to agents running as the main thread with claude --agent. Subagents cannot spawn other subagents, so Agent(agent_type) has no effect in subagent definitions.
Scope MCP servers to a subagent
Use the mcpServers field to give a subagent access to MCP servers that aren't available in the main conversation. Inline servers defined here are connected when the subagent starts and disconnected when it finishes. String references share the parent session's connection.
Each entry in the list is either an inline server definition or a string referencing an MCP server already configured in your session:
---
name: browser-tester
description: Tests features in a real browser using Playwright
mcpServers:
  # Inline definition: scoped to this subagent only
  - playwright:
      type: stdio
      command: npx
      args: ["-y", "@playwright/mcp@latest"]
  # Reference by name: reuses an already-configured server
  - github
---

Use the Playwright tools to navigate, screenshot, and interact with pages.
Inline definitions use the same schema as .mcp.json server entries (stdio, http, sse, ws), keyed by the server name.
To keep an MCP server out of the main conversation entirely and avoid its tool descriptions consuming context there, define it inline here rather than in .mcp.json. The subagent gets the tools; the parent conversation does not.
Permission modes
The permissionMode field controls how the subagent handles permission prompts. Subagents inherit the permission context from the main conversation and can override the mode, except when the parent mode takes precedence as described below.
| Mode | Behavior |
|---|---|
default |
Standard permission checking with prompts |
acceptEdits |
Auto-accept file edits and common filesystem commands for paths in the working directory or additionalDirectories |
auto |
Auto mode: a background classifier reviews commands and protected-directory writes |
dontAsk |
Auto-deny permission prompts (explicitly allowed tools still work) |
bypassPermissions |
Skip permission prompts |
plan |
Plan mode (read-only exploration) |
Warning
Use bypassPermissions with caution. It skips permission prompts, allowing the subagent to execute operations without approval. Writes to .git, .claude, .vscode, .idea, and .husky directories still prompt for confirmation, except for .claude/commands, .claude/agents, and .claude/skills. See permission modes for details.
If the parent uses bypassPermissions, this takes precedence and cannot be overridden. If the parent uses auto mode, the subagent inherits auto mode and any permissionMode in its frontmatter is ignored: the classifier evaluates the subagent's tool calls with the same block and allow rules as the parent session.
Preload skills into subagents
Use the skills field to inject skill content into a subagent's context at startup. This gives the subagent domain knowledge without requiring it to discover and load skills during execution.
---
name: api-developer
description: Implement API endpoints following team conventions
skills:
  - api-conventions
  - error-handling-patterns
---

Implement API endpoints. Follow the conventions and patterns from the preloaded skills.
The full content of each skill is injected into the subagent's context, not just made available for invocation. Subagents don't inherit skills from the parent conversation; you must list them explicitly.
Note
This is the inverse of running a skill in a subagent. With skills in a subagent, the subagent controls the system prompt and loads skill content. With context: fork in a skill, the skill content is injected into the agent you specify. Both use the same underlying system.
Enable persistent memory
The memory field gives the subagent a persistent directory that survives across conversations. The subagent uses this directory to build up knowledge over time, such as codebase patterns, debugging insights, and architectural decisions.
---
name: code-reviewer
description: Reviews code for quality and best practices
memory: user
---

You are a code reviewer. As you review code, update your agent memory with
patterns, conventions, and recurring issues you discover.
Choose a scope based on how broadly the memory should apply:
| Scope | Location | Use when |
|---|---|---|
user |
~/.claude/agent-memory/<name-of-agent>/ |
the subagent should remember learnings across all projects |
project |
.claude/agent-memory/<name-of-agent>/ |
the subagent's knowledge is project-specific and shareable via version control |
local |
.claude/agent-memory-local/<name-of-agent>/ |
the subagent's knowledge is project-specific but should not be checked into version control |
When memory is enabled:
- The subagent's system prompt includes instructions for reading and writing to the memory directory.
- The subagent's system prompt also includes the first 200 lines or 25KB of
MEMORY.mdin the memory directory, whichever comes first, with instructions to curateMEMORY.mdif it exceeds that limit. - Read, Write, and Edit tools are automatically enabled so the subagent can manage its memory files.
Persistent memory tips
projectis the recommended default scope. It makes subagent knowledge shareable via version control. Useuserwhen the subagent's knowledge is broadly applicable across projects, orlocalwhen the knowledge should not be checked into version control.Ask the subagent to consult its memory before starting work: "Review this PR, and check your memory for patterns you've seen before."
Ask the subagent to update its memory after completing a task: "Now that you're done, save what you learned to your memory." Over time, this builds a knowledge base that makes the subagent more effective.
Include memory instructions directly in the subagent's markdown file so it proactively maintains its own knowledge base:
Update your agent memory as you discover codepaths, patterns, library
locations, and key architectural decisions. This builds up institutional
knowledge across conversations. Write concise notes about what you found
and where.
Conditional rules with hooks
For more dynamic control over tool usage, use PreToolUse hooks to validate operations before they execute. This is useful when you need to allow some operations of a tool while blocking others.
This example creates a subagent that only allows read-only database queries. The PreToolUse hook runs the script specified in command before each Bash command executes:
---
name: db-reader
description: Execute read-only database queries
tools: Bash
hooks:
  PreToolUse:
    - matcher: "Bash"
      hooks:
        - type: command
          command: "./scripts/validate-readonly-query.sh"
---
Claude Code passes hook input as JSON via stdin to hook commands. The validation script reads this JSON, extracts the Bash command, and exits with code 2 to block write operations:
#!/bin/bash
# ./scripts/validate-readonly-query.sh

INPUT=$(cat)
COMMAND=$(echo "$INPUT" | jq -r '.tool_input.command // empty')

# Block SQL write operations (case-insensitive)
if echo "$COMMAND" | grep -iE '\b(INSERT|UPDATE|DELETE|DROP|CREATE|ALTER|TRUNCATE)\b' > /dev/null; then
  echo "Blocked: Only SELECT queries are allowed" >&2
  exit 2
fi

exit 0
See Hook input for the complete input schema and exit codes for how exit codes affect behavior.
Disable specific subagents
You can prevent Claude from using specific subagents by adding them to the deny array in your settings. Use the format Agent(subagent-name) where subagent-name matches the subagent's name field.
{
  "permissions": {
    "deny": ["Agent(Explore)", "Agent(my-custom-agent)"]
  }
}
This works for both built-in and custom subagents. You can also use the --disallowedTools CLI flag:
claude --disallowedTools "Agent(Explore)"
See Permissions documentation for more details on permission rules.
Define hooks for subagents
Subagents can define hooks that run during the subagent's lifecycle. There are two ways to configure hooks:
- In the subagent's frontmatter: Define hooks that run only while that subagent is active
- In
settings.json: Define hooks that run in the main session when subagents start or stop
Hooks in subagent frontmatter
Define hooks directly in the subagent's markdown file. These hooks only run while that specific subagent is active and are cleaned up when it finishes.
Note
Frontmatter hooks fire when the agent is spawned as a subagent through the Agent tool or an @-mention. They do not fire when the agent runs as the main session via --agent or the agent setting. For session-wide hooks, configure them in settings.json.
All hook events are supported. The most common events for subagents are:
| Event | Matcher input | When it fires |
|---|---|---|
PreToolUse |
Tool name | Before the subagent uses a tool |
PostToolUse |
Tool name | After the subagent uses a tool |
Stop |
(none) | When the subagent finishes (converted to SubagentStop at runtime) |
This example validates Bash commands with the PreToolUse hook and runs a linter after file edits with PostToolUse:
---
name: code-reviewer
description: Review code changes with automatic linting
hooks:
  PreToolUse:
    - matcher: "Bash"
      hooks:
        - type: command
          command: "./scripts/validate-command.sh $TOOL_INPUT"
  PostToolUse:
    - matcher: "Edit|Write"
      hooks:
        - type: command
          command: "./scripts/run-linter.sh"
---
Stop hooks in frontmatter are automatically converted to SubagentStop events.
Project-level hooks for subagent events
Configure hooks in settings.json that respond to subagent lifecycle events in the main session.
| Event | Matcher input | When it fires |
|---|---|---|
SubagentStart |
Agent type name | When a subagent begins execution |
SubagentStop |
Agent type name | When a subagent completes |
Both events support matchers to target specific agent types by name. This example runs a setup script only when the db-agent subagent starts, and a cleanup script when any subagent stops:
{
  "hooks": {
    "SubagentStart": [
      {
        "matcher": "db-agent",
        "hooks": [
          { "type": "command", "command": "./scripts/setup-db-connection.sh" }
        ]
      }
    ],
    "SubagentStop": [
      {
        "hooks": [
          { "type": "command", "command": "./scripts/cleanup-db-connection.sh" }
        ]
      }
    ]
  }
}
See Hooks for the complete hook configuration format.
Work with subagents
Understand automatic delegation
Claude automatically delegates tasks based on the task description in your request, the description field in subagent configurations, and current context. To encourage proactive delegation, include phrases like "use proactively" in your subagent's description field.
Invoke subagents explicitly
When automatic delegation isn't enough, you can request a subagent yourself. Three patterns escalate from a one-off suggestion to a session-wide default:
- Natural language: name the subagent in your prompt; Claude decides whether to delegate
- @-mention: guarantees the subagent runs for one task
- Session-wide: the whole session uses that subagent's system prompt, tool restrictions, and model via the
--agentflag or theagentsetting
For natural language, there's no special syntax. Name the subagent and Claude typically delegates:
Use the test-runner subagent to fix failing tests
Have the code-reviewer subagent look at my recent changes
@-mention the subagent. Type @ and pick the subagent from the typeahead, the same way you @-mention files. This ensures that specific subagent runs rather than leaving the choice to Claude:
@"code-reviewer (agent)" look at the auth changes
Your full message still goes to Claude, which writes the subagent's task prompt based on what you asked. The @-mention controls which subagent Claude invokes, not what prompt it receives.
Subagents provided by an enabled plugin appear in the typeahead as <plugin-name>:<agent-name>. Named background subagents currently running in the session also appear in the typeahead, showing their status next to the name. You can also type the mention manually without using the picker: @agent-<name> for local subagents, or @agent-<plugin-name>:<agent-name> for plugin subagents.
Run the whole session as a subagent. Pass --agent <name> to start a session where the main thread itself takes on that subagent's system prompt, tool restrictions, and model:
claude --agent code-reviewer
The subagent's system prompt replaces the default Claude Code system prompt entirely, the same way --system-prompt does. CLAUDE.md files and project memory still load through the normal message flow. The agent name appears as @<name> in the startup header so you can confirm it's active.
This works with built-in and custom subagents, and the choice persists when you resume the session.
For a plugin-provided subagent, pass the scoped name: claude --agent <plugin-name>:<agent-name>.
To make it the default for every session in a project, set agent in .claude/settings.json:
{
  "agent": "code-reviewer"
}
The CLI flag overrides the setting if both are present.
Run subagents in foreground or background
Subagents can run in the foreground (blocking) or background (concurrent):
- Foreground subagents block the main conversation until complete. Permission prompts and clarifying questions (like
AskUserQuestion) are passed through to you. - Background subagents run concurrently while you continue working. Before launching, Claude Code prompts for any tool permissions the subagent will need, ensuring it has the necessary approvals upfront. Once running, the subagent inherits these permissions and auto-denies anything not pre-approved. If a background subagent needs to ask clarifying questions, that tool call fails but the subagent continues.
If a background subagent fails due to missing permissions, you can start a new foreground subagent with the same task to retry with interactive prompts.
Claude decides whether to run subagents in the foreground or background based on the task. You can also:
- Ask Claude to "run this in the background"
- Press Ctrl+B to background a running task
To disable all background task functionality, set the CLAUDE_CODE_DISABLE_BACKGROUND_TASKS environment variable to 1. See Environment variables.
Common patterns
Isolate high-volume operations
One of the most effective uses for subagents is isolating operations that produce large amounts of output. Running tests, fetching documentation, or processing log files can consume significant context. By delegating these to a subagent, the verbose output stays in the subagent's context while only the relevant summary returns to your main conversation.
Use a subagent to run the test suite and report only the failing tests with their error messages
Run parallel research
For independent investigations, spawn multiple subagents to work simultaneously:
Research the authentication, database, and API modules in parallel using separate subagents
Each subagent explores its area independently, then Claude synthesizes the findings. This works best when the research paths don't depend on each other.
Warning
When subagents complete, their results return to your main conversation. Running many subagents that each return detailed results can consume significant context.
For tasks that need sustained parallelism or exceed your context window, agent teams give each worker its own independent context.
Chain subagents
For multi-step workflows, ask Claude to use subagents in sequence. Each subagent completes its task and returns results to Claude, which then passes relevant context to the next subagent.
Use the code-reviewer subagent to find performance issues, then use the optimizer subagent to fix them
Choose between subagents and main conversation
Use the main conversation when:
- The task needs frequent back-and-forth or iterative refinement
- Multiple phases share significant context (planning → implementation → testing)
- You're making a quick, targeted change
- Latency matters. Subagents start fresh and may need time to gather context
Use subagents when:
- The task produces verbose output you don't need in your main context
- You want to enforce specific tool restrictions or permissions
- The work is self-contained and can return a summary
Consider Skills instead when you want reusable prompts or workflows that run in the main conversation context rather than isolated subagent context.
For a quick question about something already in your conversation, use /btw instead of a subagent. It sees your full context but has no tool access, and the answer is discarded rather than added to history.
Note
Subagents cannot spawn other subagents. If your workflow requires nested delegation, use Skills or chain subagents from the main conversation.
Manage subagent context
Resume subagents
Each subagent invocation creates a new instance with fresh context. To continue an existing subagent's work instead of starting over, ask Claude to resume it.
Resumed subagents retain their full conversation history, including all previous tool calls, results, and reasoning. The subagent picks up exactly where it stopped rather than starting fresh.
When a subagent completes, Claude receives its agent ID. Claude uses the SendMessage tool with the agent's ID as the to field to resume it. The SendMessage tool is only available when agent teams are enabled via CLAUDE_CODE_EXPERIMENTAL_AGENT_TEAMS=1.
To resume a subagent, ask Claude to continue the previous work:
Use the code-reviewer subagent to review the authentication module
[Agent completes]

Continue that code review and now analyze the authorization logic
[Claude resumes the subagent with full context from previous conversation]
If a stopped subagent receives a SendMessage, it auto-resumes in the background without requiring a new Agent invocation.
You can also ask Claude for the agent ID if you want to reference it explicitly, or find IDs in the transcript files at ~/.claude/projects/{project}/{sessionId}/subagents/. Each transcript is stored as agent-{agentId}.jsonl.
Subagent transcripts persist independently of the main conversation:
- Main conversation compaction: When the main conversation compacts, subagent transcripts are unaffected. They're stored in separate files.
- Session persistence: Subagent transcripts persist within their session. You can resume a subagent after restarting Claude Code by resuming the same session.
- Automatic cleanup: Transcripts are cleaned up based on the
cleanupPeriodDayssetting (default: 30 days).
Auto-compaction
Subagents support automatic compaction using the same logic as the main conversation. By default, auto-compaction triggers at approximately 95% capacity. To trigger compaction earlier, set CLAUDE_AUTOCOMPACT_PCT_OVERRIDE to a lower percentage (for example, 50). See environment variables for details.
Compaction events are logged in subagent transcript files:
{
  "type": "system",
  "subtype": "compact_boundary",
  "compactMetadata": {
    "trigger": "auto",
    "preTokens": 167189
  }
}
The preTokens value shows how many tokens were used before compaction occurred.
Example subagents
These examples demonstrate effective patterns for building subagents. Use them as starting points, or generate a customized version with Claude.
Tip
Best practices:
- Design focused subagents: each subagent should excel at one specific task
- Write detailed descriptions: Claude uses the description to decide when to delegate
- Limit tool access: grant only necessary permissions for security and focus
- Check into version control: share project subagents with your team
Code reviewer
A read-only subagent that reviews code without modifying it. This example shows how to design a focused subagent with limited tool access (no Edit or Write) and a detailed prompt that specifies exactly what to look for and how to format output.
---
name: code-reviewer
description: Expert code review specialist. Proactively reviews code for quality, security, and maintainability. Use immediately after writing or modifying code.
tools: Read, Grep, Glob, Bash
model: inherit
---

You are a senior code reviewer ensuring high standards of code quality and security.

When invoked:
1. Run git diff to see recent changes
2. Focus on modified files
3. Begin review immediately

Review checklist:
- Code is clear and readable
- Functions and variables are well-named
- No duplicated code
- Proper error handling
- No exposed secrets or API keys
- Input validation implemented
- Good test coverage
- Performance considerations addressed

Provide feedback organized by priority:
- Critical issues (must fix)
- Warnings (should fix)
- Suggestions (consider improving)

Include specific examples of how to fix issues.
Debugger
A subagent that can both analyze and fix issues. Unlike the code reviewer, this one includes Edit because fixing bugs requires modifying code. The prompt provides a clear workflow from diagnosis to verification.
---
name: debugger
description: Debugging specialist for errors, test failures, and unexpected behavior. Use proactively when encountering any issues.
tools: Read, Edit, Bash, Grep, Glob
---

You are an expert debugger specializing in root cause analysis.

When invoked:
1. Capture error message and stack trace
2. Identify reproduction steps
3. Isolate the failure location
4. Implement minimal fix
5. Verify solution works

Debugging process:
- Analyze error messages and logs
- Check recent code changes
- Form and test hypotheses
- Add strategic debug logging
- Inspect variable states

For each issue, provide:
- Root cause explanation
- Evidence supporting the diagnosis
- Specific code fix
- Testing approach
- Prevention recommendations

Focus on fixing the underlying issue, not the symptoms.
Data scientist
A domain-specific subagent for data analysis work. This example shows how to create subagents for specialized workflows outside of typical coding tasks. It explicitly sets model: sonnet for more capable analysis.
---
name: data-scientist
description: Data analysis expert for SQL queries, BigQuery operations, and data insights. Use proactively for data analysis tasks and queries.
tools: Bash, Read, Write
model: sonnet
---

You are a data scientist specializing in SQL and BigQuery analysis.

When invoked:
1. Understand the data analysis requirement
2. Write efficient SQL queries
3. Use BigQuery command line tools (bq) when appropriate
4. Analyze and summarize results
5. Present findings clearly

Key practices:
- Write optimized SQL queries with proper filters
- Use appropriate aggregations and joins
- Include comments explaining complex logic
- Format results for readability
- Provide data-driven recommendations

For each analysis:
- Explain the query approach
- Document any assumptions
- Highlight key findings
- Suggest next steps based on data

Always ensure queries are efficient and cost-effective.
Database query validator
A subagent that allows Bash access but validates commands to permit only read-only SQL queries. This example shows how to use PreToolUse hooks for conditional validation when you need finer control than the tools field provides.
---
name: db-reader
description: Execute read-only database queries. Use when analyzing data or generating reports.
tools: Bash
hooks:
  PreToolUse:
    - matcher: "Bash"
      hooks:
        - type: command
          command: "./scripts/validate-readonly-query.sh"
---

You are a database analyst with read-only access. Execute SELECT queries to answer questions about the data.

When asked to analyze data:
1. Identify which tables contain the relevant data
2. Write efficient SELECT queries with appropriate filters
3. Present results clearly with context

You cannot modify data. If asked to INSERT, UPDATE, DELETE, or modify schema, explain that you only have read access.
Claude Code passes hook input as JSON via stdin to hook commands. The validation script reads this JSON, extracts the command being executed, and checks it against a list of SQL write operations. If a write operation is detected, the script exits with code 2 to block execution and returns an error message to Claude via stderr.
Create the validation script anywhere in your project. The path must match the command field in your hook configuration:
#!/bin/bash
# Blocks SQL write operations, allows SELECT queries

# Read JSON input from stdin
INPUT=$(cat)

# Extract the command field from tool_input using jq
COMMAND=$(echo "$INPUT" | jq -r '.tool_input.command // empty')

if [ -z "$COMMAND" ]; then
  exit 0
fi

# Block write operations (case-insensitive)
if echo "$COMMAND" | grep -iE '\b(INSERT|UPDATE|DELETE|DROP|CREATE|ALTER|TRUNCATE|REPLACE|MERGE)\b' > /dev/null; then
  echo "Blocked: Write operations not allowed. Use SELECT queries only." >&2
  exit 2
fi

exit 0
Make the script executable:
chmod +x ./scripts/validate-readonly-query.sh
The hook receives JSON via stdin with the Bash command in tool_input.command. Exit code 2 blocks the operation and feeds the error message back to Claude. See Hooks for details on exit codes and Hook input for the complete input schema.
Next steps
Now that you understand subagents, explore these related features:
- Distribute subagents with plugins to share subagents across teams or projects
- Run Claude Code programmatically with the Agent SDK for CI/CD and automation
- Use MCP servers to give subagents access to external tools and data
Orchestrate teams of Claude Code sessions
Coordinate multiple Claude Code instances working together as a team, with shared tasks, inter-agent messaging, and centralized management.
Warning
Agent teams are experimental and disabled by default. Enable them by adding CLAUDE_CODE_EXPERIMENTAL_AGENT_TEAMS to your settings.json or environment. Agent teams have known limitations around session resumption, task coordination, and shutdown behavior.
Agent teams let you coordinate multiple Claude Code instances working together. One session acts as the team lead, coordinating work, assigning tasks, and synthesizing results. Teammates work independently, each in its own context window, and communicate directly with each other.
Unlike subagents, which run within a single session and can only report back to the main agent, you can also interact with individual teammates directly without going through the lead.
Note
Agent teams require Claude Code v2.1.32 or later. Check your version with claude --version.
This page covers:
- When to use agent teams, including best use cases and how they compare with subagents
- Starting a team
- Controlling teammates, including display modes, task assignment, and delegation
- Best practices for parallel work
When to use agent teams
Agent teams are most effective for tasks where parallel exploration adds real value. See use case examples for full scenarios. The strongest use cases are:
- Research and review: multiple teammates can investigate different aspects of a problem simultaneously, then share and challenge each other's findings
- New modules or features: teammates can each own a separate piece without stepping on each other
- Debugging with competing hypotheses: teammates test different theories in parallel and converge on the answer faster
- Cross-layer coordination: changes that span frontend, backend, and tests, each owned by a different teammate
Agent teams add coordination overhead and use significantly more tokens than a single session. They work best when teammates can operate independently. For sequential tasks, same-file edits, or work with many dependencies, a single session or subagents are more effective.
Compare with subagents
Both agent teams and subagents let you parallelize work, but they operate differently. Choose based on whether your workers need to communicate with each other:
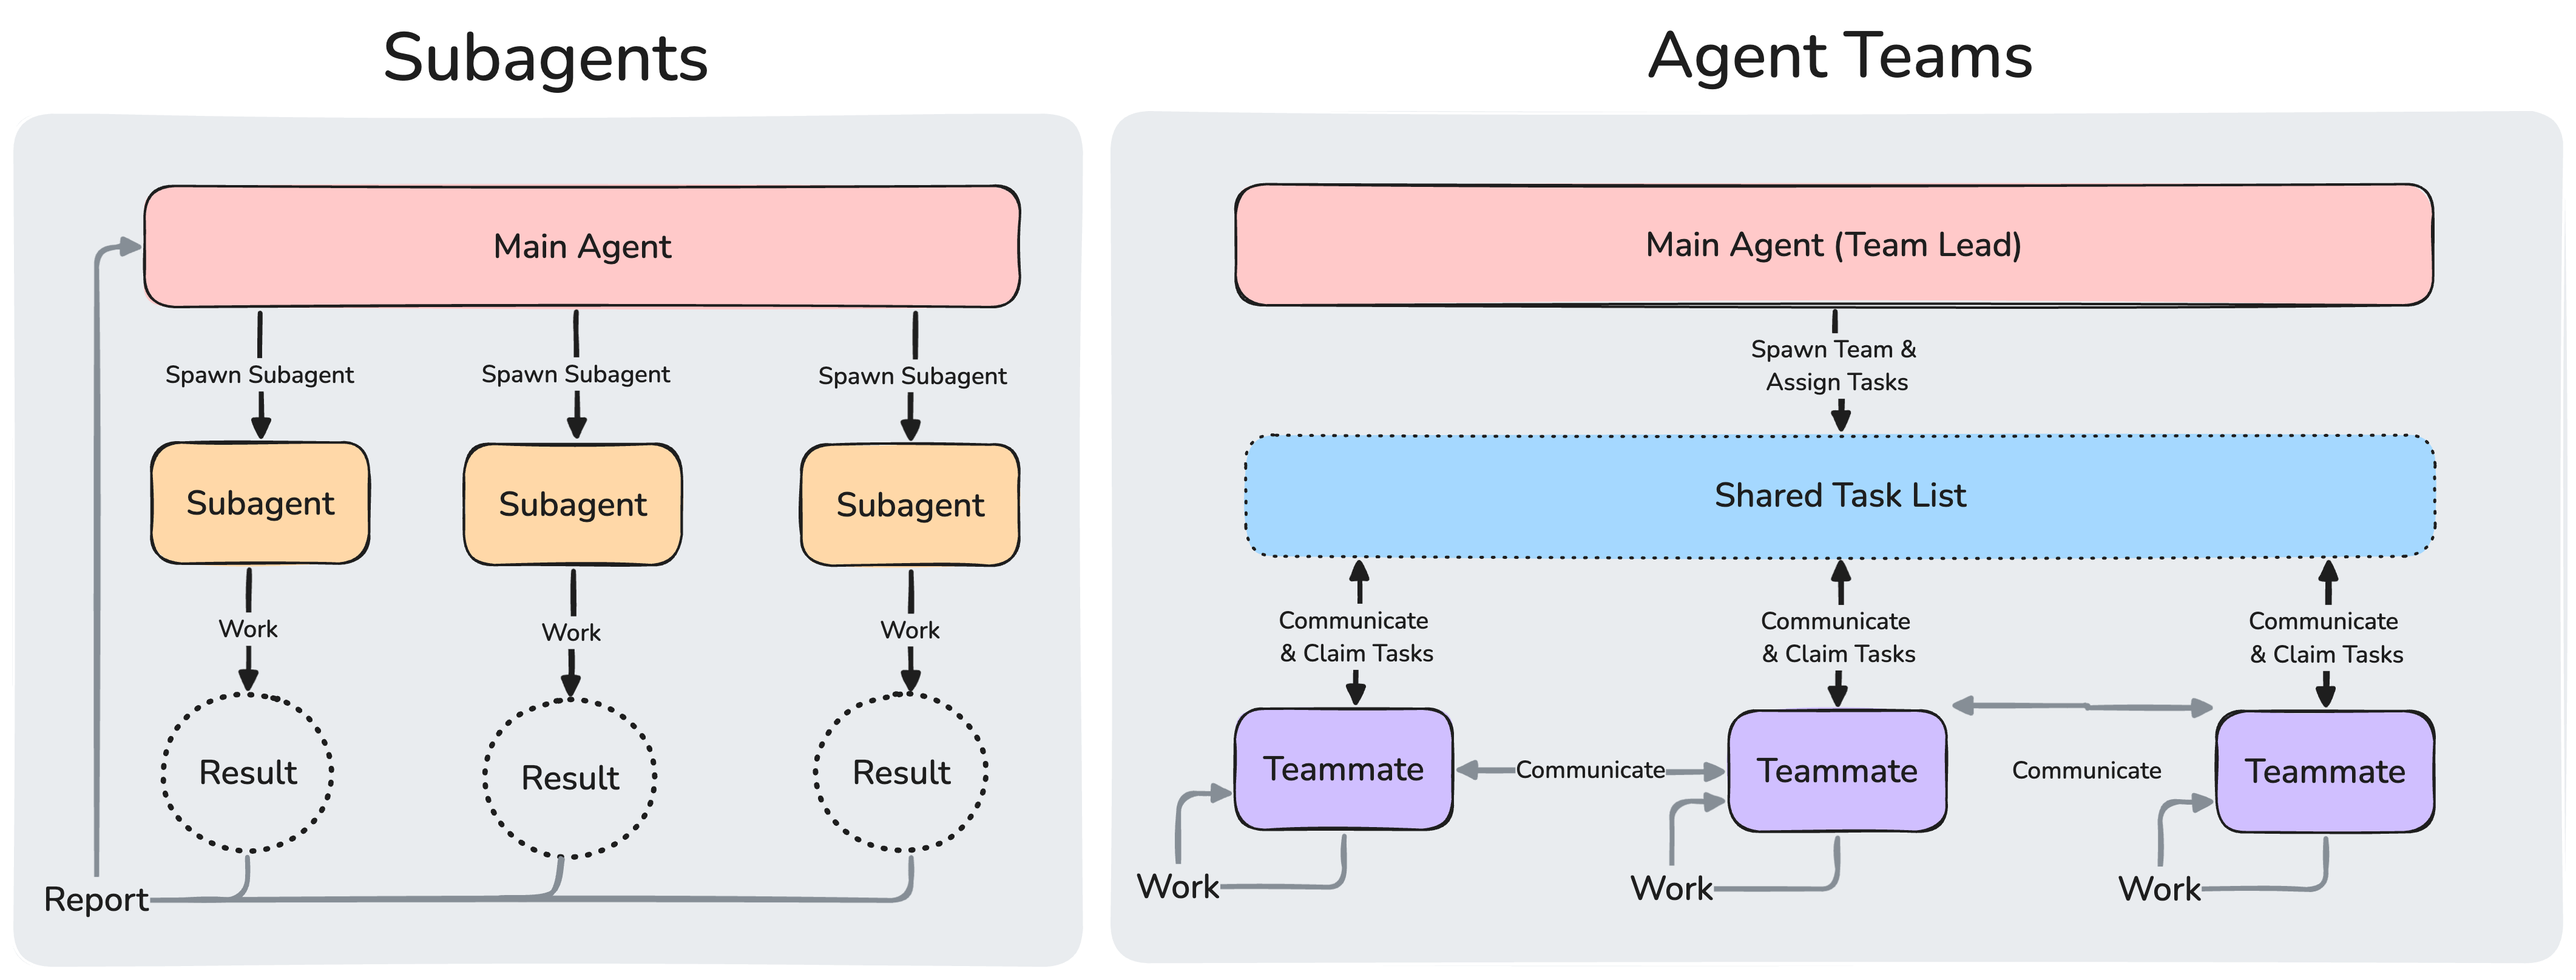

| Subagents | Agent teams | |
|---|---|---|
| Context | Own context window; results return to the caller | Own context window; fully independent |
| Communication | Report results back to the main agent only | Teammates message each other directly |
| Coordination | Main agent manages all work | Shared task list with self-coordination |
| Best for | Focused tasks where only the result matters | Complex work requiring discussion and collaboration |
| Token cost | Lower: results summarized back to main context | Higher: each teammate is a separate Claude instance |
Use subagents when you need quick, focused workers that report back. Use agent teams when teammates need to share findings, challenge each other, and coordinate on their own.
Enable agent teams
Agent teams are disabled by default. Enable them by setting the CLAUDE_CODE_EXPERIMENTAL_AGENT_TEAMS environment variable to 1, either in your shell environment or through settings.json:
{
  "env": {
    "CLAUDE_CODE_EXPERIMENTAL_AGENT_TEAMS": "1"
  }
}
Start your first agent team
After enabling agent teams, tell Claude to create an agent team and describe the task and the team structure you want in natural language. Claude creates the team, spawns teammates, and coordinates work based on your prompt.
This example works well because the three roles are independent and can explore the problem without waiting on each other:
I'm designing a CLI tool that helps developers track TODO comments across
their codebase. Create an agent team to explore this from different angles: one
teammate on UX, one on technical architecture, one playing devil's advocate.
From there, Claude creates a team with a shared task list, spawns teammates for each perspective, has them explore the problem, synthesizes findings, and attempts to clean up the team when finished.
The lead's terminal lists all teammates and what they're working on. Use Shift+Down to cycle through teammates and message them directly. After the last teammate, Shift+Down wraps back to the lead.
If you want each teammate in its own split pane, see Choose a display mode.
Control your agent team
Tell the lead what you want in natural language. It handles team coordination, task assignment, and delegation based on your instructions.
Choose a display mode
Agent teams support two display modes:
- In-process: all teammates run inside your main terminal. Use Shift+Down to cycle through teammates and type to message them directly. Works in any terminal, no extra setup required.
- Split panes: each teammate gets its own pane. You can see everyone's output at once and click into a pane to interact directly. Requires tmux, or iTerm2.
Note
tmux has known limitations on certain operating systems and traditionally works best on macOS. Using tmux -CC in iTerm2 is the suggested entrypoint into tmux.
The default is "auto", which uses split panes if you're already running inside a tmux session, and in-process otherwise. The "tmux" setting enables split-pane mode and auto-detects whether to use tmux or iTerm2 based on your terminal. To override, set teammateMode in your global config at ~/.claude.json:
{
  "teammateMode": "in-process"
}
To force in-process mode for a single session, pass it as a flag:
claude --teammate-mode in-process
Split-pane mode requires either tmux or iTerm2 with the it2 CLI. To install manually:
- tmux: install through your system's package manager. See the tmux wiki for platform-specific instructions.
- iTerm2: install the
it2CLI, then enable the Python API in iTerm2 → Settings → General → Magic → Enable Python API.
Specify teammates and models
Claude decides the number of teammates to spawn based on your task, or you can specify exactly what you want:
Create a team with 4 teammates to refactor these modules in parallel.
Use Sonnet for each teammate.
Require plan approval for teammates
For complex or risky tasks, you can require teammates to plan before implementing. The teammate works in read-only plan mode until the lead approves their approach:
Spawn an architect teammate to refactor the authentication module.
Require plan approval before they make any changes.
When a teammate finishes planning, it sends a plan approval request to the lead. The lead reviews the plan and either approves it or rejects it with feedback. If rejected, the teammate stays in plan mode, revises based on the feedback, and resubmits. Once approved, the teammate exits plan mode and begins implementation.
The lead makes approval decisions autonomously. To influence the lead's judgment, give it criteria in your prompt, such as "only approve plans that include test coverage" or "reject plans that modify the database schema."
Talk to teammates directly
Each teammate is a full, independent Claude Code session. You can message any teammate directly to give additional instructions, ask follow-up questions, or redirect their approach.
- In-process mode: use Shift+Down to cycle through teammates, then type to send them a message. Press Enter to view a teammate's session, then Escape to interrupt their current turn. Press Ctrl+T to toggle the task list.
- Split-pane mode: click into a teammate's pane to interact with their session directly. Each teammate has a full view of their own terminal.
Assign and claim tasks
The shared task list coordinates work across the team. The lead creates tasks and teammates work through them. Tasks have three states: pending, in progress, and completed. Tasks can also depend on other tasks: a pending task with unresolved dependencies cannot be claimed until those dependencies are completed.
The lead can assign tasks explicitly, or teammates can self-claim:
- Lead assigns: tell the lead which task to give to which teammate
- Self-claim: after finishing a task, a teammate picks up the next unassigned, unblocked task on its own
Task claiming uses file locking to prevent race conditions when multiple teammates try to claim the same task simultaneously.
Shut down teammates
To gracefully end a teammate's session:
Ask the researcher teammate to shut down
The lead sends a shutdown request. The teammate can approve, exiting gracefully, or reject with an explanation.
Clean up the team
When you're done, ask the lead to clean up:
Clean up the team
This removes the shared team resources. When the lead runs cleanup, it checks for active teammates and fails if any are still running, so shut them down first.
Warning
Always use the lead to clean up. Teammates should not run cleanup because their team context may not resolve correctly, potentially leaving resources in an inconsistent state.
Enforce quality gates with hooks
Use hooks to enforce rules when teammates finish work or tasks are created or completed:
TeammateIdle: runs when a teammate is about to go idle. Exit with code 2 to send feedback and keep the teammate working.TaskCreated: runs when a task is being created. Exit with code 2 to prevent creation and send feedback.TaskCompleted: runs when a task is being marked complete. Exit with code 2 to prevent completion and send feedback.
How agent teams work
This section covers the architecture and mechanics behind agent teams. If you want to start using them, see Control your agent team above.
How Claude starts agent teams
There are two ways agent teams get started:
- You request a team: give Claude a task that benefits from parallel work and explicitly ask for an agent team. Claude creates one based on your instructions.
- Claude proposes a team: if Claude determines your task would benefit from parallel work, it may suggest creating a team. You confirm before it proceeds.
In both cases, you stay in control. Claude won't create a team without your approval.
Architecture
An agent team consists of:
| Component | Role |
|---|---|
| Team lead | The main Claude Code session that creates the team, spawns teammates, and coordinates work |
| Teammates | Separate Claude Code instances that each work on assigned tasks |
| Task list | Shared list of work items that teammates claim and complete |
| Mailbox | Messaging system for communication between agents |
See Choose a display mode for display configuration options. Teammate messages arrive at the lead automatically.
The system manages task dependencies automatically. When a teammate completes a task that other tasks depend on, blocked tasks unblock without manual intervention.
Teams and tasks are stored locally:
- Team config:
~/.claude/teams/{team-name}/config.json - Task list:
~/.claude/tasks/{team-name}/
Claude Code generates both of these automatically when you create a team and updates them as teammates join, go idle, or leave. The team config holds runtime state such as session IDs and tmux pane IDs, so don't edit it by hand or pre-author it: your changes are overwritten on the next state update.
To define reusable teammate roles, use subagent definitions instead.
The team config contains a members array with each teammate's name, agent ID, and agent type. Teammates can read this file to discover other team members.
There is no project-level equivalent of the team config. A file like .claude/teams/teams.json in your project directory is not recognized as configuration; Claude treats it as an ordinary file.
Use subagent definitions for teammates
When spawning a teammate, you can reference a subagent type from any subagent scope: project, user, plugin, or CLI-defined. This lets you define a role once, such as a security-reviewer or test-runner, and reuse it both as a delegated subagent and as an agent team teammate.
To use a subagent definition, mention it by name when asking Claude to spawn the teammate:
Spawn a teammate using the security-reviewer agent type to audit the auth module.
The teammate honors that definition's tools allowlist and model, and the definition's body is appended to the teammate's system prompt as additional instructions rather than replacing it. Team coordination tools such as SendMessage and the task management tools are always available to a teammate even when tools restricts other tools.
Note
The skills and mcpServers frontmatter fields in a subagent definition are not applied when that definition runs as a teammate. Teammates load skills and MCP servers from your project and user settings, the same as a regular session.
Permissions
Teammates start with the lead's permission settings. If the lead runs with --dangerously-skip-permissions, all teammates do too. After spawning, you can change individual teammate modes, but you can't set per-teammate modes at spawn time.
Context and communication
Each teammate has its own context window. When spawned, a teammate loads the same project context as a regular session: CLAUDE.md, MCP servers, and skills. It also receives the spawn prompt from the lead. The lead's conversation history does not carry over.
How teammates share information:
- Automatic message delivery: when teammates send messages, they're delivered automatically to recipients. The lead doesn't need to poll for updates.
- Idle notifications: when a teammate finishes and stops, they automatically notify the lead.
- Shared task list: all agents can see task status and claim available work.
Teammate messaging:
- message: send a message to one specific teammate
- broadcast: send to all teammates simultaneously. Use sparingly, as costs scale with team size.
The lead assigns every teammate a name when it spawns them, and any teammate can message any other by that name. To get predictable names you can reference in later prompts, tell the lead what to call each teammate in your spawn instruction.
Token usage
Agent teams use significantly more tokens than a single session. Each teammate has its own context window, and token usage scales with the number of active teammates. For research, review, and new feature work, the extra tokens are usually worthwhile. For routine tasks, a single session is more cost-effective. See agent team token costs for usage guidance.
Use case examples
These examples show how agent teams handle tasks where parallel exploration adds value.
Run a parallel code review
A single reviewer tends to gravitate toward one type of issue at a time. Splitting review criteria into independent domains means security, performance, and test coverage all get thorough attention simultaneously. The prompt assigns each teammate a distinct lens so they don't overlap:
Create an agent team to review PR #142. Spawn three reviewers:
- One focused on security implications
- One checking performance impact
- One validating test coverage
Have them each review and report findings.
Each reviewer works from the same PR but applies a different filter. The lead synthesizes findings across all three after they finish.
Investigate with competing hypotheses
When the root cause is unclear, a single agent tends to find one plausible explanation and stop looking. The prompt fights this by making teammates explicitly adversarial: each one's job is not only to investigate its own theory but to challenge the others'.
Users report the app exits after one message instead of staying connected.
Spawn 5 agent teammates to investigate different hypotheses. Have them talk to
each other to try to disprove each other's theories, like a scientific
debate. Update the findings doc with whatever consensus emerges.
The debate structure is the key mechanism here. Sequential investigation suffers from anchoring: once one theory is explored, subsequent investigation is biased toward it.
With multiple independent investigators actively trying to disprove each other, the theory that survives is much more likely to be the actual root cause.
Best practices
Give teammates enough context
Teammates load project context automatically, including CLAUDE.md, MCP servers, and skills, but they don't inherit the lead's conversation history. See Context and communication for details. Include task-specific details in the spawn prompt:
Spawn a security reviewer teammate with the prompt: "Review the authentication module
at src/auth/ for security vulnerabilities. Focus on token handling, session
management, and input validation. The app uses JWT tokens stored in
httpOnly cookies. Report any issues with severity ratings."
Choose an appropriate team size
There's no hard limit on the number of teammates, but practical constraints apply:
- Token costs scale linearly: each teammate has its own context window and consumes tokens independently. See agent team token costs for details.
- Coordination overhead increases: more teammates means more communication, task coordination, and potential for conflicts
- Diminishing returns: beyond a certain point, additional teammates don't speed up work proportionally
Start with 3-5 teammates for most workflows. This balances parallel work with manageable coordination. The examples in this guide use 3-5 teammates because that range works well across different task types.
Having 5-6 tasks per teammate keeps everyone productive without excessive context switching. If you have 15 independent tasks, 3 teammates is a good starting point.
Scale up only when the work genuinely benefits from having teammates work simultaneously. Three focused teammates often outperform five scattered ones.
Size tasks appropriately
- Too small: coordination overhead exceeds the benefit
- Too large: teammates work too long without check-ins, increasing risk of wasted effort
- Just right: self-contained units that produce a clear deliverable, such as a function, a test file, or a review
Tip
The lead breaks work into tasks and assigns them to teammates automatically. If it isn't creating enough tasks, ask it to split the work into smaller pieces. Having 5-6 tasks per teammate keeps everyone productive and lets the lead reassign work if someone gets stuck.
Wait for teammates to finish
Sometimes the lead starts implementing tasks itself instead of waiting for teammates. If you notice this:
Wait for your teammates to complete their tasks before proceeding
Start with research and review
If you're new to agent teams, start with tasks that have clear boundaries and don't require writing code: reviewing a PR, researching a library, or investigating a bug. These tasks show the value of parallel exploration without the coordination challenges that come with parallel implementation.
Avoid file conflicts
Two teammates editing the same file leads to overwrites. Break the work so each teammate owns a different set of files.
Monitor and steer
Check in on teammates' progress, redirect approaches that aren't working, and synthesize findings as they come in. Letting a team run unattended for too long increases the risk of wasted effort.
Troubleshooting
Teammates not appearing
If teammates aren't appearing after you ask Claude to create a team:
- In in-process mode, teammates may already be running but not visible. Press Shift+Down to cycle through active teammates.
- Check that the task you gave Claude was complex enough to warrant a team. Claude decides whether to spawn teammates based on the task.
- If you explicitly requested split panes, ensure tmux is installed and available in your PATH:
which tmux - For iTerm2, verify the
it2CLI is installed and the Python API is enabled in iTerm2 preferences.
Too many permission prompts
Teammate permission requests bubble up to the lead, which can create friction. Pre-approve common operations in your permission settings before spawning teammates to reduce interruptions.
Teammates stopping on errors
Teammates may stop after encountering errors instead of recovering. Check their output using Shift+Down in in-process mode or by clicking the pane in split mode, then either:
- Give them additional instructions directly
- Spawn a replacement teammate to continue the work
Lead shuts down before work is done
The lead may decide the team is finished before all tasks are actually complete. If this happens, tell it to keep going. You can also tell the lead to wait for teammates to finish before proceeding if it starts doing work instead of delegating.
Orphaned tmux sessions
If a tmux session persists after the team ends, it may not have been fully cleaned up. List sessions and kill the one created by the team:
tmux ls
tmux kill-session -t <session-name>
Limitations
Agent teams are experimental. Current limitations to be aware of:
- No session resumption with in-process teammates:
/resumeand/rewinddo not restore in-process teammates. After resuming a session, the lead may attempt to message teammates that no longer exist. If this happens, tell the lead to spawn new teammates. - Task status can lag: teammates sometimes fail to mark tasks as completed, which blocks dependent tasks. If a task appears stuck, check whether the work is actually done and update the task status manually or tell the lead to nudge the teammate.
- Shutdown can be slow: teammates finish their current request or tool call before shutting down, which can take time.
- One team per session: a lead can only manage one team at a time. Clean up the current team before starting a new one.
- No nested teams: teammates cannot spawn their own teams or teammates. Only the lead can manage the team.
- Lead is fixed: the session that creates the team is the lead for its lifetime. You can't promote a teammate to lead or transfer leadership.
- Permissions set at spawn: all teammates start with the lead's permission mode. You can change individual teammate modes after spawning, but you can't set per-teammate modes at spawn time.
- Split panes require tmux or iTerm2: the default in-process mode works in any terminal. Split-pane mode isn't supported in VS Code's integrated terminal, Windows Terminal, or Ghostty.
Tip
CLAUDE.md works normally: teammates read CLAUDE.md files from their working directory. Use this to provide project-specific guidance to all teammates.
Next steps
Explore related approaches for parallel work and delegation:
- Lightweight delegation: subagents spawn helper agents for research or verification within your session, better for tasks that don't need inter-agent coordination
- Manual parallel sessions: Git worktrees let you run multiple Claude Code sessions yourself without automated team coordination
- Compare approaches: see the subagent vs agent team comparison for a side-by-side breakdown
Connect Claude Code to tools via MCP
Learn how to connect Claude Code to your tools with the Model Context Protocol.
Claude Code can connect to hundreds of external tools and data sources through the Model Context Protocol (MCP), an open source standard for AI-tool integrations. MCP servers give Claude Code access to your tools, databases, and APIs.
Connect a server when you find yourself copying data into chat from another tool, like an issue tracker or a monitoring dashboard. Once connected, Claude can read and act on that system directly instead of working from what you paste.
What you can do with MCP
With MCP servers connected, you can ask Claude Code to:
- Implement features from issue trackers: "Add the feature described in JIRA issue ENG-4521 and create a PR on GitHub."
- Analyze monitoring data: "Check Sentry and Statsig to check the usage of the feature described in ENG-4521."
- Query databases: "Find emails of 10 random users who used feature ENG-4521, based on our PostgreSQL database."
- Integrate designs: "Update our standard email template based on the new Figma designs that were posted in Slack"
- Automate workflows: "Create Gmail drafts inviting these 10 users to a feedback session about the new feature."
- React to external events: An MCP server can also act as a channel that pushes messages into your session, so Claude reacts to Telegram messages, Discord chats, or webhook events while you're away.
Popular MCP servers
Here are some commonly used MCP servers you can connect to Claude Code:
Warning
Use third party MCP servers at your own risk - Anthropic has not verified the correctness or security of all these servers. Make sure you trust MCP servers you are installing. Be especially careful when using MCP servers that could fetch untrusted content, as these can expose you to prompt injection risk.
Note
Need a specific integration? Find hundreds more MCP servers on GitHub, or build your own using the MCP SDK.
Installing MCP servers
MCP servers can be configured in three different ways depending on your needs:
Option 1: Add a remote HTTP server
HTTP servers are the recommended option for connecting to remote MCP servers. This is the most widely supported transport for cloud-based services.
# Basic syntax
claude mcp add --transport http <name> <url>

# Real example: Connect to Notion
claude mcp add --transport http notion https://mcp.notion.com/mcp

# Example with Bearer token
claude mcp add --transport http secure-api https://api.example.com/mcp \
  --header "Authorization: Bearer your-token"
Option 2: Add a remote SSE server
Warning
The SSE (Server-Sent Events) transport is deprecated. Use HTTP servers instead, where available.
# Basic syntax
claude mcp add --transport sse <name> <url>

# Real example: Connect to Asana
claude mcp add --transport sse asana https://mcp.asana.com/sse

# Example with authentication header
claude mcp add --transport sse private-api https://api.company.com/sse \
  --header "X-API-Key: your-key-here"
Option 3: Add a local stdio server
Stdio servers run as local processes on your machine. They're ideal for tools that need direct system access or custom scripts.
# Basic syntax
claude mcp add [options] <name> -- <command> [args...]

# Real example: Add Airtable server
claude mcp add --transport stdio --env AIRTABLE_API_KEY=YOUR_KEY airtable \
  -- npx -y airtable-mcp-server
Note
Important: Option ordering
All options (--transport, --env, --scope, --header) must come before the server name. The -- (double dash) then separates the server name from the command and arguments that get passed to the MCP server.
For example:
claude mcp add --transport stdio myserver -- npx server→ runsnpx serverclaude mcp add --transport stdio --env KEY=value myserver -- python server.py --port 8080→ runspython server.py --port 8080withKEY=valuein environment
This prevents conflicts between Claude's flags and the server's flags.
Managing your servers
Once configured, you can manage your MCP servers with these commands:
# List all configured servers
claude mcp list

# Get details for a specific server
claude mcp get github

# Remove a server
claude mcp remove github

# (within Claude Code) Check server status
/mcp
Dynamic tool updates
Claude Code supports MCP list_changed notifications, allowing MCP servers to dynamically update their available tools, prompts, and resources without requiring you to disconnect and reconnect. When an MCP server sends a list_changed notification, Claude Code automatically refreshes the available capabilities from that server.
Push messages with channels
An MCP server can also push messages directly into your session so Claude can react to external events like CI results, monitoring alerts, or chat messages. To enable this, your server declares the claude/channel capability and you opt it in with the --channels flag at startup. See Channels to use an officially supported channel, or Channels reference to build your own.
Tip
Tips:
- Use the
--scopeflag to specify where the configuration is stored:local(default): Available only to you in the current project (was calledprojectin older versions)project: Shared with everyone in the project via.mcp.jsonfileuser: Available to you across all projects (was calledglobalin older versions)
- Set environment variables with
--envflags (for example,--env KEY=value) - Configure MCP server startup timeout using the MCP_TIMEOUT environment variable (for example,
MCP_TIMEOUT=10000 claudesets a 10-second timeout) - Claude Code will display a warning when MCP tool output exceeds 10,000 tokens. To increase this limit, set the
MAX_MCP_OUTPUT_TOKENSenvironment variable (for example,MAX_MCP_OUTPUT_TOKENS=50000) - Use
/mcpto authenticate with remote servers that require OAuth 2.0 authentication
Warning
Windows Users: On native Windows (not WSL), local MCP servers that use npx require the cmd /c wrapper to ensure proper execution.
# This creates command="cmd" which Windows can execute
claude mcp add --transport stdio my-server -- cmd /c npx -y @some/package
Without the cmd /c wrapper, you'll encounter "Connection closed" errors because Windows cannot directly execute npx. (See the note above for an explanation of the -- parameter.)
Plugin-provided MCP servers
Plugins can bundle MCP servers, automatically providing tools and integrations when the plugin is enabled. Plugin MCP servers work identically to user-configured servers.
How plugin MCP servers work:
- Plugins define MCP servers in
.mcp.jsonat the plugin root or inline inplugin.json - When a plugin is enabled, its MCP servers start automatically
- Plugin MCP tools appear alongside manually configured MCP tools
- Plugin servers are managed through plugin installation (not
/mcpcommands)
Example plugin MCP configuration:
In .mcp.json at plugin root:
{
  "mcpServers": {
    "database-tools": {
      "command": "${CLAUDE_PLUGIN_ROOT}/servers/db-server",
      "args": ["--config", "${CLAUDE_PLUGIN_ROOT}/config.json"],
      "env": {
        "DB_URL": "${DB_URL}"
      }
    }
  }
}
Or inline in plugin.json:
{
  "name": "my-plugin",
  "mcpServers": {
    "plugin-api": {
      "command": "${CLAUDE_PLUGIN_ROOT}/servers/api-server",
      "args": ["--port", "8080"]
    }
  }
}
Plugin MCP features:
- Automatic lifecycle: At session startup, servers for enabled plugins connect automatically. If you enable or disable a plugin during a session, run
/reload-pluginsto connect or disconnect its MCP servers - Environment variables: use
${CLAUDE_PLUGIN_ROOT}for bundled plugin files and${CLAUDE_PLUGIN_DATA}for persistent state that survives plugin updates - User environment access: Access to same environment variables as manually configured servers
- Multiple transport types: Support stdio, SSE, and HTTP transports (transport support may vary by server)
Viewing plugin MCP servers:
# Within Claude Code, see all MCP servers including plugin ones
/mcp
Plugin servers appear in the list with indicators showing they come from plugins.
Benefits of plugin MCP servers:
- Bundled distribution: Tools and servers packaged together
- Automatic setup: No manual MCP configuration needed
- Team consistency: Everyone gets the same tools when plugin is installed
See the plugin components reference for details on bundling MCP servers with plugins.
MCP installation scopes
MCP servers can be configured at three scopes. The scope you choose controls which projects the server loads in and whether the configuration is shared with your team.
| Scope | Loads in | Shared with team | Stored in |
|---|---|---|---|
| Local | Current project only | No | ~/.claude.json |
| Project | Current project only | Yes, via version control | .mcp.json in project root |
| User | All your projects | No | ~/.claude.json |
Local scope
Local scope is the default. A local-scoped server loads only in the project where you added it and stays private to you. Claude Code stores it in ~/.claude.json under that project's path, so the same server won't appear in your other projects. Use local scope for personal development servers, experimental configurations, or servers with credentials you don't want in version control.
Note
The term "local scope" for MCP servers differs from general local settings. MCP local-scoped servers are stored in ~/.claude.json (your home directory), while general local settings use .claude/settings.local.json (in the project directory). See Settings for details on settings file locations.
# Add a local-scoped server (default)
claude mcp add --transport http stripe https://mcp.stripe.com

# Explicitly specify local scope
claude mcp add --transport http stripe --scope local https://mcp.stripe.com
The command writes the server into the entry for your current project inside ~/.claude.json. The example below shows the result when you run it from /path/to/your/project:
{
  "projects": {
    "/path/to/your/project": {
      "mcpServers": {
        "stripe": {
          "type": "http",
          "url": "https://mcp.stripe.com"
        }
      }
    }
  }
}
Project scope
Project-scoped servers enable team collaboration by storing configurations in a .mcp.json file at your project's root directory. This file is designed to be checked into version control, ensuring all team members have access to the same MCP tools and services. When you add a project-scoped server, Claude Code automatically creates or updates this file with the appropriate configuration structure.
# Add a project-scoped server
claude mcp add --transport http paypal --scope project https://mcp.paypal.com/mcp
The resulting .mcp.json file follows a standardized format:
{
  "mcpServers": {
    "shared-server": {
      "command": "/path/to/server",
      "args": [],
      "env": {}
    }
  }
}
For security reasons, Claude Code prompts for approval before using project-scoped servers from .mcp.json files. If you need to reset these approval choices, use the claude mcp reset-project-choices command.
User scope
User-scoped servers are stored in ~/.claude.json and provide cross-project accessibility, making them available across all projects on your machine while remaining private to your user account. This scope works well for personal utility servers, development tools, or services you frequently use across different projects.
# Add a user server
claude mcp add --transport http hubspot --scope user https://mcp.hubspot.com/anthropic
Scope hierarchy and precedence
When the same server is defined in more than one place, Claude Code connects to it once, using the definition from the highest-precedence source:
- Local scope
- Project scope
- User scope
- Plugin-provided servers
- claude.ai connectors
The three scopes match duplicates by name. Plugins and connectors match by endpoint, so one that points at the same URL or command as a server above is treated as a duplicate.
Environment variable expansion in .mcp.json
Claude Code supports environment variable expansion in .mcp.json files, allowing teams to share configurations while maintaining flexibility for machine-specific paths and sensitive values like API keys.
Supported syntax:
${VAR}- Expands to the value of environment variableVAR${VAR:-default}- Expands toVARif set, otherwise usesdefault
Expansion locations: Environment variables can be expanded in:
command- The server executable pathargs- Command-line argumentsenv- Environment variables passed to the serverurl- For HTTP server typesheaders- For HTTP server authentication
Example with variable expansion:
{
  "mcpServers": {
    "api-server": {
      "type": "http",
      "url": "${API_BASE_URL:-https://api.example.com}/mcp",
      "headers": {
        "Authorization": "Bearer ${API_KEY}"
      }
    }
  }
}
If a required environment variable is not set and has no default value, Claude Code will fail to parse the config.
Practical examples
{/* ### Example: Automate browser testing with Playwright
claude mcp add --transport stdio playwright -- npx -y @playwright/mcp@latest
Then write and run browser tests:
Test if the login flow works with [email protected]
Take a screenshot of the checkout page on mobile
Verify that the search feature returns results
``` */}

### Example: Monitor errors with Sentry

```bash
claude mcp add --transport http sentry https://mcp.sentry.dev/mcp
Authenticate with your Sentry account:
/mcp
Then debug production issues:
What are the most common errors in the last 24 hours?
Show me the stack trace for error ID abc123
Which deployment introduced these new errors?
Example: Connect to GitHub for code reviews
claude mcp add --transport http github https://api.githubcopilot.com/mcp/
Authenticate if needed by selecting "Authenticate" for GitHub:
/mcp
Then work with GitHub:
Review PR #456 and suggest improvements
Create a new issue for the bug we just found
Show me all open PRs assigned to me
Example: Query your PostgreSQL database
claude mcp add --transport stdio db -- npx -y @bytebase/dbhub \
  --dsn "postgresql://readonly:[email protected]:5432/analytics"
Then query your database naturally:
What's our total revenue this month?
Show me the schema for the orders table
Find customers who haven't made a purchase in 90 days
Authenticate with remote MCP servers
Many cloud-based MCP servers require authentication. Claude Code supports OAuth 2.0 for secure connections.
For example:
claude mcp add --transport http sentry https://mcp.sentry.dev/mcp
In Claude code, use the command:
/mcp
Then follow the steps in your browser to login.
Tip
Tips:
- Authentication tokens are stored securely and refreshed automatically
- Use "Clear authentication" in the
/mcpmenu to revoke access - If your browser doesn't open automatically, copy the provided URL and open it manually
- If the browser redirect fails with a connection error after authenticating, paste the full callback URL from your browser's address bar into the URL prompt that appears in Claude Code
- OAuth authentication works with HTTP servers
Use a fixed OAuth callback port
Some MCP servers require a specific redirect URI registered in advance. By default, Claude Code picks a random available port for the OAuth callback. Use --callback-port to fix the port so it matches a pre-registered redirect URI of the form http://localhost:PORT/callback.
You can use --callback-port on its own (with dynamic client registration) or together with --client-id (with pre-configured credentials).
# Fixed callback port with dynamic client registration
claude mcp add --transport http \
  --callback-port 8080 \
  my-server https://mcp.example.com/mcp
Use pre-configured OAuth credentials
Some MCP servers don't support automatic OAuth setup via Dynamic Client Registration. If you see an error like "Incompatible auth server: does not support dynamic client registration," the server requires pre-configured credentials. Claude Code also supports servers that use a Client ID Metadata Document (CIMD) instead of Dynamic Client Registration, and discovers these automatically. If automatic discovery fails, register an OAuth app through the server's developer portal first, then provide the credentials when adding the server.
Create an app through the server's developer portal and note your client ID and client secret.
Many servers also require a redirect URI. If so, choose a port and register a redirect URI in the format http://localhost:PORT/callback. Use that same port with --callback-port in the next step.
Choose one of the following methods. The port used for --callback-port can be any available port. It just needs to match the redirect URI you registered in the previous step.
- claude mcp add
- claude mcp add-json
- claude mcp add-json (callback port only)
- CI / env var
Use --client-id to pass your app's client ID. The --client-secret flag prompts for the secret with masked input:
claude mcp add --transport http \
  --client-id your-client-id --client-secret --callback-port 8080 \
  my-server https://mcp.example.com/mcp
Include the oauth object in the JSON config and pass --client-secret as a separate flag:
claude mcp add-json my-server \
  '{"type":"http","url":"https://mcp.example.com/mcp","oauth":{"clientId":"your-client-id","callbackPort":8080}}' \
  --client-secret
Use --callback-port without a client ID to fix the port while using dynamic client registration:
claude mcp add-json my-server \
  '{"type":"http","url":"https://mcp.example.com/mcp","oauth":{"callbackPort":8080}}'
Set the secret via environment variable to skip the interactive prompt:
MCP_CLIENT_SECRET=your-secret claude mcp add --transport http \
  --client-id your-client-id --client-secret --callback-port 8080 \
  my-server https://mcp.example.com/mcp
Run /mcp in Claude Code and follow the browser login flow.
Tip
Tips:
- The client secret is stored securely in your system keychain (macOS) or a credentials file, not in your config
- If the server uses a public OAuth client with no secret, use only
--client-idwithout--client-secret --callback-portcan be used with or without--client-id- These flags only apply to HTTP and SSE transports. They have no effect on stdio servers
- Use
claude mcp get <name>to verify that OAuth credentials are configured for a server
Override OAuth metadata discovery
If your MCP server's standard OAuth metadata endpoints return errors but the server exposes a working OIDC endpoint, you can point Claude Code at a specific metadata URL to bypass the default discovery chain. By default, Claude Code first checks RFC 9728 Protected Resource Metadata at /.well-known/oauth-protected-resource, then falls back to RFC 8414 authorization server metadata at /.well-known/oauth-authorization-server.
Set authServerMetadataUrl in the oauth object of your server's config in .mcp.json:
{
  "mcpServers": {
    "my-server": {
      "type": "http",
      "url": "https://mcp.example.com/mcp",
      "oauth": {
        "authServerMetadataUrl": "https://auth.example.com/.well-known/openid-configuration"
      }
    }
  }
}
The URL must use https://. This option requires Claude Code v2.1.64 or later.
Use dynamic headers for custom authentication
If your MCP server uses an authentication scheme other than OAuth (such as Kerberos, short-lived tokens, or an internal SSO), use headersHelper to generate request headers at connection time. Claude Code runs the command and merges its output into the connection headers.
{
  "mcpServers": {
    "internal-api": {
      "type": "http",
      "url": "https://mcp.internal.example.com",
      "headersHelper": "/opt/bin/get-mcp-auth-headers.sh"
    }
  }
}
The command can also be inline:
{
  "mcpServers": {
    "internal-api": {
      "type": "http",
      "url": "https://mcp.internal.example.com",
      "headersHelper": "echo '{\"Authorization\": \"Bearer '\"$(get-token)\"'\"}'"
    }
  }
}
Requirements:
- The command must write a JSON object of string key-value pairs to stdout
- The command runs in a shell with a 10-second timeout
- Dynamic headers override any static
headerswith the same name
The helper runs fresh on each connection (at session start and on reconnect). There is no caching, so your script is responsible for any token reuse.
Claude Code sets these environment variables when executing the helper:
| Variable | Value |
|---|---|
CLAUDE_CODE_MCP_SERVER_NAME |
the name of the MCP server |
CLAUDE_CODE_MCP_SERVER_URL |
the URL of the MCP server |
Use these to write a single helper script that serves multiple MCP servers.
Note
headersHelper executes arbitrary shell commands. When defined at project or local scope, it only runs after you accept the workspace trust dialog.
Add MCP servers from JSON configuration
If you have a JSON configuration for an MCP server, you can add it directly:
# Basic syntax
claude mcp add-json <name> '<json>'

# Example: Adding an HTTP server with JSON configuration
claude mcp add-json weather-api '{"type":"http","url":"https://api.weather.com/mcp","headers":{"Authorization":"Bearer token"}}'

# Example: Adding a stdio server with JSON configuration
claude mcp add-json local-weather '{"type":"stdio","command":"/path/to/weather-cli","args":["--api-key","abc123"],"env":{"CACHE_DIR":"/tmp"}}'

# Example: Adding an HTTP server with pre-configured OAuth credentials
claude mcp add-json my-server '{"type":"http","url":"https://mcp.example.com/mcp","oauth":{"clientId":"your-client-id","callbackPort":8080}}' --client-secret
claude mcp get weather-api
Tip
Tips:
- Make sure the JSON is properly escaped in your shell
- The JSON must conform to the MCP server configuration schema
- You can use
--scope userto add the server to your user configuration instead of the project-specific one
Import MCP servers from Claude Desktop
If you've already configured MCP servers in Claude Desktop, you can import them:
# Basic syntax
claude mcp add-from-claude-desktop
After running the command, you'll see an interactive dialog that allows you to select which servers you want to import.
claude mcp list
Tip
Tips:
- This feature only works on macOS and Windows Subsystem for Linux (WSL)
- It reads the Claude Desktop configuration file from its standard location on those platforms
- Use the
--scope userflag to add servers to your user configuration - Imported servers will have the same names as in Claude Desktop
- If servers with the same names already exist, they will get a numerical suffix (for example,
server_1)
Use MCP servers from Claude.ai
If you've logged into Claude Code with a Claude.ai account, MCP servers you've added in Claude.ai are automatically available in Claude Code:
Add servers at claude.ai/settings/connectors. On Team and Enterprise plans, only admins can add servers.
Complete any required authentication steps in Claude.ai.
In Claude Code, use the command:
/mcp
Claude.ai servers appear in the list with indicators showing they come from Claude.ai.
To disable claude.ai MCP servers in Claude Code, set the ENABLE_CLAUDEAI_MCP_SERVERS environment variable to false:
ENABLE_CLAUDEAI_MCP_SERVERS=false claude
Use Claude Code as an MCP server
You can use Claude Code itself as an MCP server that other applications can connect to:
# Start Claude as a stdio MCP server
claude mcp serve
You can use this in Claude Desktop by adding this configuration to claude_desktop_config.json:
{
  "mcpServers": {
    "claude-code": {
      "type": "stdio",
      "command": "claude",
      "args": ["mcp", "serve"],
      "env": {}
    }
  }
}
Warning
Configuring the executable path: The command field must reference the Claude Code executable. If the claude command is not in your system's PATH, you'll need to specify the full path to the executable.
To find the full path:
which claude
Then use the full path in your configuration:
{
  "mcpServers": {
    "claude-code": {
      "type": "stdio",
      "command": "/full/path/to/claude",
      "args": ["mcp", "serve"],
      "env": {}
    }
  }
}
Without the correct executable path, you'll encounter errors like spawn claude ENOENT.
Tip
Tips:
- The server provides access to Claude's tools like View, Edit, LS, etc.
- In Claude Desktop, try asking Claude to read files in a directory, make edits, and more.
- Note that this MCP server is only exposing Claude Code's tools to your MCP client, so your own client is responsible for implementing user confirmation for individual tool calls.
MCP output limits and warnings
When MCP tools produce large outputs, Claude Code helps manage the token usage to prevent overwhelming your conversation context:
- Output warning threshold: Claude Code displays a warning when any MCP tool output exceeds 10,000 tokens
- Configurable limit: you can adjust the maximum allowed MCP output tokens using the
MAX_MCP_OUTPUT_TOKENSenvironment variable - Default limit: the default maximum is 25,000 tokens
- Scope: the environment variable applies to tools that don't declare their own limit. Tools that set
anthropic/maxResultSizeCharsuse that value instead for text content, regardless of whatMAX_MCP_OUTPUT_TOKENSis set to. Tools that return image data are still subject toMAX_MCP_OUTPUT_TOKENS
To increase the limit for tools that produce large outputs:
export MAX_MCP_OUTPUT_TOKENS=50000
claude
This is particularly useful when working with MCP servers that:
- Query large datasets or databases
- Generate detailed reports or documentation
- Process extensive log files or debugging information
Raise the limit for a specific tool
If you're building an MCP server, you can allow individual tools to return results larger than the default persist-to-disk threshold by setting _meta["anthropic/maxResultSizeChars"] in the tool's tools/list response entry. Claude Code raises that tool's threshold to the annotated value, up to a hard ceiling of 500,000 characters.
This is useful for tools that return inherently large but necessary outputs, such as database schemas or full file trees. Without the annotation, results that exceed the default threshold are persisted to disk and replaced with a file reference in the conversation.
{
  "name": "get_schema",
  "description": "Returns the full database schema",
  "_meta": {
    "anthropic/maxResultSizeChars": 200000
  }
}
The annotation applies independently of MAX_MCP_OUTPUT_TOKENS for text content, so users don't need to raise the environment variable for tools that declare it. Tools that return image data are still subject to the token limit.
Warning
If you frequently encounter output warnings with specific MCP servers you don't control, consider increasing the MAX_MCP_OUTPUT_TOKENS limit. You can also ask the server author to add the anthropic/maxResultSizeChars annotation or to paginate their responses. The annotation has no effect on tools that return image content; for those, raising MAX_MCP_OUTPUT_TOKENS is the only option.
Respond to MCP elicitation requests
MCP servers can request structured input from you mid-task using elicitation. When a server needs information it can't get on its own, Claude Code displays an interactive dialog and passes your response back to the server. No configuration is required on your side: elicitation dialogs appear automatically when a server requests them.
Servers can request input in two ways:
- Form mode: Claude Code shows a dialog with form fields defined by the server (for example, a username and password prompt). Fill in the fields and submit.
- URL mode: Claude Code opens a browser URL for authentication or approval. Complete the flow in the browser, then confirm in the CLI.
To auto-respond to elicitation requests without showing a dialog, use the Elicitation hook.
If you're building an MCP server that uses elicitation, see the MCP elicitation specification for protocol details and schema examples.
Use MCP resources
MCP servers can expose resources that you can reference using @ mentions, similar to how you reference files.
Reference MCP resources
Type @ in your prompt to see available resources from all connected MCP servers. Resources appear alongside files in the autocomplete menu.
Use the format @server:protocol://resource/path to reference a resource:
Can you analyze @github:issue://123 and suggest a fix?
Please review the API documentation at @docs:file://api/authentication
You can reference multiple resources in a single prompt:
Compare @postgres:schema://users with @docs:file://database/user-model
Tip
Tips:
- Resources are automatically fetched and included as attachments when referenced
- Resource paths are fuzzy-searchable in the @ mention autocomplete
- Claude Code automatically provides tools to list and read MCP resources when servers support them
- Resources can contain any type of content that the MCP server provides (text, JSON, structured data, etc.)
Scale with MCP Tool Search
Tool search keeps MCP context usage low by deferring tool definitions until Claude needs them. Only tool names load at session start, so adding more MCP servers has minimal impact on your context window.
How it works
Tool search is enabled by default. MCP tools are deferred rather than loaded into context upfront, and Claude uses a search tool to discover relevant ones when a task needs them. Only the tools Claude actually uses enter context. From your perspective, MCP tools work exactly as before.
If you prefer threshold-based loading, set ENABLE_TOOL_SEARCH=auto to load schemas upfront when they fit within 10% of the context window and defer only the overflow. See Configure tool search for all options.
For MCP server authors
If you're building an MCP server, the server instructions field becomes more useful with Tool Search enabled. Server instructions help Claude understand when to search for your tools, similar to how skills work.
Add clear, descriptive server instructions that explain:
- What category of tasks your tools handle
- When Claude should search for your tools
- Key capabilities your server provides
Claude Code truncates tool descriptions and server instructions at 2KB each. Keep them concise to avoid truncation, and put critical details near the start.
Configure tool search
Tool search is enabled by default: MCP tools are deferred and discovered on demand. When ANTHROPIC_BASE_URL points to a non-first-party host, tool search is disabled by default because most proxies do not forward tool_reference blocks. Set ENABLE_TOOL_SEARCH explicitly if your proxy does. This feature requires models that support tool_reference blocks: Sonnet 4 and later, or Opus 4 and later. Haiku models do not support tool search.
Control tool search behavior with the ENABLE_TOOL_SEARCH environment variable:
| Value | Behavior |
|---|---|
| (unset) | All MCP tools deferred and loaded on demand. Falls back to loading upfront when ANTHROPIC_BASE_URL is a non-first-party host |
true |
All MCP tools deferred, including for non-first-party ANTHROPIC_BASE_URL |
auto |
Threshold mode: tools load upfront if they fit within 10% of the context window, deferred otherwise |
auto:<N> |
Threshold mode with a custom percentage, where <N> is 0-100 (e.g., auto:5 for 5%) |
false |
All MCP tools loaded upfront, no deferral |
# Use a custom 5% threshold
ENABLE_TOOL_SEARCH=auto:5 claude

# Disable tool search entirely
ENABLE_TOOL_SEARCH=false claude
Or set the value in your settings.json env field.
You can also disable the ToolSearch tool specifically:
{
  "permissions": {
    "deny": ["ToolSearch"]
  }
}
Use MCP prompts as commands
MCP servers can expose prompts that become available as commands in Claude Code.
Execute MCP prompts
Type / to see all available commands, including those from MCP servers. MCP prompts appear with the format /mcp__servername__promptname.
/mcp__github__list_prs
Many prompts accept arguments. Pass them space-separated after the command:
/mcp__github__pr_review 456
/mcp__jira__create_issue "Bug in login flow" high
Tip
Tips:
- MCP prompts are dynamically discovered from connected servers
- Arguments are parsed based on the prompt's defined parameters
- Prompt results are injected directly into the conversation
- Server and prompt names are normalized (spaces become underscores)
Managed MCP configuration
For organizations that need centralized control over MCP servers, Claude Code supports two configuration options:
- Exclusive control with
managed-mcp.json: Deploy a fixed set of MCP servers that users cannot modify or extend - Policy-based control with allowlists/denylists: Allow users to add their own servers, but restrict which ones are permitted
These options allow IT administrators to:
- Control which MCP servers employees can access: Deploy a standardized set of approved MCP servers across the organization
- Prevent unauthorized MCP servers: Restrict users from adding unapproved MCP servers
- Disable MCP entirely: Remove MCP functionality completely if needed
Option 1: Exclusive control with managed-mcp.json
When you deploy a managed-mcp.json file, it takes exclusive control over all MCP servers. Users cannot add, modify, or use any MCP servers other than those defined in this file. This is the simplest approach for organizations that want complete control.
System administrators deploy the configuration file to a system-wide directory:
- macOS:
/Library/Application Support/ClaudeCode/managed-mcp.json - Linux and WSL:
/etc/claude-code/managed-mcp.json - Windows:
C:\Program Files\ClaudeCode\managed-mcp.json
Note
These are system-wide paths (not user home directories like ~/Library/...) that require administrator privileges. They are designed to be deployed by IT administrators.
The managed-mcp.json file uses the same format as a standard .mcp.json file:
{
  "mcpServers": {
    "github": {
      "type": "http",
      "url": "https://api.githubcopilot.com/mcp/"
    },
    "sentry": {
      "type": "http",
      "url": "https://mcp.sentry.dev/mcp"
    },
    "company-internal": {
      "type": "stdio",
      "command": "/usr/local/bin/company-mcp-server",
      "args": ["--config", "/etc/company/mcp-config.json"],
      "env": {
        "COMPANY_API_URL": "https://internal.company.com"
      }
    }
  }
}
Option 2: Policy-based control with allowlists and denylists
Instead of taking exclusive control, administrators can allow users to configure their own MCP servers while enforcing restrictions on which servers are permitted. This approach uses allowedMcpServers and deniedMcpServers in the managed settings file.
Note
Choosing between options: Use Option 1 (managed-mcp.json) when you want to deploy a fixed set of servers with no user customization. Use Option 2 (allowlists/denylists) when you want to allow users to add their own servers within policy constraints.
Restriction options
Each entry in the allowlist or denylist can restrict servers in three ways:
- By server name (
serverName): Matches the configured name of the server - By command (
serverCommand): Matches the exact command and arguments used to start stdio servers - By URL pattern (
serverUrl): Matches remote server URLs with wildcard support
Important: Each entry must have exactly one of serverName, serverCommand, or serverUrl.
Example configuration
{
  "allowedMcpServers": [
    // Allow by server name
    { "serverName": "github" },
    { "serverName": "sentry" },

    // Allow by exact command (for stdio servers)
    { "serverCommand": ["npx", "-y", "@modelcontextprotocol/server-filesystem"] },
    { "serverCommand": ["python", "/usr/local/bin/approved-server.py"] },

    // Allow by URL pattern (for remote servers)
    { "serverUrl": "https://mcp.company.com/*" },
    { "serverUrl": "https://*.internal.corp/*" }
  ],
  "deniedMcpServers": [
    // Block by server name
    { "serverName": "dangerous-server" },

    // Block by exact command (for stdio servers)
    { "serverCommand": ["npx", "-y", "unapproved-package"] },

    // Block by URL pattern (for remote servers)
    { "serverUrl": "https://*.untrusted.com/*" }
  ]
}
How command-based restrictions work
Exact matching:
- Command arrays must match exactly - both the command and all arguments in the correct order
- Example:
["npx", "-y", "server"]will NOT match["npx", "server"]or["npx", "-y", "server", "--flag"]
Stdio server behavior:
- When the allowlist contains any
serverCommandentries, stdio servers must match one of those commands - Stdio servers cannot pass by name alone when command restrictions are present
- This ensures administrators can enforce which commands are allowed to run
Non-stdio server behavior:
- Remote servers (HTTP, SSE, WebSocket) use URL-based matching when
serverUrlentries exist in the allowlist - If no URL entries exist, remote servers fall back to name-based matching
- Command restrictions do not apply to remote servers
How URL-based restrictions work
URL patterns support wildcards using * to match any sequence of characters. This is useful for allowing entire domains or subdomains.
Wildcard examples:
https://mcp.company.com/*- Allow all paths on a specific domainhttps://*.example.com/*- Allow any subdomain of example.comhttp://localhost:*/*- Allow any port on localhost
Remote server behavior:
- When the allowlist contains any
serverUrlentries, remote servers must match one of those URL patterns - Remote servers cannot pass by name alone when URL restrictions are present
- This ensures administrators can enforce which remote endpoints are allowed
Example: URL-only allowlist
{
  "allowedMcpServers": [
    { "serverUrl": "https://mcp.company.com/*" },
    { "serverUrl": "https://*.internal.corp/*" }
  ]
}
Result:
- HTTP server at
https://mcp.company.com/api: ✅ Allowed (matches URL pattern) - HTTP server at
https://api.internal.corp/mcp: ✅ Allowed (matches wildcard subdomain) - HTTP server at
https://external.com/mcp: ❌ Blocked (doesn't match any URL pattern) - Stdio server with any command: ❌ Blocked (no name or command entries to match)
Example: Command-only allowlist
{
  "allowedMcpServers": [
    { "serverCommand": ["npx", "-y", "approved-package"] }
  ]
}
Result:
- Stdio server with
["npx", "-y", "approved-package"]: ✅ Allowed (matches command) - Stdio server with
["node", "server.js"]: ❌ Blocked (doesn't match command) - HTTP server named "my-api": ❌ Blocked (no name entries to match)
Example: Mixed name and command allowlist
{
  "allowedMcpServers": [
    { "serverName": "github" },
    { "serverCommand": ["npx", "-y", "approved-package"] }
  ]
}
Result:
- Stdio server named "local-tool" with
["npx", "-y", "approved-package"]: ✅ Allowed (matches command) - Stdio server named "local-tool" with
["node", "server.js"]: ❌ Blocked (command entries exist but doesn't match) - Stdio server named "github" with
["node", "server.js"]: ❌ Blocked (stdio servers must match commands when command entries exist) - HTTP server named "github": ✅ Allowed (matches name)
- HTTP server named "other-api": ❌ Blocked (name doesn't match)
Example: Name-only allowlist
{
  "allowedMcpServers": [
    { "serverName": "github" },
    { "serverName": "internal-tool" }
  ]
}
Result:
- Stdio server named "github" with any command: ✅ Allowed (no command restrictions)
- Stdio server named "internal-tool" with any command: ✅ Allowed (no command restrictions)
- HTTP server named "github": ✅ Allowed (matches name)
- Any server named "other": ❌ Blocked (name doesn't match)
Allowlist behavior (allowedMcpServers)
undefined(default): No restrictions - users can configure any MCP server- Empty array
[]: Complete lockdown - users cannot configure any MCP servers - List of entries: Users can only configure servers that match by name, command, or URL pattern
Denylist behavior (deniedMcpServers)
undefined(default): No servers are blocked- Empty array
[]: No servers are blocked - List of entries: Specified servers are explicitly blocked across all scopes
Important notes
- Option 1 and Option 2 can be combined: If
managed-mcp.jsonexists, it has exclusive control and users cannot add servers. Allowlists/denylists still apply to the managed servers themselves. - Denylist takes absolute precedence: If a server matches a denylist entry (by name, command, or URL), it will be blocked even if it's on the allowlist
- Name-based, command-based, and URL-based restrictions work together: a server passes if it matches either a name entry, a command entry, or a URL pattern (unless blocked by denylist)
Note
When using managed-mcp.json: Users cannot add MCP servers through claude mcp add or configuration files. The allowedMcpServers and deniedMcpServers settings still apply to filter which managed servers are actually loaded.
Discover and install prebuilt plugins through marketplaces
Find and install plugins from marketplaces to extend Claude Code with new skills, agents, and capabilities.
Plugins extend Claude Code with skills, agents, hooks, and MCP servers. Plugin marketplaces are catalogs that help you discover and install these extensions without building them yourself.
Looking to create and distribute your own marketplace? See Create and distribute a plugin marketplace.
How marketplaces work
A marketplace is a catalog of plugins that someone else has created and shared. Using a marketplace is a two-step process:
This registers the catalog with Claude Code so you can browse what's available. No plugins are installed yet.
Browse the catalog and install the plugins you want.
Think of it like adding an app store: adding the store gives you access to browse its collection, but you still choose which apps to download individually.
Official Anthropic marketplace
The official Anthropic marketplace (claude-plugins-official) is automatically available when you start Claude Code. Run /plugin and go to the Discover tab to browse what's available, or view the catalog at claude.com/plugins.
To install a plugin from the official marketplace, use /plugin install <name>@claude-plugins-official. For example, to install the GitHub integration:
/plugin install github@claude-plugins-official
If Claude Code reports that the plugin is not found in any marketplace, your marketplace is either missing or outdated. Run /plugin marketplace update claude-plugins-official to refresh it, or /plugin marketplace add anthropics/claude-plugins-official if you haven't added it before. Then retry the install.
Note
The official marketplace is maintained by Anthropic. To submit a plugin to the official marketplace, use one of the in-app submission forms:
- Claude.ai: claude.ai/settings/plugins/submit
- Console: platform.claude.com/plugins/submit
To distribute plugins independently, create your own marketplace and share it with users.
The official marketplace includes several categories of plugins:
Code intelligence
Code intelligence plugins enable Claude Code's built-in LSP tool, giving Claude the ability to jump to definitions, find references, and see type errors immediately after edits. These plugins configure Language Server Protocol connections, the same technology that powers VS Code's code intelligence.
These plugins require the language server binary to be installed on your system. If you already have a language server installed, Claude may prompt you to install the corresponding plugin when you open a project.
| Language | Plugin | Binary required |
|---|---|---|
| C/C++ | clangd-lsp |
clangd |
| C# | csharp-lsp |
csharp-ls |
| Go | gopls-lsp |
gopls |
| Java | jdtls-lsp |
jdtls |
| Kotlin | kotlin-lsp |
kotlin-language-server |
| Lua | lua-lsp |
lua-language-server |
| PHP | php-lsp |
intelephense |
| Python | pyright-lsp |
pyright-langserver |
| Rust | rust-analyzer-lsp |
rust-analyzer |
| Swift | swift-lsp |
sourcekit-lsp |
| TypeScript | typescript-lsp |
typescript-language-server |
You can also create your own LSP plugin for other languages.
Note
If you see Executable not found in $PATH in the /plugin Errors tab after installing a plugin, install the required binary from the table above.
What Claude gains from code intelligence plugins
Once a code intelligence plugin is installed and its language server binary is available, Claude gains two capabilities:
- Automatic diagnostics: after every file edit Claude makes, the language server analyzes the changes and reports errors and warnings back automatically. Claude sees type errors, missing imports, and syntax issues without needing to run a compiler or linter. If Claude introduces an error, it notices and fixes the issue in the same turn. This requires no configuration beyond installing the plugin. You can see diagnostics inline by pressing Ctrl+O when the "diagnostics found" indicator appears.
- Code navigation: Claude can use the language server to jump to definitions, find references, get type info on hover, list symbols, find implementations, and trace call hierarchies. These operations give Claude more precise navigation than grep-based search, though availability may vary by language and environment.
If you run into issues, see Code intelligence troubleshooting.
External integrations
These plugins bundle pre-configured MCP servers so you can connect Claude to external services without manual setup:
- Source control:
github,gitlab - Project management:
atlassian(Jira/Confluence),asana,linear,notion - Design:
figma - Infrastructure:
vercel,firebase,supabase - Communication:
slack - Monitoring:
sentry
Development workflows
Plugins that add skills and agents for common development tasks:
- commit-commands: Git commit workflows including commit, push, and PR creation
- pr-review-toolkit: Specialized agents for reviewing pull requests
- agent-sdk-dev: Tools for building with the Claude Agent SDK
- plugin-dev: Toolkit for creating your own plugins
Output styles
Customize how Claude responds:
- explanatory-output-style: Educational insights about implementation choices
- learning-output-style: Interactive learning mode for skill building
Try it: add the demo marketplace
Anthropic also maintains a demo plugins marketplace (claude-code-plugins) with example plugins that show what's possible with the plugin system. Unlike the official marketplace, you need to add this one manually.
From within Claude Code, run the plugin marketplace add command for the anthropics/claude-code marketplace:
/plugin marketplace add anthropics/claude-code
This downloads the marketplace catalog and makes its plugins available to you.
Run /plugin to open the plugin manager. This opens a tabbed interface with four tabs you can cycle through using Tab (or Shift+Tab to go backward):
- Discover: browse available plugins from all your marketplaces
- Installed: view and manage your installed plugins
- Marketplaces: add, remove, or update your added marketplaces
- Errors: view any plugin loading errors
Go to the Discover tab to see plugins from the marketplace you just added.
Select a plugin to view its details, then choose an installation scope:
- User scope: install for yourself across all projects
- Project scope: install for all collaborators on this repository
- Local scope: install for yourself in this repository only
For example, select commit-commands (a plugin that adds git workflow skills) and install it to your user scope.
You can also install directly from the command line:
/plugin install commit-commands@anthropics-claude-code
See Configuration scopes to learn more about scopes.
After installing, run /reload-plugins to activate the plugin. Plugin skills are namespaced by the plugin name, so commit-commands provides skills like /commit-commands:commit.
Try it out by making a change to a file and running:
/commit-commands:commit
This stages your changes, generates a commit message, and creates the commit.
Each plugin works differently. Check the plugin's description in the Discover tab or its homepage to learn what skills and capabilities it provides.
The rest of this guide covers all the ways you can add marketplaces, install plugins, and manage your configuration.
Add marketplaces
Use the /plugin marketplace add command to add marketplaces from different sources.
Tip
Shortcuts: You can use /plugin market instead of /plugin marketplace, and rm instead of remove.
- GitHub repositories:
owner/repoformat (for example,anthropics/claude-code) - Git URLs: any git repository URL (GitLab, Bitbucket, self-hosted)
- Local paths: directories or direct paths to
marketplace.jsonfiles - Remote URLs: direct URLs to hosted
marketplace.jsonfiles
Add from GitHub
Add a GitHub repository that contains a .claude-plugin/marketplace.json file using the owner/repo format—where owner is the GitHub username or organization and repo is the repository name.
For example, anthropics/claude-code refers to the claude-code repository owned by anthropics:
/plugin marketplace add anthropics/claude-code
Add from other Git hosts
Add any git repository by providing the full URL. This works with any Git host, including GitLab, Bitbucket, and self-hosted servers:
Using HTTPS:
/plugin marketplace add https://gitlab.com/company/plugins.git
Using SSH:
/plugin marketplace add [email protected]:company/plugins.git
To add a specific branch or tag, append # followed by the ref:
/plugin marketplace add https://gitlab.com/company/plugins.git#v1.0.0
Add from local paths
Add a local directory that contains a .claude-plugin/marketplace.json file:
/plugin marketplace add ./my-marketplace
You can also add a direct path to a marketplace.json file:
/plugin marketplace add ./path/to/marketplace.json
Add from remote URLs
Add a remote marketplace.json file via URL:
/plugin marketplace add https://example.com/marketplace.json
Note
URL-based marketplaces have some limitations compared to Git-based marketplaces. If you encounter "path not found" errors when installing plugins, see Troubleshooting.
Install plugins
Once you've added marketplaces, you can install plugins directly (installs to user scope by default):
/plugin install plugin-name@marketplace-name
To choose a different installation scope, use the interactive UI: run /plugin, go to the Discover tab, and press Enter on a plugin. You'll see options for:
- User scope (default): install for yourself across all projects
- Project scope: install for all collaborators on this repository (adds to
.claude/settings.json) - Local scope: install for yourself in this repository only (not shared with collaborators)
You may also see plugins with managed scope—these are installed by administrators via managed settings and cannot be modified.
Run /plugin and go to the Installed tab to see your plugins grouped by scope.
Warning
Make sure you trust a plugin before installing it. Anthropic does not control what MCP servers, files, or other software are included in plugins and cannot verify that they work as intended. Check each plugin's homepage for more information.
Manage installed plugins
Run /plugin and go to the Installed tab to view, enable, disable, or uninstall your plugins. Type to filter the list by plugin name or description.
You can also manage plugins with direct commands.
Disable a plugin without uninstalling:
/plugin disable plugin-name@marketplace-name
Re-enable a disabled plugin:
/plugin enable plugin-name@marketplace-name
Completely remove a plugin:
/plugin uninstall plugin-name@marketplace-name
The --scope option lets you target a specific scope with CLI commands:
claude plugin install formatter@your-org --scope project
claude plugin uninstall formatter@your-org --scope project
Apply plugin changes without restarting
When you install, enable, or disable plugins during a session, run /reload-plugins to pick up all changes without restarting:
/reload-plugins
Claude Code reloads all active plugins and shows counts for plugins, skills, agents, hooks, plugin MCP servers, and plugin LSP servers.
Manage marketplaces
You can manage marketplaces through the interactive /plugin interface or with CLI commands.
Use the interactive interface
Run /plugin and go to the Marketplaces tab to:
- View all your added marketplaces with their sources and status
- Add new marketplaces
- Update marketplace listings to fetch the latest plugins
- Remove marketplaces you no longer need
Use CLI commands
You can also manage marketplaces with direct commands.
List all configured marketplaces:
/plugin marketplace list
Refresh plugin listings from a marketplace:
/plugin marketplace update marketplace-name
Remove a marketplace:
/plugin marketplace remove marketplace-name
Warning
Removing a marketplace will uninstall any plugins you installed from it.
Configure auto-updates
Claude Code can automatically update marketplaces and their installed plugins at startup. When auto-update is enabled for a marketplace, Claude Code refreshes the marketplace data and updates installed plugins to their latest versions. If any plugins were updated, you'll see a notification prompting you to run /reload-plugins.
Toggle auto-update for individual marketplaces through the UI:
- Run
/pluginto open the plugin manager - Select Marketplaces
- Choose a marketplace from the list
- Select Enable auto-update or Disable auto-update
Official Anthropic marketplaces have auto-update enabled by default. Third-party and local development marketplaces have auto-update disabled by default.
To disable all automatic updates entirely for both Claude Code and all plugins, set the DISABLE_AUTOUPDATER environment variable. See Auto updates for details.
To keep plugin auto-updates enabled while disabling Claude Code auto-updates, set FORCE_AUTOUPDATE_PLUGINS=1 along with DISABLE_AUTOUPDATER:
export DISABLE_AUTOUPDATER=1
export FORCE_AUTOUPDATE_PLUGINS=1
This is useful when you want to manage Claude Code updates manually but still receive automatic plugin updates.
Configure team marketplaces
Team admins can set up automatic marketplace installation for projects by adding marketplace configuration to .claude/settings.json. When team members trust the repository folder, Claude Code prompts them to install these marketplaces and plugins.
Add extraKnownMarketplaces to your project's .claude/settings.json:
{
  "extraKnownMarketplaces": {
    "my-team-tools": {
      "source": {
        "source": "github",
        "repo": "your-org/claude-plugins"
      }
    }
  }
}
For full configuration options including extraKnownMarketplaces and enabledPlugins, see Plugin settings.
Security
Plugins and marketplaces are highly trusted components that can execute arbitrary code on your machine with your user privileges. Only install plugins and add marketplaces from sources you trust. Organizations can restrict which marketplaces users are allowed to add using managed marketplace restrictions.
Troubleshooting
/plugin command not recognized
If you see "unknown command" or the /plugin command doesn't appear:
- Check your version: Run
claude --versionto see what's installed. - Update Claude Code:
- Homebrew:
brew upgrade claude-code(orbrew upgrade claude-code@latestif you installed that cask) - npm:
npm update -g @anthropic-ai/claude-code - Native installer: Re-run the install command from Setup
- Homebrew:
- Restart Claude Code: After updating, restart your terminal and run
claudeagain.
Common issues
- Marketplace not loading: Verify the URL is accessible and that
.claude-plugin/marketplace.jsonexists at the path - Plugin installation failures: Check that plugin source URLs are accessible and repositories are public (or you have access)
- Files not found after installation: Plugins are copied to a cache, so paths referencing files outside the plugin directory won't work
- Plugin skills not appearing: Clear the cache with
rm -rf ~/.claude/plugins/cache, restart Claude Code, and reinstall the plugin.
For detailed troubleshooting with solutions, see Troubleshooting in the marketplace guide. For debugging tools, see Debugging and development tools.
Code intelligence issues
- Language server not starting: verify the binary is installed and available in your
$PATH. Check the/pluginErrors tab for details. - High memory usage: language servers like
rust-analyzerandpyrightcan consume significant memory on large projects. If you experience memory issues, disable the plugin with/plugin disable <plugin-name>and rely on Claude's built-in search tools instead. - False positive diagnostics in monorepos: language servers may report unresolved import errors for internal packages if the workspace isn't configured correctly. These don't affect Claude's ability to edit code.
Next steps
- Build your own plugins: See Plugins to create skills, agents, and hooks
- Create a marketplace: See Create a plugin marketplace to distribute plugins to your team or community
- Technical reference: See Plugins reference for complete specifications
Create plugins
Create custom plugins to extend Claude Code with skills, agents, hooks, and MCP servers.
Plugins let you extend Claude Code with custom functionality that can be shared across projects and teams. This guide covers creating your own plugins with skills, agents, hooks, and MCP servers.
Looking to install existing plugins? See Discover and install plugins. For complete technical specifications, see Plugins reference.
When to use plugins vs standalone configuration
Claude Code supports two ways to add custom skills, agents, and hooks:
| Approach | Skill names | Best for |
|---|---|---|
Standalone (.claude/ directory) |
/hello |
Personal workflows, project-specific customizations, quick experiments |
Plugins (directories with .claude-plugin/plugin.json) |
/plugin-name:hello |
Sharing with teammates, distributing to community, versioned releases, reusable across projects |
Use standalone configuration when:
- You're customizing Claude Code for a single project
- The configuration is personal and doesn't need to be shared
- You're experimenting with skills or hooks before packaging them
- You want short skill names like
/helloor/deploy
Use plugins when:
- You want to share functionality with your team or community
- You need the same skills/agents across multiple projects
- You want version control and easy updates for your extensions
- You're distributing through a marketplace
- You're okay with namespaced skills like
/my-plugin:hello(namespacing prevents conflicts between plugins)
Tip
Start with standalone configuration in .claude/ for quick iteration, then convert to a plugin when you're ready to share.
Quickstart
This quickstart walks you through creating a plugin with a custom skill. You'll create a manifest (the configuration file that defines your plugin), add a skill, and test it locally using the --plugin-dir flag.
Prerequisites
- Claude Code installed and authenticated
Note
If you don't see the /plugin command, update Claude Code to the latest version. See Troubleshooting for upgrade instructions.
Create your first plugin
Every plugin lives in its own directory containing a manifest and your skills, agents, or hooks. Create one now:
mkdir my-first-plugin
The manifest file at .claude-plugin/plugin.json defines your plugin's identity: its name, description, and version. Claude Code uses this metadata to display your plugin in the plugin manager.
Create the .claude-plugin directory inside your plugin folder:
mkdir my-first-plugin/.claude-plugin
Then create my-first-plugin/.claude-plugin/plugin.json with this content:
{
  "name": "my-first-plugin",
  "description": "A greeting plugin to learn the basics",
  "version": "1.0.0",
  "author": {
    "name": "Your Name"
  }
}
| Field | Purpose |
|---|---|
name |
Unique identifier and skill namespace. Skills are prefixed with this (e.g., /my-first-plugin:hello). |
description |
Shown in the plugin manager when browsing or installing plugins. |
version |
Track releases using semantic versioning. |
author |
Optional. Helpful for attribution. |
For additional fields like homepage, repository, and license, see the full manifest schema.
Skills live in the skills/ directory. Each skill is a folder containing a SKILL.md file. The folder name becomes the skill name, prefixed with the plugin's namespace (hello/ in a plugin named my-first-plugin creates /my-first-plugin:hello).
Create a skill directory in your plugin folder:
mkdir -p my-first-plugin/skills/hello
Then create my-first-plugin/skills/hello/SKILL.md with this content:
---
description: Greet the user with a friendly message
disable-model-invocation: true
---

Greet the user warmly and ask how you can help them today.
Run Claude Code with the --plugin-dir flag to load your plugin:
claude --plugin-dir ./my-first-plugin
Once Claude Code starts, try your new skill:
/my-first-plugin:hello
You'll see Claude respond with a greeting. Run /help to see your skill listed under the plugin namespace.
Note
Why namespacing? Plugin skills are always namespaced (like /my-first-plugin:hello) to prevent conflicts when multiple plugins have skills with the same name.
To change the namespace prefix, update the name field in plugin.json.
Make your skill dynamic by accepting user input. The $ARGUMENTS placeholder captures any text the user provides after the skill name.
Update your SKILL.md file:
---
description: Greet the user with a personalized message
---

# Hello Skill

Greet the user named "$ARGUMENTS" warmly and ask how you can help them today. Make the greeting personal and encouraging.
Run /reload-plugins to pick up the changes, then try the skill with your name:
/my-first-plugin:hello Alex
Claude will greet you by name. For more on passing arguments to skills, see Skills.
You've successfully created and tested a plugin with these key components:
- Plugin manifest (
.claude-plugin/plugin.json): describes your plugin's metadata - Skills directory (
skills/): contains your custom skills - Skill arguments (
$ARGUMENTS): captures user input for dynamic behavior
Tip
The --plugin-dir flag is useful for development and testing. When you're ready to share your plugin with others, see Create and distribute a plugin marketplace.
Plugin structure overview
You've created a plugin with a skill, but plugins can include much more: custom agents, hooks, MCP servers, and LSP servers.
Warning
Common mistake: Don't put commands/, agents/, skills/, or hooks/ inside the .claude-plugin/ directory. Only plugin.json goes inside .claude-plugin/. All other directories must be at the plugin root level.
| Directory | Location | Purpose |
|---|---|---|
.claude-plugin/ |
Plugin root | Contains plugin.json manifest (optional if components use default locations) |
skills/ |
Plugin root | Skills as <name>/SKILL.md directories |
commands/ |
Plugin root | Skills as flat Markdown files. Use skills/ for new plugins |
agents/ |
Plugin root | Custom agent definitions |
hooks/ |
Plugin root | Event handlers in hooks.json |
.mcp.json |
Plugin root | MCP server configurations |
.lsp.json |
Plugin root | LSP server configurations for code intelligence |
bin/ |
Plugin root | Executables added to the Bash tool's PATH while the plugin is enabled |
settings.json |
Plugin root | Default settings applied when the plugin is enabled |
Note
Next steps: Ready to add more features? Jump to Develop more complex plugins to add agents, hooks, MCP servers, and LSP servers. For complete technical specifications of all plugin components, see Plugins reference.
Develop more complex plugins
Once you're comfortable with basic plugins, you can create more sophisticated extensions.
Add Skills to your plugin
Plugins can include Agent Skills to extend Claude's capabilities. Skills are model-invoked: Claude automatically uses them based on the task context.
Add a skills/ directory at your plugin root with Skill folders containing SKILL.md files:
my-plugin/
├── .claude-plugin/
│   └── plugin.json
└── skills/
    └── code-review/
        └── SKILL.md
Each SKILL.md needs frontmatter with name and description fields, followed by instructions:
---
name: code-review
description: Reviews code for best practices and potential issues. Use when reviewing code, checking PRs, or analyzing code quality.
---

When reviewing code, check for:
1. Code organization and structure
2. Error handling
3. Security concerns
4. Test coverage
After installing the plugin, run /reload-plugins to load the Skills. For complete Skill authoring guidance including progressive disclosure and tool restrictions, see Agent Skills.
Add LSP servers to your plugin
Tip
For common languages like TypeScript, Python, and Rust, install the pre-built LSP plugins from the official marketplace. Create custom LSP plugins only when you need support for languages not already covered.
LSP (Language Server Protocol) plugins give Claude real-time code intelligence. If you need to support a language that doesn't have an official LSP plugin, you can create your own by adding an .lsp.json file to your plugin:
{
  "go": {
    "command": "gopls",
    "args": ["serve"],
    "extensionToLanguage": {
      ".go": "go"
    }
  }
}
Users installing your plugin must have the language server binary installed on their machine.
For complete LSP configuration options, see LSP servers.
Ship default settings with your plugin
Plugins can include a settings.json file at the plugin root to apply default configuration when the plugin is enabled. Currently, only the agent and subagentStatusLine keys are supported.
Setting agent activates one of the plugin's custom agents as the main thread, applying its system prompt, tool restrictions, and model. This lets a plugin change how Claude Code behaves by default when enabled.
{
  "agent": "security-reviewer"
}
This example activates the security-reviewer agent defined in the plugin's agents/ directory. Settings from settings.json take priority over settings declared in plugin.json. Unknown keys are silently ignored.
Organize complex plugins
For plugins with many components, organize your directory structure by functionality. For complete directory layouts and organization patterns, see Plugin directory structure.
Test your plugins locally
Use the --plugin-dir flag to test plugins during development. This loads your plugin directly without requiring installation.
claude --plugin-dir ./my-plugin
When a --plugin-dir plugin has the same name as an installed marketplace plugin, the local copy takes precedence for that session. This lets you test changes to a plugin you already have installed without uninstalling it first. Marketplace plugins force-enabled by managed settings are the only exception and cannot be overridden.
As you make changes to your plugin, run /reload-plugins to pick up the updates without restarting. This reloads plugins, skills, agents, hooks, plugin MCP servers, and plugin LSP servers. Test your plugin components:
- Try your skills with
/plugin-name:skill-name - Check that agents appear in
/agents - Verify hooks work as expected
Tip
You can load multiple plugins at once by specifying the flag multiple times:
claude --plugin-dir ./plugin-one --plugin-dir ./plugin-two
Debug plugin issues
If your plugin isn't working as expected:
- Check the structure: Ensure your directories are at the plugin root, not inside
.claude-plugin/ - Test components individually: Check each skill, agent, and hook separately
- Use validation and debugging tools: See Debugging and development tools for CLI commands and troubleshooting techniques
Share your plugins
When your plugin is ready to share:
- Add documentation: Include a
README.mdwith installation and usage instructions - Version your plugin: Use semantic versioning in your
plugin.json - Create or use a marketplace: Distribute through plugin marketplaces for installation
- Test with others: Have team members test the plugin before wider distribution
Once your plugin is in a marketplace, others can install it using the instructions in Discover and install plugins.
Submit your plugin to the official marketplace
To submit a plugin to the official Anthropic marketplace, use one of the in-app submission forms:
- Claude.ai: claude.ai/settings/plugins/submit
- Console: platform.claude.com/plugins/submit
Note
For complete technical specifications, debugging techniques, and distribution strategies, see Plugins reference.
Convert existing configurations to plugins
If you already have skills or hooks in your .claude/ directory, you can convert them into a plugin for easier sharing and distribution.
Migration steps
Create a new plugin directory:
mkdir -p my-plugin/.claude-plugin
Create the manifest file at my-plugin/.claude-plugin/plugin.json:
{
  "name": "my-plugin",
  "description": "Migrated from standalone configuration",
  "version": "1.0.0"
}
Copy your existing configurations to the plugin directory:
# Copy commands
cp -r .claude/commands my-plugin/

# Copy agents (if any)
cp -r .claude/agents my-plugin/

# Copy skills (if any)
cp -r .claude/skills my-plugin/
If you have hooks in your settings, create a hooks directory:
mkdir my-plugin/hooks
Create my-plugin/hooks/hooks.json with your hooks configuration. Copy the hooks object from your .claude/settings.json or settings.local.json, since the format is the same. The command receives hook input as JSON on stdin, so use jq to extract the file path:
{
  "hooks": {
    "PostToolUse": [
      {
        "matcher": "Write|Edit",
        "hooks": [{ "type": "command", "command": "jq -r '.tool_input.file_path' | xargs npm run lint:fix" }]
      }
    ]
  }
}
Load your plugin to verify everything works:
claude --plugin-dir ./my-plugin
Test each component: run your commands, check agents appear in /agents, and verify hooks trigger correctly.
What changes when migrating
Standalone (.claude/) |
Plugin |
|---|---|
| Only available in one project | Can be shared via marketplaces |
Files in .claude/commands/ |
Files in plugin-name/commands/ |
Hooks in settings.json |
Hooks in hooks/hooks.json |
| Must manually copy to share | Install with /plugin install |
Note
After migrating, you can remove the original files from .claude/ to avoid duplicates. The plugin version will take precedence when loaded.
Next steps
Now that you understand Claude Code's plugin system, here are suggested paths for different goals:
For plugin users
- Discover and install plugins: browse marketplaces and install plugins
- Configure team marketplaces: set up repository-level plugins for your team
For plugin developers
- Create and distribute a marketplace: package and share your plugins
- Plugins reference: complete technical specifications
- Dive deeper into specific plugin components:
Extend Claude with skills
Create, manage, and share skills to extend Claude's capabilities in Claude Code. Includes custom commands and bundled skills.
Skills extend what Claude can do. Create a SKILL.md file with instructions, and Claude adds it to its toolkit. Claude uses skills when relevant, or you can invoke one directly with /skill-name.
Create a skill when you keep pasting the same playbook, checklist, or multi-step procedure into chat, or when a section of CLAUDE.md has grown into a procedure rather than a fact. Unlike CLAUDE.md content, a skill's body loads only when it's used, so long reference material costs almost nothing until you need it.
Note
For built-in commands like /help and /compact, and bundled skills like /debug and /simplify, see the commands reference.
Custom commands have been merged into skills. A file at .claude/commands/deploy.md and a skill at .claude/skills/deploy/SKILL.md both create /deploy and work the same way. Your existing .claude/commands/ files keep working. Skills add optional features: a directory for supporting files, frontmatter to control whether you or Claude invokes them, and the ability for Claude to load them automatically when relevant.
Claude Code skills follow the Agent Skills open standard, which works across multiple AI tools. Claude Code extends the standard with additional features like invocation control, subagent execution, and dynamic context injection.
Bundled skills
Claude Code includes a set of bundled skills that are available in every session, including /simplify, /batch, /debug, /loop, and /claude-api. Unlike built-in commands, which execute fixed logic directly, bundled skills are prompt-based: they give Claude a detailed playbook and let it orchestrate the work using its tools. You invoke them the same way as any other skill, by typing / followed by the skill name.
Bundled skills are listed alongside built-in commands in the commands reference, marked Skill in the Purpose column.
Getting started
Create your first skill
This example creates a skill that teaches Claude to explain code using visual diagrams and analogies. Since it uses default frontmatter, Claude can load it automatically when you ask how something works, or you can invoke it directly with /explain-code.
Create a directory for the skill in your personal skills folder. Personal skills are available across all your projects.
mkdir -p ~/.claude/skills/explain-code
Every skill needs a SKILL.md file with two parts: YAML frontmatter (between --- markers) that tells Claude when to use the skill, and markdown content with instructions Claude follows when the skill is invoked. The name field becomes the /slash-command, and the description helps Claude decide when to load it automatically.
Create ~/.claude/skills/explain-code/SKILL.md:
---
name: explain-code
description: Explains code with visual diagrams and analogies. Use when explaining how code works, teaching about a codebase, or when the user asks "how does this work?"
---

When explaining code, always include:

1. **Start with an analogy**: Compare the code to something from everyday life
2. **Draw a diagram**: Use ASCII art to show the flow, structure, or relationships
3. **Walk through the code**: Explain step-by-step what happens
4. **Highlight a gotcha**: What's a common mistake or misconception?

Keep explanations conversational. For complex concepts, use multiple analogies.
You can test it two ways:
Let Claude invoke it automatically by asking something that matches the description:
How does this code work?
Or invoke it directly with the skill name:
/explain-code src/auth/login.ts
Either way, Claude should include an analogy and ASCII diagram in its explanation.
Where skills live
Where you store a skill determines who can use it:
| Location | Path | Applies to |
|---|---|---|
| Enterprise | See managed settings | All users in your organization |
| Personal | ~/.claude/skills/<skill-name>/SKILL.md |
All your projects |
| Project | .claude/skills/<skill-name>/SKILL.md |
This project only |
| Plugin | <plugin>/skills/<skill-name>/SKILL.md |
Where plugin is enabled |
When skills share the same name across levels, higher-priority locations win: enterprise > personal > project. Plugin skills use a plugin-name:skill-name namespace, so they cannot conflict with other levels. If you have files in .claude/commands/, those work the same way, but if a skill and a command share the same name, the skill takes precedence.
Live change detection
Claude Code watches skill directories for file changes. Adding, editing, or removing a skill under ~/.claude/skills/, the project .claude/skills/, or a .claude/skills/ inside an --add-dir directory takes effect within the current session without restarting. Creating a top-level skills directory that did not exist when the session started requires restarting Claude Code so the new directory can be watched.
Automatic discovery from nested directories
When you work with files in subdirectories, Claude Code automatically discovers skills from nested .claude/skills/ directories. For example, if you're editing a file in packages/frontend/, Claude Code also looks for skills in packages/frontend/.claude/skills/. This supports monorepo setups where packages have their own skills.
Each skill is a directory with SKILL.md as the entrypoint:
my-skill/
├── SKILL.md           # Main instructions (required)
├── template.md        # Template for Claude to fill in
├── examples/
│   └── sample.md      # Example output showing expected format
└── scripts/
    └── validate.sh    # Script Claude can execute
The SKILL.md contains the main instructions and is required. Other files are optional and let you build more powerful skills: templates for Claude to fill in, example outputs showing the expected format, scripts Claude can execute, or detailed reference documentation. Reference these files from your SKILL.md so Claude knows what they contain and when to load them. See Add supporting files for more details.
Note
Files in .claude/commands/ still work and support the same frontmatter. Skills are recommended since they support additional features like supporting files.
Skills from additional directories
The --add-dir flag grants file access rather than configuration discovery, but skills are an exception: .claude/skills/ within an added directory is loaded automatically. See Live change detection for how edits are picked up during a session.
Other .claude/ configuration such as subagents, commands, and output styles is not loaded from additional directories. See the exceptions table for the complete list of what is and isn't loaded, and the recommended ways to share configuration across projects.
Note
CLAUDE.md files from --add-dir directories are not loaded by default. To load them, set CLAUDE_CODE_ADDITIONAL_DIRECTORIES_CLAUDE_MD=1. See Load from additional directories.
Configure skills
Skills are configured through YAML frontmatter at the top of SKILL.md and the markdown content that follows.
Types of skill content
Skill files can contain any instructions, but thinking about how you want to invoke them helps guide what to include:
Reference content adds knowledge Claude applies to your current work. Conventions, patterns, style guides, domain knowledge. This content runs inline so Claude can use it alongside your conversation context.
---
name: api-conventions
description: API design patterns for this codebase
---

When writing API endpoints:
- Use RESTful naming conventions
- Return consistent error formats
- Include request validation
Task content gives Claude step-by-step instructions for a specific action, like deployments, commits, or code generation. These are often actions you want to invoke directly with /skill-name rather than letting Claude decide when to run them. Add disable-model-invocation: true to prevent Claude from triggering it automatically.
---
name: deploy
description: Deploy the application to production
context: fork
disable-model-invocation: true
---

Deploy the application:
1. Run the test suite
2. Build the application
3. Push to the deployment target
Your SKILL.md can contain anything, but thinking through how you want the skill invoked (by you, by Claude, or both) and where you want it to run (inline or in a subagent) helps guide what to include. For complex skills, you can also add supporting files to keep the main skill focused.
Frontmatter reference
Beyond the markdown content, you can configure skill behavior using YAML frontmatter fields between --- markers at the top of your SKILL.md file:
---
name: my-skill
description: What this skill does
disable-model-invocation: true
allowed-tools: Read Grep
---

Your skill instructions here...
All fields are optional. Only description is recommended so Claude knows when to use the skill.
| Field | Required | Description |
|---|---|---|
name |
No | Display name for the skill. If omitted, uses the directory name. Lowercase letters, numbers, and hyphens only (max 64 characters). |
description |
Recommended | What the skill does and when to use it. Claude uses this to decide when to apply the skill. If omitted, uses the first paragraph of markdown content. Front-load the key use case: the combined description and when_to_use text is truncated at 1,536 characters in the skill listing to reduce context usage. |
when_to_use |
No | Additional context for when Claude should invoke the skill, such as trigger phrases or example requests. Appended to description in the skill listing and counts toward the 1,536-character cap. |
argument-hint |
No | Hint shown during autocomplete to indicate expected arguments. Example: [issue-number] or [filename] [format]. |
disable-model-invocation |
No | Set to true to prevent Claude from automatically loading this skill. Use for workflows you want to trigger manually with /name. Default: false. |
user-invocable |
No | Set to false to hide from the / menu. Use for background knowledge users shouldn't invoke directly. Default: true. |
allowed-tools |
No | Tools Claude can use without asking permission when this skill is active. Accepts a space-separated string or a YAML list. |
model |
No | Model to use when this skill is active. |
effort |
No | Effort level when this skill is active. Overrides the session effort level. Default: inherits from session. Options: low, medium, high, max (Opus 4.6 only). |
context |
No | Set to fork to run in a forked subagent context. |
agent |
No | Which subagent type to use when context: fork is set. |
hooks |
No | Hooks scoped to this skill's lifecycle. See Hooks in skills and agents for configuration format. |
paths |
No | Glob patterns that limit when this skill is activated. Accepts a comma-separated string or a YAML list. When set, Claude loads the skill automatically only when working with files matching the patterns. Uses the same format as path-specific rules. |
shell |
No | Shell to use for !`command` and ```! blocks in this skill. Accepts bash (default) or powershell. Setting powershell runs inline shell commands via PowerShell on Windows. Requires CLAUDE_CODE_USE_POWERSHELL_TOOL=1. |
Available string substitutions
Skills support string substitution for dynamic values in the skill content:
| Variable | Description |
|---|---|
$ARGUMENTS |
All arguments passed when invoking the skill. If $ARGUMENTS is not present in the content, arguments are appended as ARGUMENTS: <value>. |
$ARGUMENTS[N] |
Access a specific argument by 0-based index, such as $ARGUMENTS[0] for the first argument. |
$N |
Shorthand for $ARGUMENTS[N], such as $0 for the first argument or $1 for the second. |
${CLAUDE_SESSION_ID} |
The current session ID. Useful for logging, creating session-specific files, or correlating skill output with sessions. |
${CLAUDE_SKILL_DIR} |
The directory containing the skill's SKILL.md file. For plugin skills, this is the skill's subdirectory within the plugin, not the plugin root. Use this in bash injection commands to reference scripts or files bundled with the skill, regardless of the current working directory. |
Indexed arguments use shell-style quoting, so wrap multi-word values in quotes to pass them as a single argument. For example, /my-skill "hello world" second makes $0 expand to hello world and $1 to second. The $ARGUMENTS placeholder always expands to the full argument string as typed.
Example using substitutions:
---
name: session-logger
description: Log activity for this session
---

Log the following to logs/${CLAUDE_SESSION_ID}.log:

$ARGUMENTS
Add supporting files
Skills can include multiple files in their directory. This keeps SKILL.md focused on the essentials while letting Claude access detailed reference material only when needed. Large reference docs, API specifications, or example collections don't need to load into context every time the skill runs.
my-skill/
├── SKILL.md (required - overview and navigation)
├── reference.md (detailed API docs - loaded when needed)
├── examples.md (usage examples - loaded when needed)
└── scripts/
    └── helper.py (utility script - executed, not loaded)
Reference supporting files from SKILL.md so Claude knows what each file contains and when to load it:
## Additional resources

- For complete API details, see [reference.md](reference.md)
- For usage examples, see [examples.md](examples.md)
Tip
Keep SKILL.md under 500 lines. Move detailed reference material to separate files.
Control who invokes a skill
By default, both you and Claude can invoke any skill. You can type /skill-name to invoke it directly, and Claude can load it automatically when relevant to your conversation. Two frontmatter fields let you restrict this:
disable-model-invocation: true: Only you can invoke the skill. Use this for workflows with side effects or that you want to control timing, like/commit,/deploy, or/send-slack-message. You don't want Claude deciding to deploy because your code looks ready.user-invocable: false: Only Claude can invoke the skill. Use this for background knowledge that isn't actionable as a command. Alegacy-system-contextskill explains how an old system works. Claude should know this when relevant, but/legacy-system-contextisn't a meaningful action for users to take.
This example creates a deploy skill that only you can trigger. The disable-model-invocation: true field prevents Claude from running it automatically:
---
name: deploy
description: Deploy the application to production
disable-model-invocation: true
---

Deploy $ARGUMENTS to production:

1. Run the test suite
2. Build the application
3. Push to the deployment target
4. Verify the deployment succeeded
Here's how the two fields affect invocation and context loading:
| Frontmatter | You can invoke | Claude can invoke | When loaded into context |
|---|---|---|---|
| (default) | Yes | Yes | Description always in context, full skill loads when invoked |
disable-model-invocation: true |
Yes | No | Description not in context, full skill loads when you invoke |
user-invocable: false |
No | Yes | Description always in context, full skill loads when invoked |
Note
In a regular session, skill descriptions are loaded into context so Claude knows what's available, but full skill content only loads when invoked. Subagents with preloaded skills work differently: the full skill content is injected at startup.
Skill content lifecycle
When you or Claude invoke a skill, the rendered SKILL.md content enters the conversation as a single message and stays there for the rest of the session. Claude Code does not re-read the skill file on later turns, so write guidance that should apply throughout a task as standing instructions rather than one-time steps.
Auto-compaction carries invoked skills forward within a token budget. When the conversation is summarized to free context, Claude Code re-attaches the most recent invocation of each skill after the summary, keeping the first 5,000 tokens of each. Re-attached skills share a combined budget of 25,000 tokens. Claude Code fills this budget starting from the most recently invoked skill, so older skills can be dropped entirely after compaction if you have invoked many in one session.
If a skill seems to stop influencing behavior after the first response, the content is usually still present and the model is choosing other tools or approaches. Strengthen the skill's description and instructions so the model keeps preferring it, or use hooks to enforce behavior deterministically. If the skill is large or you invoked several others after it, re-invoke it after compaction to restore the full content.
Pre-approve tools for a skill
The allowed-tools field grants permission for the listed tools while the skill is active, so Claude can use them without prompting you for approval. It does not restrict which tools are available: every tool remains callable, and your permission settings still govern tools that are not listed.
This skill lets Claude run git commands without per-use approval whenever you invoke it:
---
name: commit
description: Stage and commit the current changes
disable-model-invocation: true
allowed-tools: Bash(git add *) Bash(git commit *) Bash(git status *)
---
To block a skill from using certain tools, add deny rules in your permission settings instead.
Pass arguments to skills
Both you and Claude can pass arguments when invoking a skill. Arguments are available via the $ARGUMENTS placeholder.
This skill fixes a GitHub issue by number. The $ARGUMENTS placeholder gets replaced with whatever follows the skill name:
---
name: fix-issue
description: Fix a GitHub issue
disable-model-invocation: true
---

Fix GitHub issue $ARGUMENTS following our coding standards.

1. Read the issue description
2. Understand the requirements
3. Implement the fix
4. Write tests
5. Create a commit
When you run /fix-issue 123, Claude receives "Fix GitHub issue 123 following our coding standards..."
If you invoke a skill with arguments but the skill doesn't include $ARGUMENTS, Claude Code appends ARGUMENTS: <your input> to the end of the skill content so Claude still sees what you typed.
To access individual arguments by position, use $ARGUMENTS[N] or the shorter $N:
---
name: migrate-component
description: Migrate a component from one framework to another
---

Migrate the $ARGUMENTS[0] component from $ARGUMENTS[1] to $ARGUMENTS[2].
Preserve all existing behavior and tests.
Running /migrate-component SearchBar React Vue replaces $ARGUMENTS[0] with SearchBar, $ARGUMENTS[1] with React, and $ARGUMENTS[2] with Vue. The same skill using the $N shorthand:
---
name: migrate-component
description: Migrate a component from one framework to another
---

Migrate the $0 component from $1 to $2.
Preserve all existing behavior and tests.
Advanced patterns
Inject dynamic context
The !`<command>` syntax runs shell commands before the skill content is sent to Claude. The command output replaces the placeholder, so Claude receives actual data, not the command itself.
This skill summarizes a pull request by fetching live PR data with the GitHub CLI. The !`gh pr diff` and other commands run first, and their output gets inserted into the prompt:
---
name: pr-summary
description: Summarize changes in a pull request
context: fork
agent: Explore
allowed-tools: Bash(gh *)
---

## Pull request context
- PR diff: !`gh pr diff`
- PR comments: !`gh pr view --comments`
- Changed files: !`gh pr diff --name-only`

## Your task
Summarize this pull request...
When this skill runs:
- Each
!`<command>`executes immediately (before Claude sees anything) - The output replaces the placeholder in the skill content
- Claude receives the fully-rendered prompt with actual PR data
This is preprocessing, not something Claude executes. Claude only sees the final result.
For multi-line commands, use a fenced code block opened with ```! instead of the inline form:
## Environment
```!
node --version
npm --version
git status --short
```
To disable this behavior for skills and custom commands from user, project, plugin, or additional-directory sources, set "disableSkillShellExecution": true in settings. Each command is replaced with [shell command execution disabled by policy] instead of being run. Bundled and managed skills are not affected. This setting is most useful in managed settings, where users cannot override it.
Tip
To enable extended thinking in a skill, include the word "ultrathink" anywhere in your skill content.
Run skills in a subagent
Add context: fork to your frontmatter when you want a skill to run in isolation. The skill content becomes the prompt that drives the subagent. It won't have access to your conversation history.
Warning
context: fork only makes sense for skills with explicit instructions. If your skill contains guidelines like "use these API conventions" without a task, the subagent receives the guidelines but no actionable prompt, and returns without meaningful output.
Skills and subagents work together in two directions:
| Approach | System prompt | Task | Also loads |
|---|---|---|---|
Skill with context: fork |
From agent type (Explore, Plan, etc.) |
SKILL.md content | CLAUDE.md |
Subagent with skills field |
Subagent's markdown body | Claude's delegation message | Preloaded skills + CLAUDE.md |
With context: fork, you write the task in your skill and pick an agent type to execute it. For the inverse (defining a custom subagent that uses skills as reference material), see Subagents.
Example: Research skill using Explore agent
This skill runs research in a forked Explore agent. The skill content becomes the task, and the agent provides read-only tools optimized for codebase exploration:
---
name: deep-research
description: Research a topic thoroughly
context: fork
agent: Explore
---

Research $ARGUMENTS thoroughly:

1. Find relevant files using Glob and Grep
2. Read and analyze the code
3. Summarize findings with specific file references
When this skill runs:
- A new isolated context is created
- The subagent receives the skill content as its prompt ("Research $ARGUMENTS thoroughly...")
- The
agentfield determines the execution environment (model, tools, and permissions) - Results are summarized and returned to your main conversation
The agent field specifies which subagent configuration to use. Options include built-in agents (Explore, Plan, general-purpose) or any custom subagent from .claude/agents/. If omitted, uses general-purpose.
Restrict Claude's skill access
By default, Claude can invoke any skill that doesn't have disable-model-invocation: true set. Skills that define allowed-tools grant Claude access to those tools without per-use approval when the skill is active. Your permission settings still govern baseline approval behavior for all other tools. Built-in commands like /compact and /init are not available through the Skill tool.
Three ways to control which skills Claude can invoke:
Disable all skills by denying the Skill tool in /permissions:
# Add to deny rules:
Skill
Allow or deny specific skills using permission rules:
# Allow only specific skills
Skill(commit)
Skill(review-pr *)

# Deny specific skills
Skill(deploy *)
Permission syntax: Skill(name) for exact match, Skill(name *) for prefix match with any arguments.
Hide individual skills by adding disable-model-invocation: true to their frontmatter. This removes the skill from Claude's context entirely.
Note
The user-invocable field only controls menu visibility, not Skill tool access. Use disable-model-invocation: true to block programmatic invocation.
Share skills
Skills can be distributed at different scopes depending on your audience:
- Project skills: Commit
.claude/skills/to version control - Plugins: Create a
skills/directory in your plugin - Managed: Deploy organization-wide through managed settings
Generate visual output
Skills can bundle and run scripts in any language, giving Claude capabilities beyond what's possible in a single prompt. One powerful pattern is generating visual output: interactive HTML files that open in your browser for exploring data, debugging, or creating reports.
This example creates a codebase explorer: an interactive tree view where you can expand and collapse directories, see file sizes at a glance, and identify file types by color.
Create the Skill directory:
mkdir -p ~/.claude/skills/codebase-visualizer/scripts
Create ~/.claude/skills/codebase-visualizer/SKILL.md. The description tells Claude when to activate this Skill, and the instructions tell Claude to run the bundled script:
---
name: codebase-visualizer
description: Generate an interactive collapsible tree visualization of your codebase. Use when exploring a new repo, understanding project structure, or identifying large files.
allowed-tools: Bash(python *)
---

# Codebase Visualizer

Generate an interactive HTML tree view that shows your project's file structure with collapsible directories.

## Usage

Run the visualization script from your project root:

```bash
python ~/.claude/skills/codebase-visualizer/scripts/visualize.py .
```

This creates `codebase-map.html` in the current directory and opens it in your default browser.

## What the visualization shows

- **Collapsible directories**: Click folders to expand/collapse
- **File sizes**: Displayed next to each file
- **Colors**: Different colors for different file types
- **Directory totals**: Shows aggregate size of each folder
Create ~/.claude/skills/codebase-visualizer/scripts/visualize.py. This script scans a directory tree and generates a self-contained HTML file with:
- A summary sidebar showing file count, directory count, total size, and number of file types
- A bar chart breaking down the codebase by file type (top 8 by size)
- A collapsible tree where you can expand and collapse directories, with color-coded file type indicators
The script requires Python but uses only built-in libraries, so there are no packages to install:
#!/usr/bin/env python3
"""Generate an interactive collapsible tree visualization of a codebase."""

import json
import sys
import webbrowser
from pathlib import Path
from collections import Counter

IGNORE = {'.git', 'node_modules', '__pycache__', '.venv', 'venv', 'dist', 'build'}

def scan(path: Path, stats: dict) -> dict:
    result = {"name": path.name, "children": [], "size": 0}
    try:
        for item in sorted(path.iterdir()):
            if item.name in IGNORE or item.name.startswith('.'):
                continue
            if item.is_file():
                size = item.stat().st_size
                ext = item.suffix.lower() or '(no ext)'
                result["children"].append({"name": item.name, "size": size, "ext": ext})
                result["size"] += size
                stats["files"] += 1
                stats["extensions"][ext] += 1
                stats["ext_sizes"][ext] += size
            elif item.is_dir():
                stats["dirs"] += 1
                child = scan(item, stats)
                if child["children"]:
                    result["children"].append(child)
                    result["size"] += child["size"]
    except PermissionError:
        pass
    return result

def generate_html(data: dict, stats: dict, output: Path) -> None:
    ext_sizes = stats["ext_sizes"]
    total_size = sum(ext_sizes.values()) or 1
    sorted_exts = sorted(ext_sizes.items(), key=lambda x: -x[1])[:8]
    colors = {
        '.js': '#f7df1e', '.ts': '#3178c6', '.py': '#3776ab', '.go': '#00add8',
        '.rs': '#dea584', '.rb': '#cc342d', '.css': '#264de4', '.html': '#e34c26',
        '.json': '#6b7280', '.md': '#083fa1', '.yaml': '#cb171e', '.yml': '#cb171e',
        '.mdx': '#083fa1', '.tsx': '#3178c6', '.jsx': '#61dafb', '.sh': '#4eaa25',
    }
    lang_bars = "".join(
        f'<div class="bar-row"><span class="bar-label">{ext}</span>'
        f'<div class="bar" style="width:{(size/total_size)*100}%;background:{colors.get(ext,"#6b7280")}"></div>'
        f'<span class="bar-pct">{(size/total_size)*100:.1f}%</span></div>'
        for ext, size in sorted_exts
    )
    def fmt(b):
        if b < 1024: return f"{b} B"
        if b < 1048576: return f"{b/1024:.1f} KB"
        return f"{b/1048576:.1f} MB"

    html = f'''<!DOCTYPE html>
<html><head>
  <meta charset="utf-8"><title>Codebase Explorer</title>
  <style>
    body {{ font: 14px/1.5 system-ui, sans-serif; margin: 0; background: #1a1a2e; color: #eee; }}
    .container {{ display: flex; height: 100vh; }}
    .sidebar {{ width: 280px; background: #252542; padding: 20px; border-right: 1px solid #3d3d5c; overflow-y: auto; flex-shrink: 0; }}
    .main {{ flex: 1; padding: 20px; overflow-y: auto; }}
    h1 {{ margin: 0 0 10px 0; font-size: 18px; }}
    h2 {{ margin: 20px 0 10px 0; font-size: 14px; color: #888; text-transform: uppercase; }}
    .stat {{ display: flex; justify-content: space-between; padding: 8px 0; border-bottom: 1px solid #3d3d5c; }}
    .stat-value {{ font-weight: bold; }}
    .bar-row {{ display: flex; align-items: center; margin: 6px 0; }}
    .bar-label {{ width: 55px; font-size: 12px; color: #aaa; }}
    .bar {{ height: 18px; border-radius: 3px; }}
    .bar-pct {{ margin-left: 8px; font-size: 12px; color: #666; }}
    .tree {{ list-style: none; padding-left: 20px; }}
    details {{ cursor: pointer; }}
    summary {{ padding: 4px 8px; border-radius: 4px; }}
    summary:hover {{ background: #2d2d44; }}
    .folder {{ color: #ffd700; }}
    .file {{ display: flex; align-items: center; padding: 4px 8px; border-radius: 4px; }}
    .file:hover {{ background: #2d2d44; }}
    .size {{ color: #888; margin-left: auto; font-size: 12px; }}
    .dot {{ width: 8px; height: 8px; border-radius: 50%; margin-right: 8px; }}
  </style>
</head><body>
  <div class="container">
    <div class="sidebar">
      <h1>📊 Summary</h1>
      <div class="stat"><span>Files</span><span class="stat-value">{stats["files"]:,}</span></div>
      <div class="stat"><span>Directories</span><span class="stat-value">{stats["dirs"]:,}</span></div>
      <div class="stat"><span>Total size</span><span class="stat-value">{fmt(data["size"])}</span></div>
      <div class="stat"><span>File types</span><span class="stat-value">{len(stats["extensions"])}</span></div>
      <h2>By file type</h2>
      {lang_bars}
    </div>
    <div class="main">
      <h1>📁 {data["name"]}</h1>
      <ul class="tree" id="root"></ul>
    </div>
  </div>
  <script>
    const data = {json.dumps(data)};
    const colors = {json.dumps(colors)};
    function fmt(b) {{ if (b < 1024) return b + ' B'; if (b < 1048576) return (b/1024).toFixed(1) + ' KB'; return (b/1048576).toFixed(1) + ' MB'; }}
    function render(node, parent) {{
      if (node.children) {{
        const det = document.createElement('details');
        det.open = parent === document.getElementById('root');
        det.innerHTML = `<summary><span class="folder">📁 ${{node.name}}</span><span class="size">${{fmt(node.size)}}</span></summary>`;
        const ul = document.createElement('ul'); ul.className = 'tree';
        node.children.sort((a,b) => (b.children?1:0)-(a.children?1:0) || a.name.localeCompare(b.name));
        node.children.forEach(c => render(c, ul));
        det.appendChild(ul);
        const li = document.createElement('li'); li.appendChild(det); parent.appendChild(li);
      }} else {{
        const li = document.createElement('li'); li.className = 'file';
        li.innerHTML = `<span class="dot" style="background:${{colors[node.ext]||'#6b7280'}}"></span>${{node.name}}<span class="size">${{fmt(node.size)}}</span>`;
        parent.appendChild(li);
      }}
    }}
    data.children.forEach(c => render(c, document.getElementById('root')));
  </script>
</body></html>'''
    output.write_text(html)

if __name__ == '__main__':
    target = Path(sys.argv[1] if len(sys.argv) > 1 else '.').resolve()
    stats = {"files": 0, "dirs": 0, "extensions": Counter(), "ext_sizes": Counter()}
    data = scan(target, stats)
    out = Path('codebase-map.html')
    generate_html(data, stats, out)
    print(f'Generated {out.absolute()}')
    webbrowser.open(f'file://{out.absolute()}')
To test, open Claude Code in any project and ask "Visualize this codebase." Claude runs the script, generates codebase-map.html, and opens it in your browser.
This pattern works for any visual output: dependency graphs, test coverage reports, API documentation, or database schema visualizations. The bundled script does the heavy lifting while Claude handles orchestration.
Troubleshooting
Skill not triggering
If Claude doesn't use your skill when expected:
- Check the description includes keywords users would naturally say
- Verify the skill appears in
What skills are available? - Try rephrasing your request to match the description more closely
- Invoke it directly with
/skill-nameif the skill is user-invocable
Skill triggers too often
If Claude uses your skill when you don't want it:
- Make the description more specific
- Add
disable-model-invocation: trueif you only want manual invocation
Skill descriptions are cut short
Skill descriptions are loaded into context so Claude knows what's available. All skill names are always included, but if you have many skills, descriptions are shortened to fit the character budget, which can strip the keywords Claude needs to match your request. The budget scales dynamically at 1% of the context window, with a fallback of 8,000 characters.
To raise the limit, set the SLASH_COMMAND_TOOL_CHAR_BUDGET environment variable. Or trim the description and when_to_use text at the source: front-load the key use case, since each entry's combined text is capped at 1,536 characters regardless of budget.
Related resources
- Subagents: delegate tasks to specialized agents
- Plugins: package and distribute skills with other extensions
- Hooks: automate workflows around tool events
- Memory: manage CLAUDE.md files for persistent context
- Commands: reference for built-in commands and bundled skills
- Permissions: control tool and skill access
Automate workflows with hooks
Run shell commands automatically when Claude Code edits files, finishes tasks, or needs input. Format code, send notifications, validate commands, and enforce project rules.
Hooks are user-defined shell commands that execute at specific points in Claude Code's lifecycle. They provide deterministic control over Claude Code's behavior, ensuring certain actions always happen rather than relying on the LLM to choose to run them. Use hooks to enforce project rules, automate repetitive tasks, and integrate Claude Code with your existing tools.
For decisions that require judgment rather than deterministic rules, you can also use prompt-based hooks or agent-based hooks that use a Claude model to evaluate conditions.
For other ways to extend Claude Code, see skills for giving Claude additional instructions and executable commands, subagents for running tasks in isolated contexts, and plugins for packaging extensions to share across projects.
Tip
This guide covers common use cases and how to get started. For full event schemas, JSON input/output formats, and advanced features like async hooks and MCP tool hooks, see the Hooks reference.
Set up your first hook
To create a hook, add a hooks block to a settings file. This walkthrough creates a desktop notification hook, so you get alerted whenever Claude is waiting for your input instead of watching the terminal.
Open ~/.claude/settings.json and add a Notification hook. The example below uses osascript for macOS; see Get notified when Claude needs input for Linux and Windows commands.
{
  "hooks": {
    "Notification": [
      {
        "matcher": "",
        "hooks": [
          {
            "type": "command",
            "command": "osascript -e 'display notification \"Claude Code needs your attention\" with title \"Claude Code\"'"
          }
        ]
      }
    ]
  }
}
If your settings file already has a hooks key, add Notification as a sibling of the existing event keys rather than replacing the whole object. Each event name is a key inside the single hooks object:
{
  "hooks": {
    "PostToolUse": [
      {
        "matcher": "Edit|Write",
        "hooks": [{ "type": "command", "command": "jq -r '.tool_input.file_path' | xargs npx prettier --write" }]
      }
    ],
    "Notification": [
      {
        "matcher": "",
        "hooks": [{ "type": "command", "command": "osascript -e 'display notification \"Claude Code needs your attention\" with title \"Claude Code\"'" }]
      }
    ]
  }
}
You can also ask Claude to write the hook for you by describing what you want in the CLI.
Type /hooks to open the hooks browser. You'll see a list of all available hook events, with a count next to each event that has hooks configured. Select Notification to confirm your new hook appears in the list. Selecting the hook shows its details: the event, matcher, type, source file, and command.
Press Esc to return to the CLI. Ask Claude to do something that requires permission, then switch away from the terminal. You should receive a desktop notification.
Tip
The /hooks menu is read-only. To add, modify, or remove hooks, edit your settings JSON directly or ask Claude to make the change.
What you can automate
Hooks let you run code at key points in Claude Code's lifecycle: format files after edits, block commands before they execute, send notifications when Claude needs input, inject context at session start, and more. For the full list of hook events, see the Hooks reference.
Each example includes a ready-to-use configuration block that you add to a settings file. The most common patterns:
- Get notified when Claude needs input
- Auto-format code after edits
- Block edits to protected files
- Re-inject context after compaction
- Audit configuration changes
- Reload environment when directory or files change
- Auto-approve specific permission prompts
Get notified when Claude needs input
Get a desktop notification whenever Claude finishes working and needs your input, so you can switch to other tasks without checking the terminal.
This hook uses the Notification event, which fires when Claude is waiting for input or permission. Each tab below uses the platform's native notification command. Add this to ~/.claude/settings.json:
- macOS
- Linux
- Windows (PowerShell)
{
  "hooks": {
    "Notification": [
      {
        "matcher": "",
        "hooks": [
          {
            "type": "command",
            "command": "osascript -e 'display notification \"Claude Code needs your attention\" with title \"Claude Code\"'"
          }
        ]
      }
    ]
  }
}
If no notification appears
osascript routes notifications through the built-in Script Editor app. If Script Editor doesn't have notification permission, the command fails silently, and macOS won't prompt you to grant it. Run this in Terminal once to make Script Editor appear in your notification settings:
osascript -e 'display notification "test"'
Nothing will appear yet. Open System Settings > Notifications, find Script Editor in the list, and turn on Allow Notifications. Run the command again to confirm the test notification appears.
{
  "hooks": {
    "Notification": [
      {
        "matcher": "",
        "hooks": [
          {
            "type": "command",
            "command": "notify-send 'Claude Code' 'Claude Code needs your attention'"
          }
        ]
      }
    ]
  }
}
{
  "hooks": {
    "Notification": [
      {
        "matcher": "",
        "hooks": [
          {
            "type": "command",
            "command": "powershell.exe -Command \"[System.Reflection.Assembly]::LoadWithPartialName('System.Windows.Forms'); [System.Windows.Forms.MessageBox]::Show('Claude Code needs your attention', 'Claude Code')\""
          }
        ]
      }
    ]
  }
}
Auto-format code after edits
Automatically run Prettier on every file Claude edits, so formatting stays consistent without manual intervention.
This hook uses the PostToolUse event with an Edit|Write matcher, so it runs only after file-editing tools. The command extracts the edited file path with jq and passes it to Prettier. Add this to .claude/settings.json in your project root:
{
  "hooks": {
    "PostToolUse": [
      {
        "matcher": "Edit|Write",
        "hooks": [
          {
            "type": "command",
            "command": "jq -r '.tool_input.file_path' | xargs npx prettier --write"
          }
        ]
      }
    ]
  }
}
Note
The Bash examples on this page use jq for JSON parsing. Install it with brew install jq (macOS), apt-get install jq (Debian/Ubuntu), or see jq downloads.
Block edits to protected files
Prevent Claude from modifying sensitive files like .env, package-lock.json, or anything in .git/. Claude receives feedback explaining why the edit was blocked, so it can adjust its approach.
This example uses a separate script file that the hook calls. The script checks the target file path against a list of protected patterns and exits with code 2 to block the edit.
Save this to .claude/hooks/protect-files.sh:
#!/bin/bash
# protect-files.sh

INPUT=$(cat)
FILE_PATH=$(echo "$INPUT" | jq -r '.tool_input.file_path // empty')

PROTECTED_PATTERNS=(".env" "package-lock.json" ".git/")

for pattern in "${PROTECTED_PATTERNS[@]}"; do
  if [[ "$FILE_PATH" == *"$pattern"* ]]; then
    echo "Blocked: $FILE_PATH matches protected pattern '$pattern'" >&2
    exit 2
  fi
done

exit 0
Hook scripts must be executable for Claude Code to run them:
chmod +x .claude/hooks/protect-files.sh
Add a PreToolUse hook to .claude/settings.json that runs the script before any Edit or Write tool call:
{
  "hooks": {
    "PreToolUse": [
      {
        "matcher": "Edit|Write",
        "hooks": [
          {
            "type": "command",
            "command": "\"$CLAUDE_PROJECT_DIR\"/.claude/hooks/protect-files.sh"
          }
        ]
      }
    ]
  }
}
Re-inject context after compaction
When Claude's context window fills up, compaction summarizes the conversation to free space. This can lose important details. Use a SessionStart hook with a compact matcher to re-inject critical context after every compaction.
Any text your command writes to stdout is added to Claude's context. This example reminds Claude of project conventions and recent work. Add this to .claude/settings.json in your project root:
{
  "hooks": {
    "SessionStart": [
      {
        "matcher": "compact",
        "hooks": [
          {
            "type": "command",
            "command": "echo 'Reminder: use Bun, not npm. Run bun test before committing. Current sprint: auth refactor.'"
          }
        ]
      }
    ]
  }
}
You can replace the echo with any command that produces dynamic output, like git log --oneline -5 to show recent commits. For injecting context on every session start, consider using CLAUDE.md instead. For environment variables, see CLAUDE_ENV_FILE in the reference.
Audit configuration changes
Track when settings or skills files change during a session. The ConfigChange event fires when an external process or editor modifies a configuration file, so you can log changes for compliance or block unauthorized modifications.
This example appends each change to an audit log. Add this to ~/.claude/settings.json:
{
  "hooks": {
    "ConfigChange": [
      {
        "matcher": "",
        "hooks": [
          {
            "type": "command",
            "command": "jq -c '{timestamp: now | todate, source: .source, file: .file_path}' >> ~/claude-config-audit.log"
          }
        ]
      }
    ]
  }
}
The matcher filters by configuration type: user_settings, project_settings, local_settings, policy_settings, or skills. To block a change from taking effect, exit with code 2 or return {"decision": "block"}. See the ConfigChange reference for the full input schema.
Reload environment when directory or files change
Some projects set different environment variables depending on which directory you are in. Tools like direnv do this automatically in your shell, but Claude's Bash tool does not pick up those changes on its own.
A CwdChanged hook fixes this: it runs each time Claude changes directory, so you can reload the correct variables for the new location. The hook writes the updated values to CLAUDE_ENV_FILE, which Claude Code applies before each Bash command. Add this to ~/.claude/settings.json:
{
  "hooks": {
    "CwdChanged": [
      {
        "hooks": [
          {
            "type": "command",
            "command": "direnv export bash >> \"$CLAUDE_ENV_FILE\""
          }
        ]
      }
    ]
  }
}
To react to specific files instead of every directory change, use FileChanged with a matcher listing the filenames to watch, separated by |. To build the watch list, this value is split into literal filenames rather than evaluated as a regex. See FileChanged for how the same value also filters which hook groups run when a file changes. This example watches .envrc and .env in the working directory:
{
  "hooks": {
    "FileChanged": [
      {
        "matcher": ".envrc|.env",
        "hooks": [
          {
            "type": "command",
            "command": "direnv export bash >> \"$CLAUDE_ENV_FILE\""
          }
        ]
      }
    ]
  }
}
See the CwdChanged and FileChanged reference entries for input schemas, watchPaths output, and CLAUDE_ENV_FILE details.
Auto-approve specific permission prompts
Skip the approval dialog for tool calls you always allow. This example auto-approves ExitPlanMode, the tool Claude calls when it finishes presenting a plan and asks to proceed, so you aren't prompted every time a plan is ready.
Unlike the exit-code examples above, auto-approval requires your hook to write a JSON decision to stdout. A PermissionRequest hook fires when Claude Code is about to show a permission dialog, and returning "behavior": "allow" answers it on your behalf.
The matcher scopes the hook to ExitPlanMode only, so no other prompts are affected. Add this to ~/.claude/settings.json:
{
  "hooks": {
    "PermissionRequest": [
      {
        "matcher": "ExitPlanMode",
        "hooks": [
          {
            "type": "command",
            "command": "echo '{\"hookSpecificOutput\": {\"hookEventName\": \"PermissionRequest\", \"decision\": {\"behavior\": \"allow\"}}}'"
          }
        ]
      }
    ]
  }
}
When the hook approves, Claude Code exits plan mode and restores whatever permission mode was active before you entered plan mode. The transcript shows "Allowed by PermissionRequest hook" where the dialog would have appeared. The hook path always keeps the current conversation: it cannot clear context and start a fresh implementation session the way the dialog can.
To set a specific permission mode instead, your hook's output can include an updatedPermissions array with a setMode entry. The mode value is any permission mode like default, acceptEdits, or bypassPermissions, and destination: "session" applies it for the current session only.
To switch the session to acceptEdits, your hook writes this JSON to stdout:
{
  "hookSpecificOutput": {
    "hookEventName": "PermissionRequest",
    "decision": {
      "behavior": "allow",
      "updatedPermissions": [
        { "type": "setMode", "mode": "acceptEdits", "destination": "session" }
      ]
    }
  }
}
Keep the matcher as narrow as possible. Matching on .* or leaving the matcher empty would auto-approve every permission prompt, including file writes and shell commands. See the PermissionRequest reference for the full set of decision fields.
How hooks work
Hook events fire at specific lifecycle points in Claude Code. When an event fires, all matching hooks run in parallel, and identical hook commands are automatically deduplicated. The table below shows each event and when it triggers:
| Event | When it fires |
|---|---|
SessionStart |
When a session begins or resumes |
UserPromptSubmit |
When you submit a prompt, before Claude processes it |
PreToolUse |
Before a tool call executes. Can block it |
PermissionRequest |
When a permission dialog appears |
PermissionDenied |
When a tool call is denied by the auto mode classifier. Return {retry: true} to tell the model it may retry the denied tool call |
PostToolUse |
After a tool call succeeds |
PostToolUseFailure |
After a tool call fails |
Notification |
When Claude Code sends a notification |
SubagentStart |
When a subagent is spawned |
SubagentStop |
When a subagent finishes |
TaskCreated |
When a task is being created via TaskCreate |
TaskCompleted |
When a task is being marked as completed |
Stop |
When Claude finishes responding |
StopFailure |
When the turn ends due to an API error. Output and exit code are ignored |
TeammateIdle |
When an agent team teammate is about to go idle |
InstructionsLoaded |
When a CLAUDE.md or .claude/rules/*.md file is loaded into context. Fires at session start and when files are lazily loaded during a session |
ConfigChange |
When a configuration file changes during a session |
CwdChanged |
When the working directory changes, for example when Claude executes a cd command. Useful for reactive environment management with tools like direnv |
FileChanged |
When a watched file changes on disk. The matcher field specifies which filenames to watch |
WorktreeCreate |
When a worktree is being created via --worktree or isolation: "worktree". Replaces default git behavior |
WorktreeRemove |
When a worktree is being removed, either at session exit or when a subagent finishes |
PreCompact |
Before context compaction |
PostCompact |
After context compaction completes |
Elicitation |
When an MCP server requests user input during a tool call |
ElicitationResult |
After a user responds to an MCP elicitation, before the response is sent back to the server |
SessionEnd |
When a session terminates |
When multiple hooks match, each one returns its own result. For decisions, Claude Code picks the most restrictive answer. A PreToolUse hook returning deny cancels the tool call no matter what the others return. One hook returning ask forces the permission prompt even if the rest return allow. Text from additionalContext is kept from every hook and passed to Claude together.
Each hook has a type that determines how it runs. Most hooks use "type": "command", which runs a shell command. Three other types are available:
"type": "http": POST event data to a URL. See HTTP hooks."type": "prompt": single-turn LLM evaluation. See Prompt-based hooks."type": "agent": multi-turn verification with tool access. See Agent-based hooks.
Read input and return output
Hooks communicate with Claude Code through stdin, stdout, stderr, and exit codes. When an event fires, Claude Code passes event-specific data as JSON to your script's stdin. Your script reads that data, does its work, and tells Claude Code what to do next via the exit code.
Hook input
Every event includes common fields like session_id and cwd, but each event type adds different data. For example, when Claude runs a Bash command, a PreToolUse hook receives something like this on stdin:
{
  "session_id": "abc123",          // unique ID for this session
  "cwd": "/Users/sarah/myproject", // working directory when the event fired
  "hook_event_name": "PreToolUse", // which event triggered this hook
  "tool_name": "Bash",             // the tool Claude is about to use
  "tool_input": {                  // the arguments Claude passed to the tool
    "command": "npm test"          // for Bash, this is the shell command
  }
}
Your script can parse that JSON and act on any of those fields. UserPromptSubmit hooks get the prompt text instead, SessionStart hooks get the source (startup, resume, clear, compact), and so on. See Common input fields in the reference for shared fields, and each event's section for event-specific schemas.
Hook output
Your script tells Claude Code what to do next by writing to stdout or stderr and exiting with a specific code. For example, a PreToolUse hook that wants to block a command:
#!/bin/bash
INPUT=$(cat)
COMMAND=$(echo "$INPUT" | jq -r '.tool_input.command')

if echo "$COMMAND" | grep -q "drop table"; then
  echo "Blocked: dropping tables is not allowed" >&2  # stderr becomes Claude's feedback
  exit 2                                               # exit 2 = block the action
fi

exit 0  # exit 0 = let it proceed
The exit code determines what happens next:
- Exit 0: the action proceeds. For
UserPromptSubmitandSessionStarthooks, anything you write to stdout is added to Claude's context. - Exit 2: the action is blocked. Write a reason to stderr, and Claude receives it as feedback so it can adjust.
- Any other exit code: the action proceeds. The transcript shows a
<hook name> hook errornotice followed by the first line of stderr; the full stderr goes to the debug log.
Structured JSON output
Exit codes give you two options: allow or block. For more control, exit 0 and print a JSON object to stdout instead.
Note
Use exit 2 to block with a stderr message, or exit 0 with JSON for structured control. Don't mix them: Claude Code ignores JSON when you exit 2.
For example, a PreToolUse hook can deny a tool call and tell Claude why, or escalate it to the user for approval:
{
  "hookSpecificOutput": {
    "hookEventName": "PreToolUse",
    "permissionDecision": "deny",
    "permissionDecisionReason": "Use rg instead of grep for better performance"
  }
}
With "deny", Claude Code cancels the tool call and feeds permissionDecisionReason back to Claude. These permissionDecision values are specific to PreToolUse:
"allow": skip the interactive permission prompt. Deny and ask rules, including enterprise managed deny lists, still apply"deny": cancel the tool call and send the reason to Claude"ask": show the permission prompt to the user as normal
A fourth value, "defer", is available in non-interactive mode with the -p flag. It exits the process with the tool call preserved so an Agent SDK wrapper can collect input and resume. See Defer a tool call for later in the reference.
Returning "allow" skips the interactive prompt but does not override permission rules. If a deny rule matches the tool call, the call is blocked even when your hook returns "allow". If an ask rule matches, the user is still prompted. This means deny rules from any settings scope, including managed settings, always take precedence over hook approvals.
Other events use different decision patterns. For example, PostToolUse and Stop hooks use a top-level decision: "block" field, while PermissionRequest uses hookSpecificOutput.decision.behavior. See the summary table in the reference for a full breakdown by event.
For UserPromptSubmit hooks, use additionalContext instead to inject text into Claude's context. Prompt-based hooks (type: "prompt") handle output differently: see Prompt-based hooks.
Filter hooks with matchers
Without a matcher, a hook fires on every occurrence of its event. Matchers let you narrow that down. For example, if you want to run a formatter only after file edits (not after every tool call), add a matcher to your PostToolUse hook:
{
  "hooks": {
    "PostToolUse": [
      {
        "matcher": "Edit|Write",
        "hooks": [
          { "type": "command", "command": "prettier --write ..." }
        ]
      }
    ]
  }
}
The "Edit|Write" matcher fires only when Claude uses the Edit or Write tool, not when it uses Bash, Read, or any other tool. See Matcher patterns for how plain names and regular expressions are evaluated.
Each event type matches on a specific field:
| Event | What the matcher filters | Example matcher values |
|---|---|---|
PreToolUse, PostToolUse, PostToolUseFailure, PermissionRequest, PermissionDenied |
tool name | Bash, Edit|Write, mcp__.* |
SessionStart |
how the session started | startup, resume, clear, compact |
SessionEnd |
why the session ended | clear, resume, logout, prompt_input_exit, bypass_permissions_disabled, other |
Notification |
notification type | permission_prompt, idle_prompt, auth_success, elicitation_dialog |
SubagentStart |
agent type | Bash, Explore, Plan, or custom agent names |
PreCompact, PostCompact |
what triggered compaction | manual, auto |
SubagentStop |
agent type | same values as SubagentStart |
ConfigChange |
configuration source | user_settings, project_settings, local_settings, policy_settings, skills |
StopFailure |
error type | rate_limit, authentication_failed, billing_error, invalid_request, server_error, max_output_tokens, unknown |
InstructionsLoaded |
load reason | session_start, nested_traversal, path_glob_match, include, compact |
Elicitation |
MCP server name | your configured MCP server names |
ElicitationResult |
MCP server name | same values as Elicitation |
FileChanged |
literal filenames to watch (see FileChanged) | .envrc|.env |
UserPromptSubmit, Stop, TeammateIdle, TaskCreated, TaskCompleted, WorktreeCreate, WorktreeRemove, CwdChanged |
no matcher support | always fires on every occurrence |
A few more examples showing matchers on different event types:
- Log every Bash command
- Match MCP tools
- Clean up on session end
Match only Bash tool calls and log each command to a file. The PostToolUse event fires after the command completes, so tool_input.command contains what ran. The hook receives the event data as JSON on stdin, and jq -r '.tool_input.command' extracts just the command string, which >> appends to the log file:
{
  "hooks": {
    "PostToolUse": [
      {
        "matcher": "Bash",
        "hooks": [
          {
            "type": "command",
            "command": "jq -r '.tool_input.command' >> ~/.claude/command-log.txt"
          }
        ]
      }
    ]
  }
}
MCP tools use a different naming convention than built-in tools: mcp__<server>__<tool>, where <server> is the MCP server name and <tool> is the tool it provides. For example, mcp__github__search_repositories or mcp__filesystem__read_file. Use a regex matcher to target all tools from a specific server, or match across servers with a pattern like mcp__.*__write.*. See Match MCP tools in the reference for the full list of examples.
The command below extracts the tool name from the hook's JSON input with jq and writes it to stderr. Writing to stderr keeps stdout clean for JSON output and sends the message to the debug log:
{
  "hooks": {
    "PreToolUse": [
      {
        "matcher": "mcp__github__.*",
        "hooks": [
          {
            "type": "command",
            "command": "echo \"GitHub tool called: $(jq -r '.tool_name')\" >&2"
          }
        ]
      }
    ]
  }
}
The SessionEnd event supports matchers on the reason the session ended. This hook only fires on clear (when you run /clear), not on normal exits:
{
  "hooks": {
    "SessionEnd": [
      {
        "matcher": "clear",
        "hooks": [
          {
            "type": "command",
            "command": "rm -f /tmp/claude-scratch-*.txt"
          }
        ]
      }
    ]
  }
}
For full matcher syntax, see the Hooks reference.
Filter by tool name and arguments with the if field
Note
The if field requires Claude Code v2.1.85 or later. Earlier versions ignore it and run the hook on every matched call.
The if field uses permission rule syntax to filter hooks by tool name and arguments together, so the hook process only spawns when the tool call matches. This goes beyond matcher, which filters at the group level by tool name only.
For example, to run a hook only when Claude uses git commands rather than all Bash commands:
{
  "hooks": {
    "PreToolUse": [
      {
        "matcher": "Bash",
        "hooks": [
          {
            "type": "command",
            "if": "Bash(git *)",
            "command": "\"$CLAUDE_PROJECT_DIR\"/.claude/hooks/check-git-policy.sh"
          }
        ]
      }
    ]
  }
}
The hook process only spawns when the Bash command starts with git. Other Bash commands skip this handler entirely. The if field accepts the same patterns as permission rules: "Bash(git *)", "Edit(*.ts)", and so on. To match multiple tool names, use separate handlers each with its own if value, or match at the matcher level where pipe alternation is supported.
if only works on tool events: PreToolUse, PostToolUse, PostToolUseFailure, PermissionRequest, and PermissionDenied. Adding it to any other event prevents the hook from running.
Configure hook location
Where you add a hook determines its scope:
| Location | Scope | Shareable |
|---|---|---|
~/.claude/settings.json |
All your projects | No, local to your machine |
.claude/settings.json |
Single project | Yes, can be committed to the repo |
.claude/settings.local.json |
Single project | No, gitignored |
| Managed policy settings | Organization-wide | Yes, admin-controlled |
Plugin hooks/hooks.json |
When plugin is enabled | Yes, bundled with the plugin |
| Skill or agent frontmatter | While the skill or agent is active | Yes, defined in the component file |
Run /hooks in Claude Code to browse all configured hooks grouped by event. To disable all hooks at once, set "disableAllHooks": true in your settings file.
If you edit settings files directly while Claude Code is running, the file watcher normally picks up hook changes automatically.
Prompt-based hooks
For decisions that require judgment rather than deterministic rules, use type: "prompt" hooks. Instead of running a shell command, Claude Code sends your prompt and the hook's input data to a Claude model (Haiku by default) to make the decision. You can specify a different model with the model field if you need more capability.
The model's only job is to return a yes/no decision as JSON:
"ok": true: the action proceeds"ok": false: the action is blocked. The model's"reason"is fed back to Claude so it can adjust.
This example uses a Stop hook to ask the model whether all requested tasks are complete. If the model returns "ok": false, Claude keeps working and uses the reason as its next instruction:
{
  "hooks": {
    "Stop": [
      {
        "hooks": [
          {
            "type": "prompt",
            "prompt": "Check if all tasks are complete. If not, respond with {\"ok\": false, \"reason\": \"what remains to be done\"}."
          }
        ]
      }
    ]
  }
}
For full configuration options, see Prompt-based hooks in the reference.
Agent-based hooks
When verification requires inspecting files or running commands, use type: "agent" hooks. Unlike prompt hooks which make a single LLM call, agent hooks spawn a subagent that can read files, search code, and use other tools to verify conditions before returning a decision.
Agent hooks use the same "ok" / "reason" response format as prompt hooks, but with a longer default timeout of 60 seconds and up to 50 tool-use turns.
This example verifies that tests pass before allowing Claude to stop:
{
  "hooks": {
    "Stop": [
      {
        "hooks": [
          {
            "type": "agent",
            "prompt": "Verify that all unit tests pass. Run the test suite and check the results. $ARGUMENTS",
            "timeout": 120
          }
        ]
      }
    ]
  }
}
Use prompt hooks when the hook input data alone is enough to make a decision. Use agent hooks when you need to verify something against the actual state of the codebase.
For full configuration options, see Agent-based hooks in the reference.
HTTP hooks
Use type: "http" hooks to POST event data to an HTTP endpoint instead of running a shell command. The endpoint receives the same JSON that a command hook would receive on stdin, and returns results through the HTTP response body using the same JSON format.
HTTP hooks are useful when you want a web server, cloud function, or external service to handle hook logic: for example, a shared audit service that logs tool use events across a team.
This example posts every tool use to a local logging service:
{
  "hooks": {
    "PostToolUse": [
      {
        "hooks": [
          {
            "type": "http",
            "url": "http://localhost:8080/hooks/tool-use",
            "headers": {
              "Authorization": "Bearer $MY_TOKEN"
            },
            "allowedEnvVars": ["MY_TOKEN"]
          }
        ]
      }
    ]
  }
}
The endpoint should return a JSON response body using the same output format as command hooks. To block a tool call, return a 2xx response with the appropriate hookSpecificOutput fields. HTTP status codes alone cannot block actions.
Header values support environment variable interpolation using $VAR_NAME or ${VAR_NAME} syntax. Only variables listed in the allowedEnvVars array are resolved; all other $VAR references remain empty.
For full configuration options and response handling, see HTTP hooks in the reference.
Limitations and troubleshooting
Limitations
- Command hooks communicate through stdout, stderr, and exit codes only. They cannot trigger
/commands or tool calls. Text returned viaadditionalContextis injected as a system reminder that Claude reads as plain text. HTTP hooks communicate through the response body instead. - Hook timeout is 10 minutes by default, configurable per hook with the
timeoutfield (in seconds). PostToolUsehooks cannot undo actions since the tool has already executed.PermissionRequesthooks do not fire in non-interactive mode (-p). UsePreToolUsehooks for automated permission decisions.Stophooks fire whenever Claude finishes responding, not only at task completion. They do not fire on user interrupts. API errors fire StopFailure instead.- When multiple PreToolUse hooks return
updatedInputto rewrite a tool's arguments, the last one to finish wins. Since hooks run in parallel, the order is non-deterministic. Avoid having more than one hook modify the same tool's input.
Hooks and permission modes
PreToolUse hooks fire before any permission-mode check. A hook that returns permissionDecision: "deny" blocks the tool even in bypassPermissions mode or with --dangerously-skip-permissions. This lets you enforce policy that users cannot bypass by changing their permission mode.
The reverse is not true: a hook returning "allow" does not bypass deny rules from settings. Hooks can tighten restrictions but not loosen them past what permission rules allow.
Hook not firing
The hook is configured but never executes.
- Run
/hooksand confirm the hook appears under the correct event - Check that the matcher pattern matches the tool name exactly (matchers are case-sensitive)
- Verify you're triggering the right event type (e.g.,
PreToolUsefires before tool execution,PostToolUsefires after) - If using
PermissionRequesthooks in non-interactive mode (-p), switch toPreToolUseinstead
Hook error in output
You see a message like "PreToolUse hook error: ..." in the transcript.
- Your script exited with a non-zero code unexpectedly. Test it manually by piping sample JSON:
echo '{"tool_name":"Bash","tool_input":{"command":"ls"}}' | ./my-hook.sh echo $? # Check the exit code - If you see "command not found", use absolute paths or
$CLAUDE_PROJECT_DIRto reference scripts - If you see "jq: command not found", install
jqor use Python/Node.js for JSON parsing - If the script isn't running at all, make it executable:
chmod +x ./my-hook.sh
/hooks shows no hooks configured
You edited a settings file but the hooks don't appear in the menu.
- File edits are normally picked up automatically. If they haven't appeared after a few seconds, the file watcher may have missed the change: restart your session to force a reload.
- Verify your JSON is valid (trailing commas and comments are not allowed)
- Confirm the settings file is in the correct location:
.claude/settings.jsonfor project hooks,~/.claude/settings.jsonfor global hooks
Stop hook runs forever
Claude keeps working in an infinite loop instead of stopping.
Your Stop hook script needs to check whether it already triggered a continuation. Parse the stop_hook_active field from the JSON input and exit early if it's true:
#!/bin/bash
INPUT=$(cat)
if [ "$(echo "$INPUT" | jq -r '.stop_hook_active')" = "true" ]; then
  exit 0  # Allow Claude to stop
fi
# ... rest of your hook logic
JSON validation failed
Claude Code shows a JSON parsing error even though your hook script outputs valid JSON.
When Claude Code runs a hook, it spawns a shell that sources your profile (~/.zshrc or ~/.bashrc). If your profile contains unconditional echo statements, that output gets prepended to your hook's JSON:
Shell ready on arm64
{"decision": "block", "reason": "Not allowed"}
Claude Code tries to parse this as JSON and fails. To fix this, wrap echo statements in your shell profile so they only run in interactive shells:
# In ~/.zshrc or ~/.bashrc
if [[ $- == *i* ]]; then
  echo "Shell ready"
fi
The $- variable contains shell flags, and i means interactive. Hooks run in non-interactive shells, so the echo is skipped.
Debug techniques
The transcript view, toggled with Ctrl+O, shows a one-line summary for each hook that fired: success is silent, blocking errors show stderr, and non-blocking errors show a <hook name> hook error notice followed by the first line of stderr.
For full execution details including which hooks matched, their exit codes, stdout, and stderr, read the debug log. Start Claude Code with claude --debug-file /tmp/claude.log to write to a known path, then tail -f /tmp/claude.log in another terminal. If you started without that flag, run /debug mid-session to enable logging and find the log path.
Learn more
- Hooks reference: full event schemas, JSON output format, async hooks, and MCP tool hooks
- Security considerations: review before deploying hooks in shared or production environments
- Bash command validator example: complete reference implementation
Push events into a running session with channels
Use channels to push messages, alerts, and webhooks into your Claude Code session from an MCP server. Forward CI results, chat messages, and monitoring events so Claude can react while you're away.
Note
Channels are in research preview and require Claude Code v2.1.80 or later. They require claude.ai login. Console and API key authentication is not supported. Team and Enterprise organizations must explicitly enable them.
A channel is an MCP server that pushes events into your running Claude Code session, so Claude can react to things that happen while you're not at the terminal. Channels can be two-way: Claude reads the event and replies back through the same channel, like a chat bridge. Events only arrive while the session is open, so for an always-on setup you run Claude in a background process or persistent terminal.
Unlike integrations that spawn a fresh cloud session or wait to be polled, the event arrives in the session you already have open: see how channels compare.
You install a channel as a plugin and configure it with your own credentials. Telegram, Discord, and iMessage are included in the research preview.
When Claude replies through a channel, you see the inbound message in your terminal but not the reply text. The terminal shows the tool call and a confirmation (like "sent"), and the actual reply appears on the other platform.
This page covers:
- Supported channels: Telegram, Discord, and iMessage setup
- Install and run a channel with fakechat, a localhost demo
- Who can push messages: sender allowlists and how you pair
- Enable channels for your organization on Team and Enterprise
- How channels compare to web sessions, Slack, MCP, and Remote Control
To build your own channel, see the Channels reference.
Supported channels
Each supported channel is a plugin that requires Bun. For a hands-on demo of the plugin flow before connecting a real platform, try the fakechat quickstart.
- Telegram
- Discord
- iMessage
View the full Telegram plugin source.
Open BotFather in Telegram and send /newbot. Give it a display name and a unique username ending in bot. Copy the token BotFather returns.
In Claude Code, run:
/plugin install telegram@claude-plugins-official
If Claude Code reports that the plugin is not found in any marketplace, your marketplace is either missing or outdated. Run /plugin marketplace update claude-plugins-official to refresh it, or /plugin marketplace add anthropics/claude-plugins-official if you haven't added it before. Then retry the install.
After installing, run /reload-plugins to activate the plugin's configure command.
Run the configure command with the token from BotFather:
/telegram:configure <token>
This saves it to ~/.claude/channels/telegram/.env. You can also set TELEGRAM_BOT_TOKEN in your shell environment before launching Claude Code.
Exit Claude Code and restart with the channel flag. This starts the Telegram plugin, which begins polling for messages from your bot:
claude --channels plugin:telegram@claude-plugins-official
Open Telegram and send any message to your bot. The bot replies with a pairing code.
Note
If your bot doesn't respond, make sure Claude Code is running with --channels from the previous step. The bot can only reply while the channel is active.
Back in Claude Code, run:
/telegram:access pair <code>
Then lock down access so only your account can send messages:
/telegram:access policy allowlist
View the full Discord plugin source.
Go to the Discord Developer Portal, click New Application, and name it. In the Bot section, create a username, then click Reset Token and copy the token.
In your bot's settings, scroll to Privileged Gateway Intents and enable Message Content Intent.
Go to OAuth2 > URL Generator. Select the bot scope and enable these permissions:
- View Channels
- Send Messages
- Send Messages in Threads
- Read Message History
- Attach Files
- Add Reactions
Open the generated URL to add the bot to your server.
In Claude Code, run:
/plugin install discord@claude-plugins-official
If Claude Code reports that the plugin is not found in any marketplace, your marketplace is either missing or outdated. Run /plugin marketplace update claude-plugins-official to refresh it, or /plugin marketplace add anthropics/claude-plugins-official if you haven't added it before. Then retry the install.
After installing, run /reload-plugins to activate the plugin's configure command.
Run the configure command with the bot token you copied:
/discord:configure <token>
This saves it to ~/.claude/channels/discord/.env. You can also set DISCORD_BOT_TOKEN in your shell environment before launching Claude Code.
Exit Claude Code and restart with the channel flag. This connects the Discord plugin so your bot can receive and respond to messages:
claude --channels plugin:discord@claude-plugins-official
DM your bot on Discord. The bot replies with a pairing code.
Note
If your bot doesn't respond, make sure Claude Code is running with --channels from the previous step. The bot can only reply while the channel is active.
Back in Claude Code, run:
/discord:access pair <code>
Then lock down access so only your account can send messages:
/discord:access policy allowlist
View the full iMessage plugin source.
The iMessage channel reads your Messages database directly and sends replies through AppleScript. It requires macOS and needs no bot token or external service.
The Messages database at ~/Library/Messages/chat.db is protected by macOS. The first time the server reads it, macOS prompts for access: click Allow. The prompt names whichever app launched Bun, such as Terminal, iTerm, or your IDE.
If the prompt doesn't appear or you clicked Don't Allow, grant access manually under System Settings > Privacy & Security > Full Disk Access and add your terminal. Without this, the server exits immediately with authorization denied.
In Claude Code, run:
/plugin install imessage@claude-plugins-official
If Claude Code reports that the plugin is not found in any marketplace, your marketplace is either missing or outdated. Run /plugin marketplace update claude-plugins-official to refresh it, or /plugin marketplace add anthropics/claude-plugins-official if you haven't added it before. Then retry the install.
Exit Claude Code and restart with the channel flag:
claude --channels plugin:imessage@claude-plugins-official
Open Messages on any device signed into your Apple ID and send a message to yourself. It reaches Claude immediately: self-chat bypasses access control with no setup.
Note
The first reply Claude sends triggers a macOS Automation prompt asking if your terminal can control Messages. Click OK.
By default, only your own messages pass through. To let another contact reach Claude, add their handle:
/imessage:access allow +15551234567
Handles are phone numbers in +country format or Apple ID emails like [email protected].
You can also build your own channel for systems that don't have a plugin yet.
Quickstart
Fakechat is an officially supported demo channel that runs a chat UI on localhost, with nothing to authenticate and no external service to configure.
Once you install and enable fakechat, you can type in the browser and the message arrives in your Claude Code session. Claude replies, and the reply shows up back in the browser. After you've tested the fakechat interface, try out Telegram, Discord, or iMessage.
To try the fakechat demo, you'll need:
- Claude Code installed and authenticated with a claude.ai account
- Bun installed. The pre-built channel plugins are Bun scripts. Check with
bun --version; if that fails, install Bun. - Team/Enterprise users: your organization admin must enable channels in managed settings
Start a Claude Code session and run the install command:
/plugin install fakechat@claude-plugins-official
If Claude Code reports that the plugin is not found in any marketplace, your marketplace is either missing or outdated. Run /plugin marketplace update claude-plugins-official to refresh it, or /plugin marketplace add anthropics/claude-plugins-official if you haven't added it before. Then retry the install.
Exit Claude Code, then restart with --channels and pass the fakechat plugin you installed:
claude --channels plugin:fakechat@claude-plugins-official
The fakechat server starts automatically.
Tip
You can pass several plugins to --channels, space-separated.
Open the fakechat UI at http://localhost:8787 and type a message:
hey, what's in my working directory?
The message arrives in your Claude Code session as a <channel source="fakechat"> event. Claude reads it, does the work, and calls fakechat's reply tool. The answer shows up in the chat UI.
If Claude hits a permission prompt while you're away from the terminal, the session pauses until you respond. Channel servers that declare the permission relay capability can forward these prompts to you so you can approve or deny remotely. For unattended use, --dangerously-skip-permissions bypasses prompts entirely, but only use it in environments you trust.
Security
Every approved channel plugin maintains a sender allowlist: only IDs you've added can push messages, and everyone else is silently dropped.
Telegram and Discord bootstrap the list by pairing:
- Find your bot in Telegram or Discord and send it any message
- The bot replies with a pairing code
- In your Claude Code session, approve the code when prompted
- Your sender ID is added to the allowlist
iMessage works differently: texting yourself bypasses the gate automatically, and you add other contacts by handle with /imessage:access allow.
On top of that, you control which servers are enabled each session with --channels, and on Team and Enterprise plans your organization controls availability with channelsEnabled.
Being in .mcp.json isn't enough to push messages: a server also has to be named in --channels.
The allowlist also gates permission relay if the channel declares it. Anyone who can reply through the channel can approve or deny tool use in your session, so only allowlist senders you trust with that authority.
Enterprise controls
On Team and Enterprise plans, channels are off by default. Admins control availability through two managed settings that users cannot override:
| Setting | Purpose | When not configured |
|---|---|---|
channelsEnabled |
Master switch. Must be true for any channel to deliver messages. Set via the claude.ai Admin console toggle or directly in managed settings. Blocks all channels including the development flag when off. |
Channels blocked |
allowedChannelPlugins |
Which plugins can register once channels are enabled. Replaces the Anthropic-maintained list when set. Only applies when channelsEnabled is true. |
Anthropic default list applies |
Pro and Max users without an organization skip these checks entirely: channels are available and users opt in per session with --channels.
Enable channels for your organization
Admins can enable channels from claude.ai → Admin settings → Claude Code → Channels, or by setting channelsEnabled to true in managed settings.
Once enabled, users in your organization can use --channels to opt channel servers into individual sessions. If the setting is disabled or unset, the MCP server still connects and its tools work, but channel messages won't arrive. A startup warning tells the user to have an admin enable the setting.
Restrict which channel plugins can run
By default, any plugin on the Anthropic-maintained allowlist can register as a channel. Admins on Team and Enterprise plans can replace that allowlist with their own by setting allowedChannelPlugins in managed settings. Use this to restrict which official plugins are allowed, approve channels from your own internal marketplace, or both. Each entry names a plugin and the marketplace it comes from:
{
  "channelsEnabled": true,
  "allowedChannelPlugins": [
    { "marketplace": "claude-plugins-official", "plugin": "telegram" },
    { "marketplace": "claude-plugins-official", "plugin": "discord" },
    { "marketplace": "acme-corp-plugins", "plugin": "internal-alerts" }
  ]
}
When allowedChannelPlugins is set, it replaces the Anthropic allowlist entirely: only the listed plugins can register. Leave it unset to fall back to the default Anthropic allowlist. An empty array blocks all channel plugins from the allowlist, but --dangerously-load-development-channels can still bypass it for local testing. To block channels entirely including the development flag, leave channelsEnabled unset instead.
This setting requires channelsEnabled: true. If a user passes a plugin to --channels that isn't on your list, Claude Code starts normally but the channel doesn't register, and the startup notice explains that the plugin isn't on the organization's approved list.
Research preview
Channels are a research preview feature. Availability is rolling out gradually, and the --channels flag syntax and protocol contract may change based on feedback.
During the preview, --channels only accepts plugins from an Anthropic-maintained allowlist, or from your organization's allowlist if an admin has set allowedChannelPlugins. The channel plugins in claude-plugins-official are the default approved set. If you pass something that isn't on the effective allowlist, Claude Code starts normally but the channel doesn't register, and the startup notice tells you why.
To test a channel you're building, use --dangerously-load-development-channels. See Test during the research preview for information about testing custom channels that you build.
Report issues or feedback on the Claude Code GitHub repository.
How channels compare
Several Claude Code features connect to systems outside the terminal, each suited to a different kind of work:
| Feature | What it does | Good for |
|---|---|---|
| Claude Code on the web | Runs tasks in a fresh cloud sandbox, cloned from GitHub | Delegating self-contained async work you check on later |
| Claude in Slack | Spawns a web session from an @Claude mention in a channel or thread |
Starting tasks directly from team conversation context |
| Standard MCP server | Claude queries it during a task; nothing is pushed to the session | Giving Claude on-demand access to read or query a system |
| Remote Control | You drive your local session from claude.ai or the Claude mobile app | Steering an in-progress session while away from your desk |
Channels fill the gap in that list by pushing events from non-Claude sources into your already-running local session.
- Chat bridge: ask Claude something from your phone via Telegram, Discord, or iMessage, and the answer comes back in the same chat while the work runs on your machine against your real files.
- Webhook receiver: a webhook from CI, your error tracker, a deploy pipeline, or other external service arrives where Claude already has your files open and remembers what you were debugging.
Next steps
Once you have a channel running, explore these related features:
- Build your own channel for systems that don't have plugins yet
- Remote Control to drive a local session from your phone instead of forwarding events into it
- Scheduled tasks to poll on a timer instead of reacting to pushed events
Run prompts on a schedule
Use /loop and the cron scheduling tools to run prompts repeatedly, poll for status, or set one-time reminders within a Claude Code session.
Note
Scheduled tasks require Claude Code v2.1.72 or later. Check your version with claude --version.
Scheduled tasks let Claude re-run a prompt automatically on an interval. Use them to poll a deployment, babysit a PR, check back on a long-running build, or remind yourself to do something later in the session. To react to events as they happen instead of polling, see Channels: your CI can push the failure into the session directly.
Tasks are session-scoped: they live in the current Claude Code process and are gone when you exit. For durable scheduling that survives restarts, use Cloud or Desktop scheduled tasks, or GitHub Actions.
Compare scheduling options
Claude Code offers three ways to schedule recurring work:
| Cloud | Desktop | /loop |
|
|---|---|---|---|
| Runs on | Anthropic cloud | Your machine | Your machine |
| Requires machine on | No | Yes | Yes |
| Requires open session | No | No | Yes |
| Persistent across restarts | Yes | Yes | No (session-scoped) |
| Access to local files | No (fresh clone) | Yes | Yes |
| MCP servers | Connectors configured per task | Config files and connectors | Inherits from session |
| Permission prompts | No (runs autonomously) | Configurable per task | Inherits from session |
| Customizable schedule | Via /schedule in the CLI |
Yes | Yes |
| Minimum interval | 1 hour | 1 minute | 1 minute |
Tip
Use cloud tasks for work that should run reliably without your machine. Use Desktop tasks when you need access to local files and tools. Use /loop for quick polling during a session.
Run a prompt repeatedly with /loop
The /loop bundled skill is the quickest way to run a prompt on repeat while the session stays open. Both the interval and the prompt are optional, and what you provide determines how the loop behaves.
| What you provide | Example | What happens |
|---|---|---|
| Interval and prompt | /loop 5m check the deploy |
Your prompt runs on a fixed schedule |
| Prompt only | /loop check the deploy |
Your prompt runs at an interval Claude chooses each iteration |
| Interval only, or nothing | /loop |
The built-in maintenance prompt runs, or your loop.md if one exists |
You can also pass another command as the prompt, for example /loop 20m /review-pr 1234, to re-run a packaged workflow each iteration.
Run on a fixed interval
When you supply an interval, Claude converts it to a cron expression, schedules the job, and confirms the cadence and job ID.
/loop 5m check if the deployment finished and tell me what happened
The interval can lead the prompt as a bare token like 30m, or trail it as a clause like every 2 hours. Supported units are s for seconds, m for minutes, h for hours, and d for days.
Seconds are rounded up to the nearest minute since cron has one-minute granularity. Intervals that don't map to a clean cron step, such as 7m or 90m, are rounded to the nearest interval that does and Claude tells you what it picked.
Let Claude choose the interval
When you omit the interval, Claude chooses one dynamically instead of running on a fixed cron schedule. After each iteration it picks a delay between one minute and one hour based on what it observed: short waits while a build is finishing or a PR is active, longer waits when nothing is pending. The chosen delay and the reason for it are printed at the end of each iteration.
The example below checks CI and review comments, with Claude waiting longer between iterations once the PR goes quiet:
/loop check whether CI passed and address any review comments
When you ask for a dynamic /loop schedule, Claude may use the Monitor tool directly. Monitor runs a background script and streams each output line back, which avoids polling altogether and is often more token-efficient and responsive than re-running a prompt on an interval.
A dynamically scheduled loop appears in your scheduled task list like any other task, so you can list or cancel it the same way. The jitter rules don't apply to it, but the seven-day expiry does: the loop ends automatically seven days after you start it.
Note
On Bedrock, Vertex AI, and Microsoft Foundry, a prompt with no interval runs on a fixed 10-minute schedule instead.
Run the built-in maintenance prompt
When you omit the prompt, Claude uses a built-in maintenance prompt instead of one you supply. On each iteration it works through the following, in order:
- continue any unfinished work from the conversation
- tend to the current branch's pull request: review comments, failed CI runs, merge conflicts
- run cleanup passes such as bug hunts or simplification when nothing else is pending
Claude does not start new initiatives outside that scope, and irreversible actions such as pushing or deleting only proceed when they continue something the transcript already authorized.
/loop
A bare /loop runs this prompt at a dynamically chosen interval. Add an interval, for example /loop 15m, to run it on a fixed schedule instead. To replace the built-in prompt with your own default, see Customize the default prompt with loop.md.
Note
On Bedrock, Vertex AI, and Microsoft Foundry, /loop with no prompt prints the usage message instead of starting the maintenance loop.
Customize the default prompt with loop.md
A loop.md file replaces the built-in maintenance prompt with your own instructions. It defines a single default prompt for bare /loop, not a list of separate scheduled tasks, and is ignored whenever you supply a prompt on the command line. To schedule additional prompts alongside it, use /loop <prompt> or ask Claude directly.
Claude looks for the file in two locations and uses the first one it finds.
| Path | Scope |
|---|---|
.claude/loop.md |
Project-level. Takes precedence when both files exist. |
~/.claude/loop.md |
User-level. Applies in any project that does not define its own. |
The file is plain Markdown with no required structure. Write it as if you were typing the /loop prompt directly. The following example keeps a release branch healthy:
Check the `release/next` PR. If CI is red, pull the failing job log,
diagnose, and push a minimal fix. If new review comments have arrived,
address each one and resolve the thread. If everything is green and
quiet, say so in one line.
Edits to loop.md take effect on the next iteration, so you can refine the instructions while a loop is running. When no loop.md exists in either location, the loop falls back to the built-in maintenance prompt. Keep the file concise: content beyond 25,000 bytes is truncated.
Set a one-time reminder
For one-shot reminders, describe what you want in natural language instead of using /loop. Claude schedules a single-fire task that deletes itself after running.
remind me at 3pm to push the release branch
in 45 minutes, check whether the integration tests passed
Claude pins the fire time to a specific minute and hour using a cron expression and confirms when it will fire.
Manage scheduled tasks
Ask Claude in natural language to list or cancel tasks, or reference the underlying tools directly.
what scheduled tasks do I have?
cancel the deploy check job
Under the hood, Claude uses these tools:
| Tool | Purpose |
|---|---|
CronCreate |
Schedule a new task. Accepts a 5-field cron expression, the prompt to run, and whether it recurs or fires once. |
CronList |
List all scheduled tasks with their IDs, schedules, and prompts. |
CronDelete |
Cancel a task by ID. |
Each scheduled task has an 8-character ID you can pass to CronDelete. A session can hold up to 50 scheduled tasks at once.
How scheduled tasks run
The scheduler checks every second for due tasks and enqueues them at low priority. A scheduled prompt fires between your turns, not while Claude is mid-response. If Claude is busy when a task comes due, the prompt waits until the current turn ends.
All times are interpreted in your local timezone. A cron expression like 0 9 * * * means 9am wherever you're running Claude Code, not UTC.
Jitter
To avoid every session hitting the API at the same wall-clock moment, the scheduler adds a small deterministic offset to fire times:
- Recurring tasks fire up to 10% of their period late, capped at 15 minutes. An hourly job might fire anywhere from
:00to:06. - One-shot tasks scheduled for the top or bottom of the hour fire up to 90 seconds early.
The offset is derived from the task ID, so the same task always gets the same offset. If exact timing matters, pick a minute that is not :00 or :30, for example 3 9 * * * instead of 0 9 * * *, and the one-shot jitter will not apply.
Seven-day expiry
Recurring tasks automatically expire 7 days after creation. The task fires one final time, then deletes itself. This bounds how long a forgotten loop can run. If you need a recurring task to last longer, cancel and recreate it before it expires, or use Cloud scheduled tasks or Desktop scheduled tasks for durable scheduling.
Cron expression reference
CronCreate accepts standard 5-field cron expressions: minute hour day-of-month month day-of-week. All fields support wildcards (*), single values (5), steps (*/15), ranges (1-5), and comma-separated lists (1,15,30).
| Example | Meaning |
|---|---|
*/5 * * * * |
Every 5 minutes |
0 * * * * |
Every hour on the hour |
7 * * * * |
Every hour at 7 minutes past |
0 9 * * * |
Every day at 9am local |
0 9 * * 1-5 |
Weekdays at 9am local |
30 14 15 3 * |
March 15 at 2:30pm local |
Day-of-week uses 0 or 7 for Sunday through 6 for Saturday. Extended syntax like L, W, ?, and name aliases such as MON or JAN is not supported.
When both day-of-month and day-of-week are constrained, a date matches if either field matches. This follows standard vixie-cron semantics.
Disable scheduled tasks
Set CLAUDE_CODE_DISABLE_CRON=1 in your environment to disable the scheduler entirely. The cron tools and /loop become unavailable, and any already-scheduled tasks stop firing. See Environment variables for the full list of disable flags.
Limitations
Session-scoped scheduling has inherent constraints:
- Tasks only fire while Claude Code is running and idle. Closing the terminal or letting the session exit cancels everything.
- No catch-up for missed fires. If a task's scheduled time passes while Claude is busy on a long-running request, it fires once when Claude becomes idle, not once per missed interval.
- No persistence across restarts. Restarting Claude Code clears all session-scoped tasks.
For cron-driven automation that needs to run unattended:
- Cloud scheduled tasks: run on Anthropic-managed infrastructure
- GitHub Actions: use a
scheduletrigger in CI
Run Claude Code programmatically
Use the Agent SDK to run Claude Code programmatically from the CLI, Python, or TypeScript.
The Agent SDK gives you the same tools, agent loop, and context management that power Claude Code. It's available as a CLI for scripts and CI/CD, or as Python and TypeScript packages for full programmatic control.
Note
The CLI was previously called "headless mode." The -p flag and all CLI options work the same way.
To run Claude Code programmatically from the CLI, pass -p with your prompt and any CLI options:
claude -p "Find and fix the bug in auth.py" --allowedTools "Read,Edit,Bash"
This page covers using the Agent SDK via the CLI (claude -p). For the Python and TypeScript SDK packages with structured outputs, tool approval callbacks, and native message objects, see the full Agent SDK documentation.
Basic usage
Add the -p (or --print) flag to any claude command to run it non-interactively. All CLI options work with -p, including:
--continuefor continuing conversations--allowedToolsfor auto-approving tools--output-formatfor structured output
This example asks Claude a question about your codebase and prints the response:
claude -p "What does the auth module do?"
Start faster with bare mode
Add --bare to reduce startup time by skipping auto-discovery of hooks, skills, plugins, MCP servers, auto memory, and CLAUDE.md. Without it, claude -p loads the same context an interactive session would, including anything configured in the working directory or ~/.claude.
Bare mode is useful for CI and scripts where you need the same result on every machine. A hook in a teammate's ~/.claude or an MCP server in the project's .mcp.json won't run, because bare mode never reads them. Only flags you pass explicitly take effect.
This example runs a one-off summarize task in bare mode and pre-approves the Read tool so the call completes without a permission prompt:
claude --bare -p "Summarize this file" --allowedTools "Read"
In bare mode Claude has access to the Bash, file read, and file edit tools. Pass any context you need with a flag:
| To load | Use |
|---|---|
| System prompt additions | --append-system-prompt, --append-system-prompt-file |
| Settings | --settings <file-or-json> |
| MCP servers | --mcp-config <file-or-json> |
| Custom agents | --agents <json> |
| A plugin directory | --plugin-dir <path> |
Bare mode skips OAuth and keychain reads. Anthropic authentication must come from ANTHROPIC_API_KEY or an apiKeyHelper in the JSON passed to --settings. Bedrock, Vertex, and Foundry use their usual provider credentials.
Note
--bare is the recommended mode for scripted and SDK calls, and will become the default for -p in a future release.
Examples
These examples highlight common CLI patterns. For CI and other scripted calls, add --bare so they don't pick up whatever happens to be configured locally.
Get structured output
Use --output-format to control how responses are returned:
text(default): plain text outputjson: structured JSON with result, session ID, and metadatastream-json: newline-delimited JSON for real-time streaming
This example returns a project summary as JSON with session metadata, with the text result in the result field:
claude -p "Summarize this project" --output-format json
To get output conforming to a specific schema, use --output-format json with --json-schema and a JSON Schema definition. The response includes metadata about the request (session ID, usage, etc.) with the structured output in the structured_output field.
This example extracts function names and returns them as an array of strings:
claude -p "Extract the main function names from auth.py" \
  --output-format json \
  --json-schema '{"type":"object","properties":{"functions":{"type":"array","items":{"type":"string"}}},"required":["functions"]}'
Tip
Use a tool like jq to parse the response and extract specific fields:
# Extract the text result
claude -p "Summarize this project" --output-format json | jq -r '.result'

# Extract structured output
claude -p "Extract function names from auth.py" \
  --output-format json \
  --json-schema '{"type":"object","properties":{"functions":{"type":"array","items":{"type":"string"}}},"required":["functions"]}' \
  | jq '.structured_output'
Stream responses
Use --output-format stream-json with --verbose and --include-partial-messages to receive tokens as they're generated. Each line is a JSON object representing an event:
claude -p "Explain recursion" --output-format stream-json --verbose --include-partial-messages
The following example uses jq to filter for text deltas and display just the streaming text. The -r flag outputs raw strings (no quotes) and -j joins without newlines so tokens stream continuously:
claude -p "Write a poem" --output-format stream-json --verbose --include-partial-messages | \
  jq -rj 'select(.type == "stream_event" and .event.delta.type? == "text_delta") | .event.delta.text'
When an API request fails with a retryable error, Claude Code emits a system/api_retry event before retrying. You can use this to surface retry progress or implement custom backoff logic.
| Field | Type | Description |
|---|---|---|
type |
"system" |
message type |
subtype |
"api_retry" |
identifies this as a retry event |
attempt |
integer | current attempt number, starting at 1 |
max_retries |
integer | total retries permitted |
retry_delay_ms |
integer | milliseconds until the next attempt |
error_status |
integer or null | HTTP status code, or null for connection errors with no HTTP response |
error |
string | error category: authentication_failed, billing_error, rate_limit, invalid_request, server_error, max_output_tokens, or unknown |
uuid |
string | unique event identifier |
session_id |
string | session the event belongs to |
For programmatic streaming with callbacks and message objects, see Stream responses in real-time in the Agent SDK documentation.
Auto-approve tools
Use --allowedTools to let Claude use certain tools without prompting. This example runs a test suite and fixes failures, allowing Claude to execute Bash commands and read/edit files without asking for permission:
claude -p "Run the test suite and fix any failures" \
  --allowedTools "Bash,Read,Edit"
To set a baseline for the whole session instead of listing individual tools, pass a permission mode. dontAsk denies anything not in your permissions.allow rules, which is useful for locked-down CI runs. acceptEdits lets Claude write files without prompting and also auto-approves common filesystem commands such as mkdir, touch, mv, and cp. Other shell commands and network requests still need an --allowedTools entry or a permissions.allow rule, otherwise the run aborts when one is attempted:
claude -p "Apply the lint fixes" --permission-mode acceptEdits
Create a commit
This example reviews staged changes and creates a commit with an appropriate message:
claude -p "Look at my staged changes and create an appropriate commit" \
  --allowedTools "Bash(git diff *),Bash(git log *),Bash(git status *),Bash(git commit *)"
The --allowedTools flag uses permission rule syntax. The trailing * enables prefix matching, so Bash(git diff *) allows any command starting with git diff. The space before * is important: without it, Bash(git diff*) would also match git diff-index.
Note
User-invoked skills like /commit and built-in commands are only available in interactive mode. In -p mode, describe the task you want to accomplish instead.
Customize the system prompt
Use --append-system-prompt to add instructions while keeping Claude Code's default behavior. This example pipes a PR diff to Claude and instructs it to review for security vulnerabilities:
gh pr diff "$1" | claude -p \
  --append-system-prompt "You are a security engineer. Review for vulnerabilities." \
  --output-format json
See system prompt flags for more options including --system-prompt to fully replace the default prompt.
Continue conversations
Use --continue to continue the most recent conversation, or --resume with a session ID to continue a specific conversation. This example runs a review, then sends follow-up prompts:
# First request
claude -p "Review this codebase for performance issues"

# Continue the most recent conversation
claude -p "Now focus on the database queries" --continue
claude -p "Generate a summary of all issues found" --continue
If you're running multiple conversations, capture the session ID to resume a specific one:
session_id=$(claude -p "Start a review" --output-format json | jq -r '.session_id')
claude -p "Continue that review" --resume "$session_id"
Next steps
- Agent SDK quickstart: build your first agent with Python or TypeScript
- CLI reference: all CLI flags and options
- GitHub Actions: use the Agent SDK in GitHub workflows
- GitLab CI/CD: use the Agent SDK in GitLab pipelines
Troubleshooting
Discover solutions to common issues with Claude Code installation and usage.
Troubleshoot installation issues
Find the error message or symptom you're seeing:
| What you see | Solution |
|---|---|
command not found: claude or 'claude' is not recognized |
Fix your PATH |
syntax error near unexpected token '<' |
Install script returns HTML |
curl: (56) Failure writing output to destination |
Download script first, then run it |
Killed during install on Linux |
Add swap space for low-memory servers |
TLS connect error or SSL/TLS secure channel |
Update CA certificates |
Failed to fetch version or can't reach download server |
Check network and proxy settings |
irm is not recognized or && is not valid |
Use the right command for your shell |
'bash' is not recognized as the name of a cmdlet |
Use the Windows installer command |
Claude Code on Windows requires git-bash |
Install or configure Git Bash |
Claude Code does not support 32-bit Windows |
Open Windows PowerShell, not the x86 entry |
Error loading shared library |
Wrong binary variant for your system |
Illegal instruction on Linux |
Architecture mismatch |
dyld: cannot load, dyld: Symbol not found, or Abort trap on macOS |
Binary incompatibility |
Invoke-Expression: Missing argument in parameter list |
Install script returns HTML |
App unavailable in region |
Claude Code is not available in your country. See supported countries. |
unable to get local issuer certificate |
Configure corporate CA certificates |
OAuth error or 403 Forbidden |
Fix authentication |
If your issue isn't listed, work through these diagnostic steps.
Debug installation problems
Check network connectivity
The installer downloads from storage.googleapis.com. Verify you can reach it:
curl -sI https://storage.googleapis.com
If this fails, your network may be blocking the connection. Common causes:
- Corporate firewalls or proxies blocking Google Cloud Storage
- Regional network restrictions: try a VPN or alternative network
- TLS/SSL issues: update your system's CA certificates, or check if
HTTPS_PROXYis configured
If you're behind a corporate proxy, set HTTPS_PROXY and HTTP_PROXY to your proxy's address before installing. Ask your IT team for the proxy URL if you don't know it, or check your browser's proxy settings.
This example sets both proxy variables, then runs the installer through your proxy:
export HTTP_PROXY=http://proxy.example.com:8080
export HTTPS_PROXY=http://proxy.example.com:8080
curl -fsSL https://claude.ai/install.sh | bash
Verify your PATH
If installation succeeded but you get a command not found or not recognized error when running claude, the install directory isn't in your PATH. Your shell searches for programs in directories listed in PATH, and the installer places claude at ~/.local/bin/claude on macOS/Linux or %USERPROFILE%\.local\bin\claude.exe on Windows.
Check if the install directory is in your PATH by listing your PATH entries and filtering for local/bin:
- macOS/Linux
- Windows PowerShell
echo $PATH | tr ':' '\n' | grep local/bin
If there's no output, the directory is missing. Add it to your shell configuration:
# Zsh (macOS default)
echo 'export PATH="$HOME/.local/bin:$PATH"' >> ~/.zshrc
source ~/.zshrcBash (Linux default)
echo 'export PATH="$HOME/.local/bin:$PATH"' >> ~/.bashrc
source ~/.bashrc
Alternatively, close and reopen your terminal.
Verify the fix worked:
claude --version
$env:PATH -split ';' | Select-String 'local\\bin'
If there's no output, add the install directory to your User PATH:
$currentPath = [Environment]::GetEnvironmentVariable('PATH', 'User')
[Environment]::SetEnvironmentVariable('PATH', "$currentPath;$env:USERPROFILE\.local\bin", 'User')
Restart your terminal for the change to take effect.
Verify the fix worked:
claude --version
Check for conflicting installations
Multiple Claude Code installations can cause version mismatches or unexpected behavior. Check what's installed:
- macOS/Linux
- Windows PowerShell
List all claude binaries found in your PATH:
which -a claude
Check whether the native installer and npm versions are present:
ls -la ~/.local/bin/claude
ls -la ~/.claude/local/
npm -g ls @anthropic-ai/claude-code 2>/dev/null
where.exe claude
Test-Path "$env:LOCALAPPDATA\Claude Code\claude.exe"
If you find multiple installations, keep only one. The native install at ~/.local/bin/claude is recommended. Remove any extra installations:
Uninstall an npm global install:
npm uninstall -g @anthropic-ai/claude-code
Remove a Homebrew install on macOS (use claude-code@latest if you installed that cask):
brew uninstall --cask claude-code
Check directory permissions
The installer needs write access to ~/.local/bin/ and ~/.claude/. If installation fails with permission errors, check whether these directories are writable:
test -w ~/.local/bin && echo "writable" || echo "not writable"
test -w ~/.claude && echo "writable" || echo "not writable"
If either directory isn't writable, create the install directory and set your user as the owner:
sudo mkdir -p ~/.local/bin
sudo chown -R $(whoami) ~/.local
Verify the binary works
If claude is installed but crashes or hangs on startup, run these checks to narrow down the cause.
Confirm the binary exists and is executable:
ls -la $(which claude)
On Linux, check for missing shared libraries. If ldd shows missing libraries, you may need to install system packages. On Alpine Linux and other musl-based distributions, see Alpine Linux setup.
ldd $(which claude) | grep "not found"
Run a quick sanity check that the binary can execute:
claude --version
Common installation issues
These are the most frequently encountered installation problems and their solutions.
Install script returns HTML instead of a shell script
When running the install command, you may see one of these errors:
bash: line 1: syntax error near unexpected token `<'
bash: line 1: `<!DOCTYPE html>'
On PowerShell, the same problem appears as:
Invoke-Expression: Missing argument in parameter list.
This means the install URL returned an HTML page instead of the install script. If the HTML page says "App unavailable in region," Claude Code is not available in your country. See supported countries.
Otherwise, this can happen due to network issues, regional routing, or a temporary service disruption.
Solutions:
Use an alternative install method:
On macOS or Linux, install via Homebrew:
brew install --cask claude-codeRetry after a few minutes: the issue is often temporary. Wait and try the original command again.
command not found: claude after installation
The install finished but claude doesn't work. The exact error varies by platform:
| Platform | Error message |
|---|---|
| macOS | zsh: command not found: claude |
| Linux | bash: claude: command not found |
| PowerShell | claude : The term 'claude' is not recognized as the name of a cmdlet |
This means the install directory isn't in your shell's search path. See Verify your PATH for the fix on each platform.
curl: (56) Failure writing output to destination
The curl ... | bash command downloads the script and passes it directly to Bash for execution using a pipe (|). This error means the connection broke before the script finished downloading. Common causes include network interruptions, the download being blocked mid-stream, or system resource limits.
Solutions:
Check network stability: Claude Code binaries are hosted on Google Cloud Storage. Test that you can reach it:
curl -fsSL https://storage.googleapis.com -o /dev/nullIf the command completes silently, your connection is fine and the issue is likely intermittent. Retry the install command. If you see an error, your network may be blocking the download.
Try an alternative install method:
On macOS or Linux:
brew install --cask claude-code
TLS or SSL connection errors
Errors like curl: (35) TLS connect error, schannel: next InitializeSecurityContext failed, or PowerShell's Could not establish trust relationship for the SSL/TLS secure channel indicate TLS handshake failures.
Solutions:
Update your system CA certificates:
On Ubuntu/Debian:
sudo apt-get update && sudo apt-get install ca-certificatesOn macOS via Homebrew:
brew install ca-certificatesOn Windows, enable TLS 1.2 in PowerShell before running the installer:
[Net.ServicePointManager]::SecurityProtocol = [Net.SecurityProtocolType]::Tls12
irm https://claude.ai/install.ps1 | iex
Check for proxy or firewall interference: corporate proxies that perform TLS inspection can cause these errors, including
unable to get local issuer certificate. SetNODE_EXTRA_CA_CERTSto your corporate CA certificate bundle:export NODE_EXTRA_CA_CERTS=/path/to/corporate-ca.pemAsk your IT team for the certificate file if you don't have it. You can also try on a direct connection to confirm the proxy is the cause.
On Windows, bypass certificate revocation checks if you see
CRYPT_E_NO_REVOCATION_CHECK (0x80092012)orCRYPT_E_REVOCATION_OFFLINE (0x80092013). These mean curl reached the server but your network blocks the certificate revocation lookup, which is common behind corporate firewalls. Add--ssl-revoke-best-effortto the install command:curl --ssl-revoke-best-effort -fsSL https://claude.ai/install.cmd -o install.cmd && install.cmd && del install.cmd
Failed to fetch version from storage.googleapis.com
The installer couldn't reach the download server. This typically means storage.googleapis.com is blocked on your network.
Solutions:
Test connectivity directly:
curl -sI https://storage.googleapis.comIf behind a proxy, set
HTTPS_PROXYso the installer can route through it. See proxy configuration for details.export HTTPS_PROXY=http://proxy.example.com:8080 curl -fsSL https://claude.ai/install.sh | bashIf on a restricted network, try a different network or VPN, or use an alternative install method:
On macOS or Linux:
brew install --cask claude-code
Windows: wrong install command
If you see 'irm' is not recognized, The token '&&' is not valid, or 'bash' is not recognized as the name of a cmdlet, you copied the install command for a different shell or operating system.
irmnot recognized: you're in CMD, not PowerShell. You have two options:Open PowerShell by searching for "PowerShell" in the Start menu, then run the original install command:
irm https://claude.ai/install.ps1 | iexOr stay in CMD and use the CMD installer instead:
curl -fsSL https://claude.ai/install.cmd -o install.cmd && install.cmd && del install.cmd&¬ valid: you're in PowerShell but ran the CMD installer command. Use the PowerShell installer:irm https://claude.ai/install.ps1 | iexbashnot recognized: you ran the macOS/Linux installer on Windows. Use the PowerShell installer instead:irm https://claude.ai/install.ps1 | iex
Install killed on low-memory Linux servers
If you see Killed during installation on a VPS or cloud instance:
Setting up Claude Code...
Installing Claude Code native build latest...
bash: line 142: 34803 Killed    "$binary_path" install ${TARGET:+"$TARGET"}
The Linux OOM killer terminated the process because the system ran out of memory. Claude Code requires at least 4 GB of available RAM.
Solutions:
Add swap space if your server has limited RAM. Swap uses disk space as overflow memory, letting the install complete even with low physical RAM.
Create a 2 GB swap file and enable it:
sudo fallocate -l 2G /swapfile
sudo chmod 600 /swapfile
sudo mkswap /swapfile
sudo swapon /swapfile
Then retry the installation:
curl -fsSL https://claude.ai/install.sh | bashClose other processes to free memory before installing.
Use a larger instance if possible. Claude Code requires at least 4 GB of RAM.
Install hangs in Docker
When installing Claude Code in a Docker container, installing as root into / can cause hangs.
Solutions:
Set a working directory before running the installer. When run from
/, the installer scans the entire filesystem, which causes excessive memory usage. SettingWORKDIRlimits the scan to a small directory:WORKDIR /tmp RUN curl -fsSL https://claude.ai/install.sh | bashIncrease Docker memory limits if using Docker Desktop:
docker build --memory=4g .
Windows: Claude Desktop overrides claude CLI command
If you installed an older version of Claude Desktop, it may register a Claude.exe in the WindowsApps directory that takes PATH priority over Claude Code CLI. Running claude opens instead of the CLI.
Update Claude Desktop to the latest version to fix this issue.
Windows: Claude Code on Windows requires git-bash
Claude Code on native Windows needs Git for Windows, which includes Git Bash.
If Git is not installed, download and install it from git-scm.com/downloads/win. During setup, select "Add to PATH." Restart your terminal after installing.
If Git is already installed but Claude Code still can't find it, set the path in your settings.json file:
{
  "env": {
    "CLAUDE_CODE_GIT_BASH_PATH": "C:\\Program Files\\Git\\bin\\bash.exe"
  }
}
If your Git is installed somewhere else, find the path by running where.exe git in PowerShell and use the bin\bash.exe path from that directory.
Windows: Claude Code does not support 32-bit Windows
Windows includes two PowerShell entries in the Start menu: Windows PowerShell and Windows PowerShell (x86). The x86 entry runs as a 32-bit process and triggers this error even on a 64-bit machine. To check which case you're in, run this in the same window that produced the error:
[Environment]::Is64BitOperatingSystem
If this prints True, your operating system is fine. Close the window, open Windows PowerShell without the x86 suffix, and run the install command again.
If this prints False, you are on a 32-bit edition of Windows. Claude Code requires a 64-bit operating system. See the system requirements.
Linux: wrong binary variant installed (musl/glibc mismatch)
If you see errors about missing shared libraries like libstdc++.so.6 or libgcc_s.so.1 after installation, the installer may have downloaded the wrong binary variant for your system.
Error loading shared library libstdc++.so.6: No such file or directory
This can happen on glibc-based systems that have musl cross-compilation packages installed, causing the installer to misdetect the system as musl.
Solutions:
Check which libc your system uses:
ldd /bin/ls | head -1If it shows
linux-vdso.soor references to/lib/x86_64-linux-gnu/, you're on glibc. If it showsmusl, you're on musl.If you're on glibc but got the musl binary, remove the installation and reinstall. You can also manually download the correct binary from the GCS bucket at
https://storage.googleapis.com/claude-code-dist-86c565f3-f756-42ad-8dfa-d59b1c096819/claude-code-releases/{VERSION}/manifest.json. File a GitHub issue with the output ofldd /bin/lsandls /lib/libc.musl*.If you're actually on musl (Alpine Linux), install the required packages:
apk add libgcc libstdc++ ripgrep
Illegal instruction on Linux
If the installer prints Illegal instruction instead of the OOM Killed message, the downloaded binary doesn't match your CPU architecture. This commonly happens on ARM servers that receive an x86 binary, or on older CPUs that lack required instruction sets.
bash: line 142: 2238232 Illegal instruction "$binary_path" install ${TARGET:+"$TARGET"}
Solutions:
Verify your architecture:
uname -mx86_64means 64-bit Intel/AMD,aarch64means ARM64. If the binary doesn't match, file a GitHub issue with the output.Try an alternative install method while the architecture issue is resolved:
brew install --cask claude-code
dyld: cannot load on macOS
If you see dyld: cannot load, dyld: Symbol not found, or Abort trap: 6 during installation, the binary is incompatible with your macOS version or hardware.
dyld: cannot load 'claude-2.1.42-darwin-x64' (load command 0x80000034 is unknown)
Abort trap: 6
A Symbol not found error that references libicucore also indicates your macOS version is older than the binary supports:
dyld: Symbol not found: _ubrk_clone
  Referenced from: claude-darwin-x64 (which was built for Mac OS X 13.0)
  Expected in: /usr/lib/libicucore.A.dylib
Solutions:
Check your macOS version: Claude Code requires macOS 13.0 or later. Open the Apple menu and select About This Mac to check your version.
Update macOS if you're on an older version. The binary uses load commands that older macOS versions don't support.
Try Homebrew as an alternative install method:
brew install --cask claude-code
Windows installation issues: errors in WSL
You might encounter the following issues in WSL:
OS/platform detection issues: if you receive an error during installation, WSL may be using Windows npm. Try:
- Run
npm config set os linuxbefore installation - Install with
npm install -g @anthropic-ai/claude-code --force --no-os-check. Do not usesudo.
Node not found errors: if you see exec: node: not found when running claude, your WSL environment may be using a Windows installation of Node.js. You can confirm this with which npm and which node, which should point to Linux paths starting with /usr/ rather than /mnt/c/. To fix this, try installing Node via your Linux distribution's package manager or via nvm.
nvm version conflicts: if you have nvm installed in both WSL and Windows, you may experience version conflicts when switching Node versions in WSL. This happens because WSL imports the Windows PATH by default, causing Windows nvm/npm to take priority over the WSL installation.
You can identify this issue by:
- Running
which npmandwhich node- if they point to Windows paths (starting with/mnt/c/), Windows versions are being used - Experiencing broken functionality after switching Node versions with nvm in WSL
To resolve this issue, fix your Linux PATH to ensure the Linux node/npm versions take priority:
Primary solution: Ensure nvm is properly loaded in your shell
The most common cause is that nvm isn't loaded in non-interactive shells. Add the following to your shell configuration file (~/.bashrc, ~/.zshrc, etc.):
# Load nvm if it exists
export NVM_DIR="$HOME/.nvm"
[ -s "$NVM_DIR/nvm.sh" ] && \. "$NVM_DIR/nvm.sh"
[ -s "$NVM_DIR/bash_completion" ] && \. "$NVM_DIR/bash_completion"
Or run directly in your current session:
source ~/.nvm/nvm.sh
Alternative: Adjust PATH order
If nvm is properly loaded but Windows paths still take priority, you can explicitly prepend your Linux paths to PATH in your shell configuration:
export PATH="$HOME/.nvm/versions/node/$(node -v)/bin:$PATH"
Warning
Avoid disabling Windows PATH importing via appendWindowsPath = false as this breaks the ability to call Windows executables from WSL. Similarly, avoid uninstalling Node.js from Windows if you use it for Windows development.
WSL2 sandbox setup
Sandboxing is supported on WSL2 but requires installing additional packages. If you see an error about missing bubblewrap or socat when running /sandbox, install the dependencies:
- Ubuntu/Debian
- Fedora
sudo apt-get install bubblewrap socat
sudo dnf install bubblewrap socat
WSL1 does not support sandboxing. If you see "Sandboxing requires WSL2", you need to upgrade to WSL2 or run Claude Code without sandboxing.
Sandboxed commands cannot launch Windows binaries such as cmd.exe, powershell.exe, or executables under /mnt/c/. WSL hands these off to the Windows host over a Unix socket, which the sandbox blocks. If a command needs to invoke a Windows binary, add it to excludedCommands so it runs outside the sandbox.
Permission errors during installation
If the native installer fails with permission errors, the target directory may not be writable. See Check directory permissions.
If you previously installed with npm and are hitting npm-specific permission errors, switch to the native installer:
curl -fsSL https://claude.ai/install.sh | bash
Permissions and authentication
These sections address login failures, token issues, and permission prompt behavior.
Repeated permission prompts
If you find yourself repeatedly approving the same commands, you can allow specific tools
to run without approval using the /permissions command. See Permissions docs.
Authentication issues
If you're experiencing authentication problems:
- Run
/logoutto sign out completely - Close Claude Code
- Restart with
claudeand complete the authentication process again
If the browser doesn't open automatically during login, press c to copy the OAuth URL to your clipboard, then paste it into your browser manually.
OAuth error: Invalid code
If you see OAuth error: Invalid code. Please make sure the full code was copied, the login code expired or was truncated during copy-paste.
Solutions:
- Press Enter to retry and complete the login quickly after the browser opens
- Type
cto copy the full URL if the browser doesn't open automatically - If using a remote/SSH session, the browser may open on the wrong machine. Copy the URL displayed in the terminal and open it in your local browser instead.
403 Forbidden after login
If you see API Error: 403 {"error":{"type":"forbidden","message":"Request not allowed"}} after logging in:
- Claude Pro/Max users: verify your subscription is active at claude.ai/settings
- Console users: confirm your account has the "Claude Code" or "Developer" role assigned by your admin
- Behind a proxy: corporate proxies can interfere with API requests. See network configuration for proxy setup.
Model not found or not accessible
If you see There's an issue with the selected model (...). It may not exist or you may not have access to it, the API rejected the configured model name.
Common causes:
- A typo in the model name passed to
--model - A stale or deprecated model ID saved in your settings
- An API key without access to that model on your current usage tier
Check where the model is set, in priority order:
- The
--modelflag - The
ANTHROPIC_MODELenvironment variable - The
modelfield in.claude/settings.local.json - The
modelfield in your project's.claude/settings.json - The
modelfield in~/.claude/settings.json
To clear a stale value, remove the model field from your settings or unset ANTHROPIC_MODEL, and Claude Code will fall back to the default model for your account.
To browse models available to your account, start claude interactively and run /model to open the picker. For Vertex AI deployments, see the Vertex AI troubleshooting section.
This organization has been disabled with an active subscription
If you see API Error: 400 ... "This organization has been disabled" despite having an active Claude subscription, an ANTHROPIC_API_KEY environment variable is overriding your subscription. This commonly happens when an old API key from a previous employer or project is still set in your shell profile.
When ANTHROPIC_API_KEY is present and you have approved it, Claude Code uses that key instead of your subscription's OAuth credentials. In non-interactive mode (-p), the key is always used when present. See authentication precedence for the full resolution order.
To use your subscription instead, unset the environment variable and remove it from your shell profile:
unset ANTHROPIC_API_KEY
claude
Check ~/.zshrc, ~/.bashrc, or ~/.profile for export ANTHROPIC_API_KEY=... lines and remove them to make the change permanent. Run /status inside Claude Code to confirm which authentication method is active.
OAuth login fails in WSL2
Browser-based login in WSL2 may fail if WSL can't open your Windows browser. Set the BROWSER environment variable:
export BROWSER="/mnt/c/Program Files/Google/Chrome/Application/chrome.exe"
claude
Or copy the URL manually: when the login prompt appears, press c to copy the OAuth URL, then paste it into your Windows browser.
Not logged in or token expired
If Claude Code prompts you to log in again after a session, your OAuth token may have expired.
Run /login to re-authenticate. If this happens frequently, check that your system clock is accurate, as token validation depends on correct timestamps.
On macOS, login can also fail when the Keychain is locked or its password is out of sync with your account password, which prevents Claude Code from saving credentials. Run claude doctor to check Keychain access. To unlock the Keychain manually, run security unlock-keychain ~/Library/Keychains/login.keychain-db. If unlocking doesn't help, open Keychain Access, select the login keychain, and choose Edit > Change Password for Keychain "login" to resync it with your account password.
Configuration file locations
Claude Code stores configuration in several locations:
| File | Purpose |
|---|---|
~/.claude/settings.json |
User settings (permissions, hooks, model overrides) |
.claude/settings.json |
Project settings (checked into source control) |
.claude/settings.local.json |
Local project settings (not committed) |
~/.claude.json |
Global state (theme, OAuth, MCP servers) |
.mcp.json |
Project MCP servers (checked into source control) |
managed-mcp.json |
Managed MCP servers |
| Managed settings | Managed settings (server-managed, MDM/OS-level policies, or file-based) |
On Windows, ~ refers to your user home directory, such as C:\Users\YourName.
For details on configuring these files, see Settings and MCP.
Resetting configuration
To reset Claude Code to default settings, you can remove the configuration files:
# Reset all user settings and state
rm ~/.claude.json
rm -rf ~/.claude/

# Reset project-specific settings
rm -rf .claude/
rm .mcp.json
Warning
This will remove all your settings, MCP server configurations, and session history.
Performance and stability
These sections cover issues related to resource usage, responsiveness, and search behavior.
High CPU or memory usage
Claude Code is designed to work with most development environments, but may consume significant resources when processing large codebases. If you're experiencing performance issues:
- Use
/compactregularly to reduce context size - Close and restart Claude Code between major tasks
- Consider adding large build directories to your
.gitignorefile
Auto-compaction stops with a thrashing error
If you see Autocompact is thrashing: the context refilled to the limit..., automatic compaction succeeded but a file or tool output immediately refilled the context window several times in a row. Claude Code stops retrying to avoid wasting API calls on a loop that isn't making progress.
To recover:
- Ask Claude to read the oversized file in smaller chunks, such as a specific line range or function, instead of the whole file
- Run
/compactwith a focus that drops the large output, for example/compact keep only the plan and the diff - Move the large-file work to a subagent so it runs in a separate context window
- Run
/clearif the earlier conversation is no longer needed
Command hangs or freezes
If Claude Code seems unresponsive:
- Press Ctrl+C to attempt to cancel the current operation
- If unresponsive, you may need to close the terminal and restart
Search and discovery issues
If Search tool, @file mentions, custom agents, and custom skills aren't working, install system ripgrep:
# macOS (Homebrew)
brew install ripgrep

# Ubuntu/Debian
sudo apt install ripgrep

# Alpine Linux
apk add ripgrep

# Arch Linux
pacman -S ripgrep
Then set USE_BUILTIN_RIPGREP=0 in your environment.
Slow or incomplete search results on WSL
Disk read performance penalties when working across file systems on WSL may result in fewer-than-expected matches when using Claude Code on WSL. Search still functions, but returns fewer results than on a native filesystem.
Note
/doctor will show Search as OK in this case.
Solutions:
Submit more specific searches: reduce the number of files searched by specifying directories or file types: "Search for JWT validation logic in the auth-service package" or "Find use of md5 hash in JS files".
Move project to Linux filesystem: if possible, ensure your project is located on the Linux filesystem (
/home/) rather than the Windows filesystem (/mnt/c/).Use native Windows instead: consider running Claude Code natively on Windows instead of through WSL, for better file system performance.
IDE integration issues
If Claude Code does not connect to your IDE or behaves unexpectedly within an IDE terminal, try the solutions below.
JetBrains IDE not detected on WSL2
If you're using Claude Code on WSL2 with JetBrains IDEs and getting "No available IDEs detected" errors, this is likely due to WSL2's networking configuration or Windows Firewall blocking the connection.
WSL2 networking modes
WSL2 uses NAT networking by default, which can prevent IDE detection. You have two options:
Option 1: Configure Windows Firewall (recommended)
Find your WSL2 IP address:
wsl hostname -I
# Example output: 172.21.123.45
Open PowerShell as Administrator and create a firewall rule:
New-NetFirewallRule -DisplayName "Allow WSL2 Internal Traffic" -Direction Inbound -Protocol TCP -Action Allow -RemoteAddress 172.21.0.0/16 -LocalAddress 172.21.0.0/16Adjust the IP range based on your WSL2 subnet from step 1.
Restart both your IDE and Claude Code
Option 2: Switch to mirrored networking
Add to .wslconfig in your Windows user directory:
[wsl2]
networkingMode=mirrored
Then restart WSL with wsl --shutdown from PowerShell.
Note
These networking issues only affect WSL2. WSL1 uses the host's network directly and doesn't require these configurations.
For additional JetBrains configuration tips, see the JetBrains IDE guide.
Report Windows IDE integration issues
If you're experiencing IDE integration problems on Windows, create an issue with the following information:
- Environment type: native Windows (Git Bash) or WSL1/WSL2
- WSL networking mode, if applicable: NAT or mirrored
- IDE name and version
- Claude Code extension/plugin version
- Shell type: Bash, Zsh, PowerShell, etc.
Escape key not working in JetBrains IDE terminals
If you're using Claude Code in JetBrains terminals and the Esc key doesn't interrupt the agent as expected, this is likely due to a keybinding clash with JetBrains' default shortcuts.
To fix this issue:
- Go to Settings → Tools → Terminal
- Either:
- Uncheck "Move focus to the editor with Escape", or
- Click "Configure terminal keybindings" and delete the "Switch focus to Editor" shortcut
- Apply the changes
This allows the Esc key to properly interrupt Claude Code operations.
Markdown formatting issues
Claude Code sometimes generates markdown files with missing language tags on code fences, which can affect syntax highlighting and readability in GitHub, editors, and documentation tools.
Missing language tags in code blocks
If you notice code blocks like this in generated markdown:
```
function example() {
  return "hello";
}
```
Instead of properly tagged blocks like:
```javascript
function example() {
  return "hello";
}
```
Solutions:
Ask Claude to add language tags: request "Add appropriate language tags to all code blocks in this markdown file."
Use post-processing hooks: set up automatic formatting hooks to detect and add missing language tags. See Auto-format code after edits for an example of a PostToolUse formatting hook.
Manual verification: after generating markdown files, review them for proper code block formatting and request corrections if needed.
Inconsistent spacing and formatting
If generated markdown has excessive blank lines or inconsistent spacing:
Solutions:
Request formatting corrections: ask Claude to "Fix spacing and formatting issues in this markdown file."
Use formatting tools: set up hooks to run markdown formatters like
prettieror custom formatting scripts on generated markdown files.Specify formatting preferences: include formatting requirements in your prompts or project memory files.
Reduce markdown formatting issues
To minimize formatting issues:
- Be explicit in requests: ask for "properly formatted markdown with language-tagged code blocks"
- Use project conventions: document your preferred markdown style in
CLAUDE.md - Set up validation hooks: use post-processing hooks to automatically verify and fix common formatting issues
Get more help
If you're experiencing issues not covered here:
- Use the
/feedbackcommand within Claude Code to report problems directly to Anthropic - Check the GitHub repository for known issues
- Run
/doctorto diagnose issues. It checks:- Installation type, version, and search functionality
- Auto-update status and available versions
- Invalid settings files (malformed JSON, incorrect types)
- MCP server configuration errors
- Keybinding configuration problems
- Context usage warnings (large CLAUDE.md files, high MCP token usage, unreachable permission rules)
- Plugin and agent loading errors
- Ask Claude directly about its capabilities and features - Claude has built-in access to its documentation